1. Product Overview
The OOYCYOO MPPT 60A Solar Charge Controller is an advanced device designed to manage power flow from your solar panels to your battery bank, ensuring efficient charging and protecting your batteries from overcharge and over-discharge. It features innovative Maximum Power Point Tracking (MPPT) technology for high efficiency and supports various battery types.

Figure 1: Front view of the OOYCYOO MPPT 60A Solar Charge Controller, showing the LCD display and control buttons.
2. Key Features
- Advanced MPPT Technology: Achieves a tracking efficiency of at least 99.99% and a conversion efficiency of up to 99%, maximizing power harvest from solar panels.
- Automatic System Voltage Detection: Automatically detects 12V or 24V DC system voltages.
- Wide Battery Compatibility: Supports sealed, gel, AGM, flooded, and lithium battery types.
- Comprehensive Protection: Includes protection against overcharge, over-discharge, overload, short circuits, reverse polarity, overheating, and battery undervoltage.
- User-Friendly LCD Display: Provides clear data display and system status monitoring.
- Configurable Settings: Allows users to reset parameters, open/close load with a single key, and restore factory settings.

Figure 2: The MPPT Solar Controller emphasizing its protective functions, ensuring system safety.
3. Components Included
The package for the OOYCYOO MPPT 60A Solar Charge Controller typically includes the following items:
- 1 x OOYCYOO MPPT 60A Solar Charge Controller
- 1 x Temperature Sensor
- 1 x English User Manual
4. Setup and Installation
Proper installation is crucial for the safe and efficient operation of your solar charge controller. Please follow these steps carefully:
- Mounting: Choose a dry, well-ventilated location away from direct sunlight and heat sources. Ensure adequate space around the controller for air circulation and heat dissipation. Use the mounting holes provided to secure the controller firmly.
- Wiring Sequence:
- Step 1: Connect the Battery. Connect the battery to the controller's battery terminals (marked with + and -). Ensure correct polarity. The controller will automatically detect the battery voltage (12V or 24V).
- Step 2: Connect the Load. Connect your DC loads to the controller's load terminals (marked with + and -). Ensure correct polarity.
- Step 3: Connect the Solar Panel. Connect your solar panel array to the controller's solar panel terminals (marked with + and -). Ensure correct polarity.
Important Note: Always connect the battery first, then the load, and finally the solar panel. Disconnect in the reverse order (solar panel, then load, then battery).
- Temperature Sensor Connection: Connect the included temperature sensor to the designated port on the controller. This allows for accurate temperature compensation during charging.
- RS485 Communication Port: The RS485 communication port is reserved for future expansion or connection to external display units (additional purchase may be required).

Figure 3: Detailed view of the controller with all terminals and ports labeled for easy identification during installation.
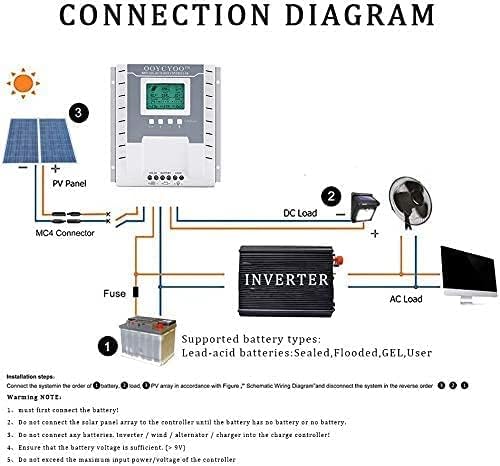
Figure 4: Schematic wiring diagram illustrating the connection of solar panels, battery, and loads to the MPPT controller.
5. Operating Instructions
The OOYCYOO MPPT 60A Solar Charge Controller is designed for ease of use with its intuitive LCD display and control buttons.
5.1 LCD Display and Indicators
The LCD screen provides real-time information about the system's operation, including PV voltage, battery voltage, charging current, load status, and more. Multiple LED indicators also provide quick status checks.
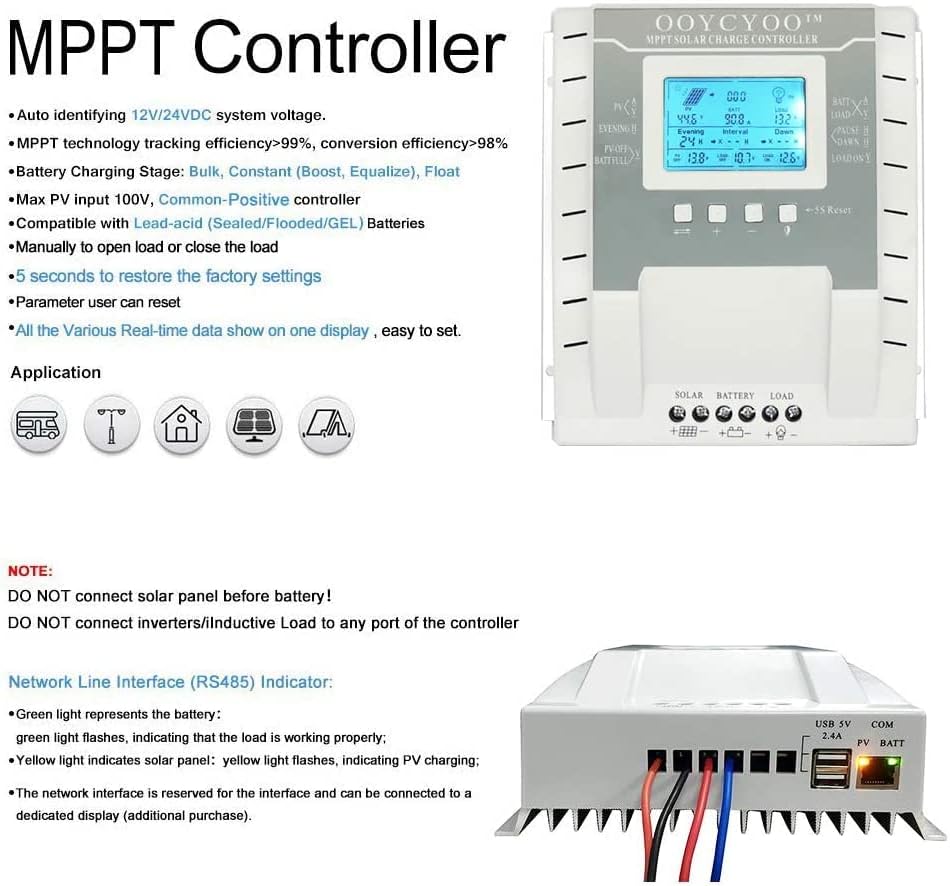
Figure 5: The LCD display showing real-time data such as PV voltage, battery voltage, and load status, along with various application icons.
5.2 Button Functions
- Select Button: Used to navigate through different display screens and menu options.
- Plus (+) Button: Used to increase values or move forward in menu options.
- Minus (-) Button: Used to decrease values or move backward in menu options.
- Load Control Button: A dedicated button to manually turn the DC load ON or OFF.
- 5S Reset Button: Press and hold for 5 seconds to restore factory settings.
5.3 Battery Charging Stages
The controller employs intelligent multi-stage charging to optimize battery life:
- Bulk Charge: Charges the battery at maximum current until voltage rises to the absorption level.
- Constant (Boost/Equalize) Charge: Maintains a constant voltage to fully charge the battery. Equalization is performed periodically for flooded batteries.
- Float Charge: Reduces voltage to a lower level to maintain the battery at full charge, compensating for self-discharge.
6. Specifications
| Parameter | Value |
|---|---|
| Model | MPPT 60A |
| Maximum Power Current | 60 A |
| System Voltage | 12V/24V Auto Detection |
| Max. Solar Panel Power (12V System) | 750 Wp |
| Max. Solar Panel Power (24V System) | 1500 Wp |
| Max. Open Circuit Voltage of Solar Panel | ≤ 96 V |
| Battery Float Voltage (12V System) | 13.8 V |
| Battery Float Voltage (24V System) | 27.6 V |
| Battery Undervoltage Protection (12V System) | 10.6 V |
| Battery Undervoltage Protection (24V System) | 21.2 V |
| Battery Recovery Voltage (12V System) | 12.6 V |
| Battery Recovery Voltage (24V System) | 25.2 V |
| System Load Loss | ≤ 13 mA |
| Buck Loop | ≤ 100 mV |
| Operating Temperature | -10 ℃ to 60 ℃ |
| Storage Temperature | -30 ℃ to 70 ℃ |
| Operating Humidity | ≤ 90% (non-condensing) |
| Temperature Compensation | -4 mV/cell/℃ |
| Dimensions (Package) | 21.1 x 20.7 x 8.4 cm |
| Weight | 1.34 kg |
| Display Type | LCD |

Figure 6: Side view of the controller, illustrating the heat sink design for efficient thermal management.
7. Safety Information
Please read and understand all safety instructions before installing or operating the controller. Failure to do so may result in injury or damage to the equipment.
- Always ensure proper polarity when connecting wires. Reverse polarity can damage the controller and connected devices.
- Do not exceed the maximum input voltage or current ratings of the controller.
- Ensure all connections are tight and secure to prevent loose connections and potential arcing.
- Install the controller in a dry, well-ventilated area, away from flammable materials and corrosive gases.
- Do not attempt to disassemble or repair the controller yourself. Refer to qualified personnel for service.
- Wear appropriate personal protective equipment (PPE) such as safety glasses and insulated gloves during installation.
8. Troubleshooting
This section provides solutions to common issues you might encounter with your MPPT solar charge controller.
8.1 Common Issues and Solutions
- No Display/No Power:
- Check battery connections and ensure they are secure and have correct polarity.
- Verify battery voltage is within the operating range (12V or 24V).
- Battery Not Charging:
- Check solar panel connections and polarity.
- Ensure solar panels are receiving adequate sunlight.
- Verify solar panel open circuit voltage (Voc) is within the controller's acceptable range (18V-48V for 12V system, 36V-96V for 24V system).
- Check for any blown fuses in the system.
- Load Not Working:
- Check load connections and polarity.
- Ensure the load control function is enabled on the controller.
- Verify battery voltage is above the low voltage disconnect (LVD) threshold.
- Check if the load is overloaded or short-circuited.
- Controller Overheating:
- Ensure the installation location has sufficient ventilation.
- Reduce the load or solar input if consistently operating at high temperatures.
If the issue persists after following these steps, please contact customer support.
9. Maintenance
Regular maintenance helps ensure the longevity and optimal performance of your OOYCYOO MPPT Solar Charge Controller.
- Periodically Inspect Connections: Check all wiring connections (battery, solar panel, load) for tightness and corrosion. Tighten any loose connections.
- Clean the Controller: Keep the controller clean and free from dust and debris. Use a dry cloth to wipe the surface. Do not use liquid cleaners.
- Check Ventilation: Ensure that the ventilation openings are not blocked and that there is adequate airflow around the controller to prevent overheating.
- Monitor System Performance: Regularly check the LCD display for normal operating parameters and any error codes.
- Battery Maintenance: Follow the maintenance guidelines for your specific battery type (e.g., checking electrolyte levels for flooded batteries).
10. Warranty and Support
OOYCYOO products are manufactured to high quality standards. For warranty information and technical support, please refer to the contact details provided with your purchase or visit the official OOYCYOO website.
When contacting support, please have your product model (K 60A) and purchase details ready.


