1. Introduction
This manual provides essential information for the safe and effective operation and maintenance of your XPOtool MIG100 Inverter FCAW Flux-Cored Welder. Please read this manual thoroughly before operating the device and keep it for future reference. The XPOtool MIG100 is designed for gasless flux-cored arc welding (FCAW), making it suitable for various applications, including outdoor use, due to its self-shielding wire technology.
The device is equipped with modern IGBT technology, ensuring a stable electric arc and efficient duty cycle. It includes safety features such as overheat and overload protection. This welder is ideal for joining construction steels, carbon steels, thin steels, and cast iron, producing durable and fine welds.
2. Safety Information
WARNING: Welding can be dangerous. Always follow safety precautions to prevent injury or death.
- Personal Protective Equipment (PPE): Always wear a welding helmet with appropriate shade, welding gloves, protective clothing, and safety shoes. Protect bystanders with welding screens.
- Fumes and Gases: Ensure adequate ventilation. Welding fumes and gases can be hazardous to health. Keep your head out of the fumes.
- Electric Shock: Electric shock can kill. Do not touch live electrical parts. Ensure the welder is properly grounded. Inspect cables and connections for damage before each use.
- Fire and Explosion: Welding sparks and hot metal can cause fires. Keep flammable materials away from the welding area. Have a fire extinguisher readily available. Do not weld on containers that have held flammable substances.
- Arc Rays: Arc rays can burn eyes and skin. Use proper eye and face protection.
- Hot Parts: Welded materials and equipment parts can remain hot for a long time after welding. Handle with care and allow to cool.
- Work Area: Keep the work area clean, dry, and free of clutter. Ensure good lighting.
- Children and Unauthorized Personnel: Keep children and unauthorized personnel away from the welding area.
3. Package Contents
Carefully unpack the XPOtool MIG100 welder and check for all included components. If any items are missing or damaged, contact your supplier immediately.

Image 3.1: XPOtool MIG100 Welder with included accessories.
This image displays the main unit, welding torch, ground clamp, welding mask, and a spool of flux-cored wire, along with a wire brush/chipping hammer.
- XPOtool MIG100 Inverter Welder Unit
- Integrated Welding Torch
- Ground Clamp with Cable
- Welding Mask (basic)
- Flux-Cored Welding Wire Spool (0.5-1 kg, 0.8-0.9 mm)
- Wire Brush / Chipping Hammer
- Power Cable

Image 3.2: Rear view of the welder, showing the power input, along with the welding mask and a spool of flux-cored wire.
This image provides a clearer view of the basic welding mask and the flux-cored wire spool included with the unit.
4. Product Overview
The XPOtool MIG100 is a compact and portable inverter welder designed for flux-cored arc welding (FCAW) without the need for external shielding gas. Its key features include:
- Gasless FCAW Operation: Utilizes self-shielding flux-cored wire, eliminating the need for a gas cylinder, making it highly portable and suitable for outdoor use.
- IGBT Technology: Ensures a stable welding arc, high efficiency, and reliable performance.
- Synergistic Control: A convenient rotary regulator allows for easy adjustment of welding current based on material type and thickness (0.5–5 mm).
- Integrated Wire Feeder: Designed for 0.8–0.9 mm welding wire and flux-cored wire spools (0.5–1 kg).
- Safety Features: Equipped with overheat and overload protection for enhanced user safety and equipment longevity.
- Versatile Application: Suitable for most construction steels, carbon steels, thin steels, and cast iron, particularly effective for joining thicker workpieces.

Image 4.1: The XPOtool MIG100 welder depicted with a background of welding sparks, highlighting its operational context.
This image illustrates the welder's intended use in a dynamic welding environment.

Image 4.2: Detailed view of the welder's front panel with controls, rear power input, ground clamp, and welding torch.
This image provides a closer look at the control knob for current adjustment, the power input socket, the robust ground clamp, and the welding torch assembly.
5. Setup
Before starting any welding operation, ensure the welder is set up correctly and safely.
- Placement: Place the welder on a stable, level surface in a well-ventilated area, away from flammable materials. Ensure there is sufficient space around the unit for air circulation.
- Power Connection: Connect the power cable to the welder's input socket and then to a suitable grounded power outlet (1-AC 230V). Ensure the power switch on the back of the unit is in the "OFF" position before connecting.

Image 5.1: Rear panel of the welder, illustrating the power input and the main ON/OFF switch.
This image shows the location of the power connection and the main power switch.
- Install Flux-Cored Wire:
- Open the side panel of the welder to access the wire feeder compartment.
- Mount the spool of flux-cored wire onto the spindle, ensuring it rotates freely.
- Thread the wire through the wire feeder mechanism, ensuring it passes through the guide tube and into the drive rollers.
- Adjust the tension of the drive rollers to prevent slipping or crushing of the wire.
- Close the side panel.

Image 5.2: Internal view of the welder, showing the wire spool mounted and the wire feeding mechanism.
This image details the placement of the wire spool and the path the wire takes through the feeder.

Image 5.3: Close-up of the wire feeding mechanism, with arrows indicating the direction of wire travel.
This image highlights the precise path the flux-cored wire follows through the drive rollers and guide tube.
- Connect Ground Clamp: Attach the ground clamp securely to the workpiece or a clean, bare metal part of the welding table. Ensure good electrical contact.
- Feed Welding Wire: With the power on and the torch pointed away from yourself and others, press the "Quick Wire Feeding" button (if available) or trigger the torch to feed the wire through the torch liner until it emerges from the contact tip. Trim any excess wire.
6. Operating Instructions
Always wear appropriate PPE before operating the welder.
- Power On: Flip the main power switch on the rear of the unit to the "ON" position.
- Prepare Workpiece: Clean the welding area of any rust, paint, oil, or other contaminants.
- Adjust Welding Current: Use the rotary regulator on the front panel to set the appropriate welding current. The synergistic control helps in selecting the correct parameters based on the material thickness (0.5 mm to 5 mm). Start with recommended settings for your material and adjust as needed.
- Welding Process (FCAW):
- Position the welding torch at the starting point of the weld, maintaining a consistent stick-out (distance from contact tip to workpiece).
- Press the torch trigger to initiate the arc. The flux-cored wire will melt, and the flux within the wire will create a protective gas shield around the weld pool.
- Move the torch steadily along the joint, maintaining a consistent travel speed and angle. Observe the weld pool and adjust your technique for optimal penetration and bead appearance.
- Release the trigger to stop welding.
- Post-Weld Cleaning: After the weld cools, use the wire brush/chipping hammer to remove any slag that forms on the weld bead.
- Power Off: Once welding is complete, turn the main power switch to the "OFF" position and disconnect the power cable.
7. Maintenance
Regular maintenance ensures the longevity and safe operation of your welder.
- Daily/Before Use:
- Inspect all cables (power, ground, torch) for cuts, cracks, or exposed wires. Replace damaged cables immediately.
- Check the contact tip for wear and replace if necessary.
- Ensure the ground clamp makes good contact and is free of debris.
- Weekly/After Use:
- Clean the exterior of the welder with a dry, soft cloth. Do not use solvents.
- Inspect the wire feeder mechanism for debris or wire shavings. Clean as needed.
- Check the drive rollers for wear and proper tension.
- Periodically:
- Clean the internal components of the welder using compressed air to remove dust and metal particles. Ensure the unit is unplugged before opening.
- Check all electrical connections for tightness.
8. Troubleshooting
This section addresses common issues you might encounter. For problems not listed here, contact customer support.
| Problem | Possible Cause | Solution |
|---|---|---|
| Welder does not power on. | No power from outlet; power switch off; internal fuse blown. | Check power outlet and cable; ensure switch is ON; consult qualified technician for fuse replacement. |
| No welding arc. | Poor ground connection; incorrect wire feeding; contact tip blocked; wrong current setting. | Ensure ground clamp is clean and secure; check wire path and tension; clean/replace contact tip; adjust current. |
| Irregular wire feeding. | Wire spool tangled; drive rollers too loose/tight; dirty liner; incorrect wire size. | Untangle wire; adjust drive roller tension; clean torch liner; ensure correct wire diameter. |
| Poor weld quality (porosity, weak weld). | Insufficient current; improper travel speed/angle; contaminated workpiece; worn contact tip. | Increase current; adjust technique; clean workpiece thoroughly; replace contact tip. |
| Overheat protection activated. | Exceeded duty cycle; insufficient ventilation. | Allow welder to cool down; ensure proper ventilation around the unit. |
9. Specifications
Technical data for the XPOtool MIG100 Inverter FCAW Welder.
| Feature | Detail |
|---|---|
| Brand | XPOtool |
| Model Number | 63319 |
| Welding Process | FCAW (Flux-Cored Arc Welding) - Gasless |
| Technology | IGBT Inverter |
| Input Voltage | 1-AC 230V |
| Wire Diameter Compatibility | 0.8 - 0.9 mm |
| Wire Spool Capacity | 0.5 - 1 kg |
| Material Thickness (Recommended) | 0.5 - 5 mm |
| Product Dimensions (L x W x H) | 35 x 15 x 22.5 cm |
| Item Weight | 6.12 kg |
| Special Features | Portable and flexible, Overheat/Overload Protection |
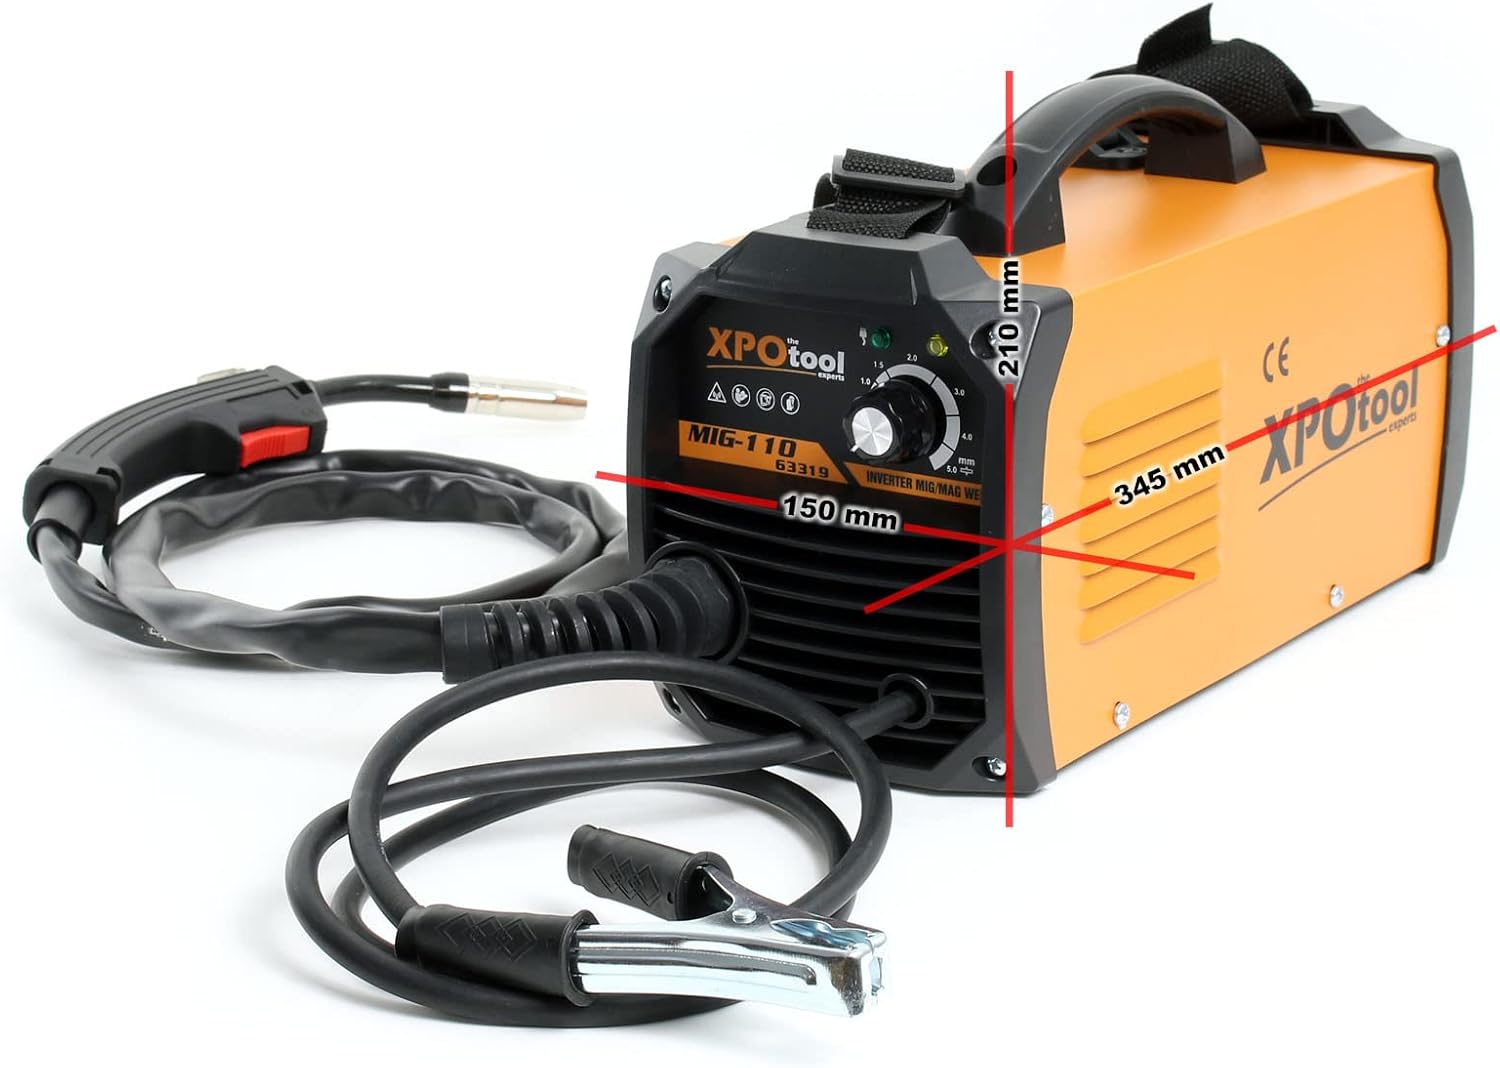
Image 9.1: Dimensions of the XPOtool MIG100 welder.
This image visually represents the length, width, and height of the welding unit.
10. Warranty and Support
For warranty information, please refer to the terms and conditions provided at the time of purchase or contact your retailer. For technical support, troubleshooting assistance beyond this manual, or spare parts inquiries, please contact XPOtool customer service or your authorized dealer. Keep your purchase receipt and model number (63319) handy when contacting support.


