1. Introduction
This manual provides essential information for setting up, operating, maintaining, and troubleshooting your Dell OptiPlex 5000 Micro PC. Please read this guide thoroughly before using your computer to ensure proper operation and to maximize its lifespan.
The Dell OptiPlex 5000 is a compact and responsive desktop computer designed for business environments, featuring an Intel Core i5 12th Gen processor and Windows 10 Pro operating system.
2. What's in the Box
Verify that all items are present in the packaging:
- OptiPlex 5000 Micro PC
- Pro Wireless Keyboard and Mouse
- USB Receiver (for wireless keyboard and mouse)
- Power Cord (US)
- Safety/Environment and Regulatory Guide (English/French Multi-language)
- Quick Start Guide
- Shipping Material
- Power Adapter
3. Setup Instructions
3.1 Connecting Peripherals
Follow these steps to connect your Dell OptiPlex 5000 Micro PC:
- Connect the Keyboard and Mouse: Insert the USB receiver for the wireless keyboard and mouse into an available USB port on the computer.
- Connect the Monitor: Connect your monitor to the computer using an HDMI or DisplayPort cable. The OptiPlex 5000 supports up to four independent displays.
- Connect to Network (Optional): For a wired network connection, connect an Ethernet cable from your router or modem to the Ethernet port on the back of the computer.
- Connect Power: Connect the power adapter to the computer's power input, then plug the power cord into a wall outlet.
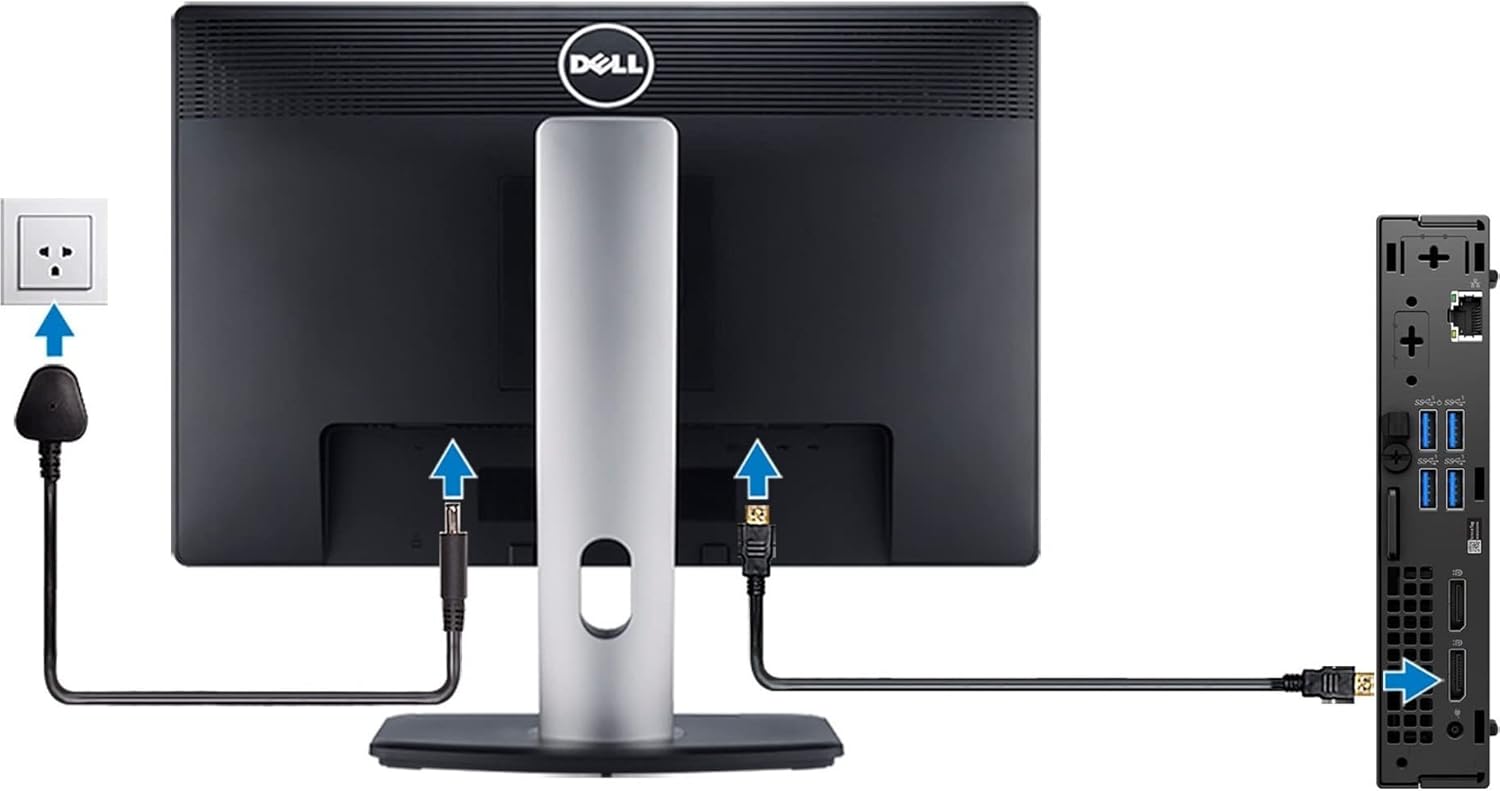
Figure 3.1: Connecting power, monitor, and network cables.

Figure 3.2: Connecting an Ethernet cable.

Figure 3.3: Example of a complete setup with multiple displays and peripherals.
3.2 Initial Power On
After connecting all peripherals and power, press the power button located on the front of the OptiPlex 5000 to turn on the computer. Follow the on-screen instructions to complete the initial Windows 10 Pro setup.
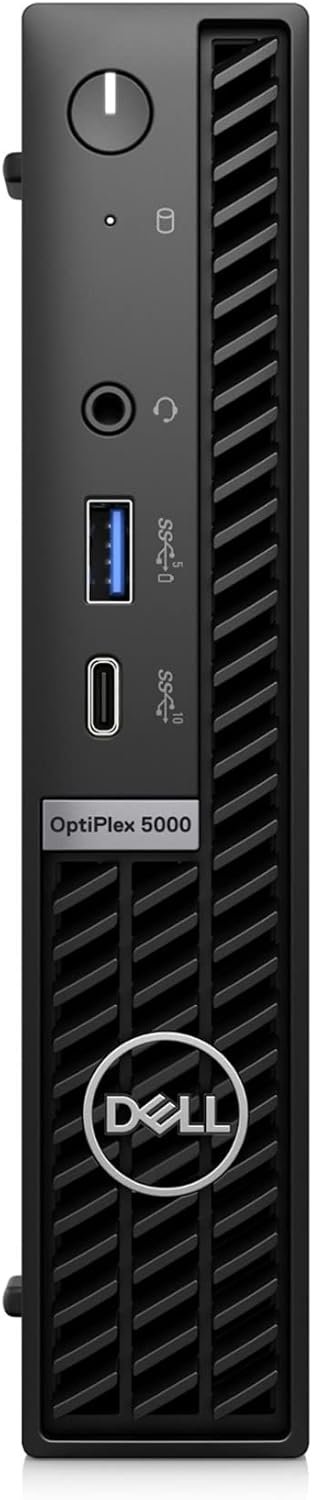
Figure 3.4: Front panel of the OptiPlex 5000.
4. Operating Instructions
4.1 Basic Operation
Your Dell OptiPlex 5000 comes pre-installed with Windows 10 Pro. Upon first boot, you will be guided through the operating system setup. Once complete, you can begin using your computer for various tasks.
- Multitasking: Windows 10 Pro allows you to snap up to four applications to different locations on the screen for efficient multitasking.
- Virtual Desktops: Create individual desktops for specific projects or tasks to organize your workspace.
- Connectivity: Utilize the high-speed Wi-Fi 6E for wireless network access or the Ethernet port for a wired connection.
4.2 Dell Optimizer Features
The OptiPlex 5000 includes Dell Optimizer, an AI-based software designed to enhance your PC's performance in the background.
- ExpressResponse: Improves application performance by adapting to your usage patterns.
- ExpressConnect: Optimizes conference calls and network connectivity for better remote work experiences.
- Intelligent Audio: Enhances sound quality and reduces background noise during calls using automated tuning and neural noise-cancellation.
5. Maintenance
5.1 General Care
- Cleaning: Regularly clean the exterior of the computer with a soft, dry cloth. Avoid using liquid cleaners directly on the device.
- Ventilation: Ensure that the ventilation openings are not blocked to prevent overheating. Maintain adequate space around the computer for airflow.
- Software Updates: Keep your operating system and drivers updated to ensure optimal performance and security.
5.2 Component Access
The OptiPlex 5000 is designed for simple maintenance with tool-less access to the chassis. This allows for easy upgrades or servicing of internal components without needing to remove the front bezel.

Figure 5.1: OptiPlex 5000 mounted on a monitor stand.
6. Troubleshooting
This section provides solutions to common issues you might encounter with your Dell OptiPlex 5000.
- No Power:
- Ensure the power adapter is securely connected to both the computer and a working wall outlet.
- Verify the power cord is not damaged.
- Try a different power outlet.
- No Display:
- Check that the monitor is powered on and the video cable (HDMI/DisplayPort) is securely connected to both the computer and the monitor.
- Ensure the correct input source is selected on your monitor.
- If using multiple monitors, try connecting only one monitor to isolate the issue.
- Network Connectivity Issues:
- For wired connections, ensure the Ethernet cable is properly connected and the router/modem is functioning.
- For wireless connections, verify Wi-Fi is enabled in Windows settings and you are connected to the correct network. Restart your router/modem if necessary.
- Slow Performance:
- Close unnecessary applications.
- Ensure Windows and drivers are up to date.
- Run a system diagnostic or antivirus scan.
For more complex issues or if the problem persists, please refer to the Dell support website or contact Dell technical support.
7. Specifications
| Feature | Description |
|---|---|
| Model Number | PX13N |
| Processor | Intel Core i5-12500T Hexa-core (6 Core) 2 GHz (12th Gen) |
| RAM | 16 GB DDR4 SDRAM |
| Storage | 512 GB M.2 PCI Express NVMe 3.0 x4 SSD |
| Graphics | Intel UHD Graphics 770 (Integrated) |
| Operating System | Windows 10 Pro |
| Wireless Connectivity | 802.11ac (Wi-Fi 6E support) |
| Dimensions (LxWxH) | 9.3 x 5.2 x 19.6 inches |
| Item Weight | 5.7 pounds |
| Color | Black |
| Max Screen Resolution | 3840 x 2160 |

Figure 7.1: Rear ports of the OptiPlex 5000.

Figure 7.2: Front and side view of the OptiPlex 5000.
8. Warranty and Support
8.1 Product Warranty
Your Dell OptiPlex 5000 Micro PC is covered by Dell's standard limited hardware warranty. For detailed information regarding warranty terms, conditions, and duration, please refer to the warranty documentation included with your product or visit the official Dell support website.
Protection plans are available for extended coverage. For details, refer to the information provided at the time of purchase or contact Dell support.
8.2 Technical Support
For technical assistance, driver downloads, or further troubleshooting, please visit the official Dell Support website:
When contacting support, please have your service tag or express service code ready. This information can typically be found on a label on your computer.


