Introduction
Thank you for choosing the LFF Atomic Clock. This device provides accurate time, date, indoor and outdoor temperature, and humidity readings. It features automatic time synchronization via the WWVB radio signal and a large, easy-to-read LCD display. Please read this manual thoroughly before use to ensure proper operation and to maximize the lifespan of your product.
Product Features
- Atomic Time Synchronization: Automatically synchronizes with the WWVB radio signal from Fort Collins, Colorado, ensuring precise time and date.
- Large LCD Display: 15-inch display with 4.5-inch numbers for easy readability, suitable for various environments.
- Comprehensive Information: Displays time (12/24H), calendar (month, date, day of week), alarm status, indoor temperature (°C/°F), indoor humidity, outdoor temperature (°C/°F), and outdoor humidity.
- Wireless Outdoor Sensor: Transmits outdoor temperature and humidity data up to 328 feet (100 meters). The sensor has an IPX4 splash-proof rating.
- Multiple Time Zones: Supports 8 time zones: EST, CST, MST, PST, AKT, HST, AST, NST.
- Battery Operated: Main clock requires 4 AA batteries, and the outdoor sensor requires 2 AAA batteries (batteries not included).
- Versatile Placement: Can be wall-mounted using three hanging holes or placed on a tabletop using the integrated stand.

Figure 1: Overview of LFF Atomic Clock features.
Package Contents
- 1 x LFF Atomic Clock (Model LWC100)
- 1 x Wireless Outdoor Sensor
- 1 x Instruction Manual
Product Overview
Main Unit (Atomic Clock)

Figure 2: Rear panel of the LFF Atomic Clock.
- Battery Case: Compartment for 4 AA batteries.
- SET Button: Enters setting mode for time, date, and other parameters.
- ALARM Button: Activates/deactivates the alarm and enters alarm setting mode.
- UP Button: Adjusts values upwards in setting mode.
- DOWN/RCC Button: Adjusts values downwards in setting mode. Press and hold to manually initiate WWVB signal reception.
- CHANNEL Button: Switches between outdoor sensor channels (if multiple sensors are used).
- Hang Holes (x3): For wall mounting.
- Table Stand: For tabletop placement.
Wireless Outdoor Sensor
The outdoor sensor is a compact unit designed to measure external temperature and humidity. It features a small LCD display for local readings and a battery compartment for 2 AAA batteries. The sensor is splash-proof (IPX4).
Setup
1. Battery Installation
Ensure you have 4 AA batteries for the main clock and 2 AAA batteries for the outdoor sensor (not included).
- For the Outdoor Sensor: Open the battery compartment cover on the back of the sensor. Insert 2 AAA batteries, observing the correct polarity (+/-). Close the cover securely.
- For the Main Clock: Open the battery compartment cover on the back of the clock. Insert 4 AA batteries, observing the correct polarity (+/-). Close the cover securely.
Upon battery insertion, the clock will power on and perform an initial self-check. The display will illuminate, and it will begin searching for the WWVB atomic time signal.
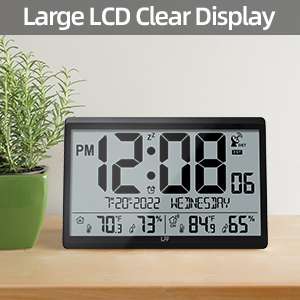
Figure 3: Battery requirements for the clock and sensor.
2. Atomic Time Synchronization (WWVB)
The clock will automatically attempt to receive the WWVB signal after battery installation. A signal tower icon will flash on the display, indicating it is searching. This process can take several minutes to several hours, depending on your location and environmental conditions. For best reception, place the clock near a window, away from electronic interference.
Once the signal is successfully received, the signal tower icon will become solid, and the clock will display the correct time and date for the default time zone (PST).

Figure 4: Atomic time synchronization via WWVB signal.
3. Manual Time Zone Setting
If the clock does not automatically set to your local time zone, or if you wish to change it:
- Press and hold the SET button for approximately 3 seconds to enter setting mode.
- The time zone will begin to flash. Use the UP or DOWN/RCC buttons to select your desired time zone (EST, CST, MST, PST, AKT, HST, AST, NST).
- Press SET again to confirm and move to the next setting.
4. Temperature Unit Selection (°C/°F)
To switch between Celsius and Fahrenheit for temperature display:
- Briefly press the DOWN/RCC button while in normal display mode. The temperature unit will toggle between °C and °F.
5. Outdoor Sensor Placement
For accurate outdoor readings, place the wireless sensor in a sheltered location that is protected from direct sunlight and rain. The transmission range is up to 328 feet (100 meters) in open air. Avoid placing it near large metal objects or other electronic devices that could interfere with the signal.

Figure 5: Wireless transmission range and sensor placement.
Operating Instructions
1. Display Information
The large LCD display shows the following information:
- Top Row: PM indicator, Time (hours:minutes), Zz (snooze icon), DST (Daylight Saving Time) indicator, Atomic signal icon, Time Zone.
- Middle Row: Date (month-day-year), Day of the week.
- Bottom Row: Indoor temperature, Indoor humidity, Channel indicator, Outdoor temperature, Outdoor humidity.
2. Alarm Function
To set the alarm:
- Press and hold the ALARM button for 3 seconds. The alarm hour will flash.
- Use the UP or DOWN/RCC buttons to adjust the hour. Press ALARM to confirm.
- The alarm minute will flash. Use the UP or DOWN/RCC buttons to adjust the minute. Press ALARM to confirm and exit alarm setting.
To activate/deactivate the alarm:
- Briefly press the ALARM button. The alarm icon will appear or disappear on the display, indicating its status.
To use the snooze function:
- When the alarm sounds, press any button (except ALARM) to activate snooze. The alarm will sound again after approximately 5 minutes.
- To stop the alarm completely, press the ALARM button.
3. Manual Time Setting (If WWVB Signal is Unavailable)
In areas where the WWVB signal cannot be received, you can manually set the time and date:
- Press and hold the SET button for 3 seconds to enter setting mode.
- Repeatedly press SET to cycle through the settings (Time Zone, DST ON/OFF, 12/24H format, Hour, Minute, Year, Month, Day, Temperature Unit).
- Use the UP or DOWN/RCC buttons to adjust the flashing value for each setting.
- Press SET to confirm each adjustment and move to the next.
- After setting the last parameter, press SET again to exit setting mode.
Maintenance
1. Battery Replacement
When the battery indicator appears on the display, it is time to replace the batteries. Replace all batteries in the main clock and/or outdoor sensor simultaneously with new ones of the same type. Do not mix old and new batteries or different battery types.
For outdoor sensors in temperatures below -4°F, lithium batteries are recommended for optimal performance.
2. Cleaning
Wipe the clock and sensor with a soft, dry cloth. Do not use abrasive cleaners or solvents, as they may damage the display or casing.
Troubleshooting
| Problem | Possible Cause | Solution |
|---|---|---|
| Clock not receiving WWVB signal. | Interference, distance from transmitter, weak signal. | Relocate the clock near a window, away from electronics. Manually initiate signal search by holding DOWN/RCC button. Allow several hours for synchronization. |
| Outdoor temperature/humidity not displayed or inaccurate. | Sensor out of range, low sensor batteries, interference, improper sensor placement. | Ensure sensor is within 100m (328ft) of the main unit. Replace sensor batteries. Relocate sensor away from direct sunlight/rain and metal objects. Press CHANNEL button on main unit to re-establish connection. |
| Display is dim or blank. | Low main unit batteries. | Replace all 4 AA batteries in the main clock. |
| Time is incorrect after initial setup. | Incorrect time zone set, temporary signal loss. | Verify time zone setting. Manually initiate WWVB signal search. If signal is consistently poor, manually set the time. |
Specifications
| Feature | Specification |
|---|---|
| Model Number | LWC100 |
| Display Type | Digital LCD |
| Clock Dimensions | 14.2" W x 9.4" H x 1.2" D |
| Main Unit Power | 4 x AA batteries (not included) |
| Sensor Power | 2 x AAA batteries (not included) |
| Indoor Temperature Range | 14.1°F to 122.0°F (-9.9°C to 50.0°C) |
| Outdoor Temperature Range | -58.0°F to 158.0°F (-50.0°C to 70.0°C) |
| Humidity Range | 1% to 99% RH (Indoor & Outdoor) |
| Wireless Transmission Range | Up to 328 feet (100 meters) in open area |
| Outdoor Sensor Water Resistance | IPX4 (splash-proof) |
| Material | Plastic |
| Mounting Options | Wall Mount, Tabletop |
Warranty and Support
LFF products are designed for quality and reliability. If you encounter any quality problems with your LFF Atomic Clock, please contact our customer support team for assistance. Please refer to your purchase documentation for specific warranty terms and contact information.
For further support, visit the official LFF store on Amazon: LFF Store


