1. Introduction
This manual provides detailed instructions for installing and operating the MYMG 4th Generation Motor and Light Upgrade Kit designed specifically for the Lego Technic Land Rover Defender 42110 model. This kit transforms your static model into a dynamic, remote-controlled vehicle with functional lighting, enhancing realism and playability. Please read all instructions carefully before beginning the installation process.
2. Product Overview and Components
The MYMG upgrade kit includes two main components: a motorization kit with remote control and a separate lighting kit. Each kit contains specific parts necessary for its function.
2.1 Motor and Remote Control Kit Components
- 1 Super L Motor
- 2 Super Servo Motors
- 1 Remote Control
- 1 Rechargeable Lithium Battery
- 1 Pack of additional building pieces
- 1 AAA Battery (for remote control)
- USB charging cable
- Small screwdriver

Figure 1: Physical components of the MYMG Motor and Remote Control Upgrade Kit.
2.2 Light Kit Components
- Various LED light strings and modules
- 1 Remote Control for lights
- 1 Lithium Battery for lights
- USB charging cable

Figure 2: Physical components of the MYMG Light Upgrade Kit.

Figure 3: The Lego Technic Land Rover Defender 42110 model with the MYMG upgrade kit installed, showcasing the illuminated features.
3. Setup and Installation
The installation process involves integrating the motor and light components into your existing Lego Technic Land Rover Defender 42110 model. It is recommended to follow the detailed PDF instructions provided by scanning the QR code included in your kit packaging. These digital instructions offer step-by-step guidance with clear images.
3.1 General Installation Guidelines
- Preparation: Ensure your Lego model is partially disassembled to allow access for component integration. The upgrade instructions will indicate specific points for integration.
- Motor Kit Installation: This involves replacing certain structural elements with the provided motors and connecting them to the control unit. The instructions will guide you through the wiring and placement of the motors (Super L Motor for drive, Super Servo Motors for steering).
- Light Kit Installation: This involves carefully routing LED wires and placing light modules within the model's existing structure, such as headlights, taillights, and interior lights.
- Battery Placement: Securely place the rechargeable lithium batteries for both the motor and light kits in designated areas within the model, as indicated in the instructions.
- Remote Control Pairing: Once all components are installed and powered, follow the instructions to pair the remote controls with their respective kits.
3.2 Accessing Detailed PDF Instructions
A QR code is provided in the kit packaging. Scan this code with your smartphone or tablet to access the comprehensive electronic PDF manual for both the motor and light kit installations. These manuals are crucial for a successful build.
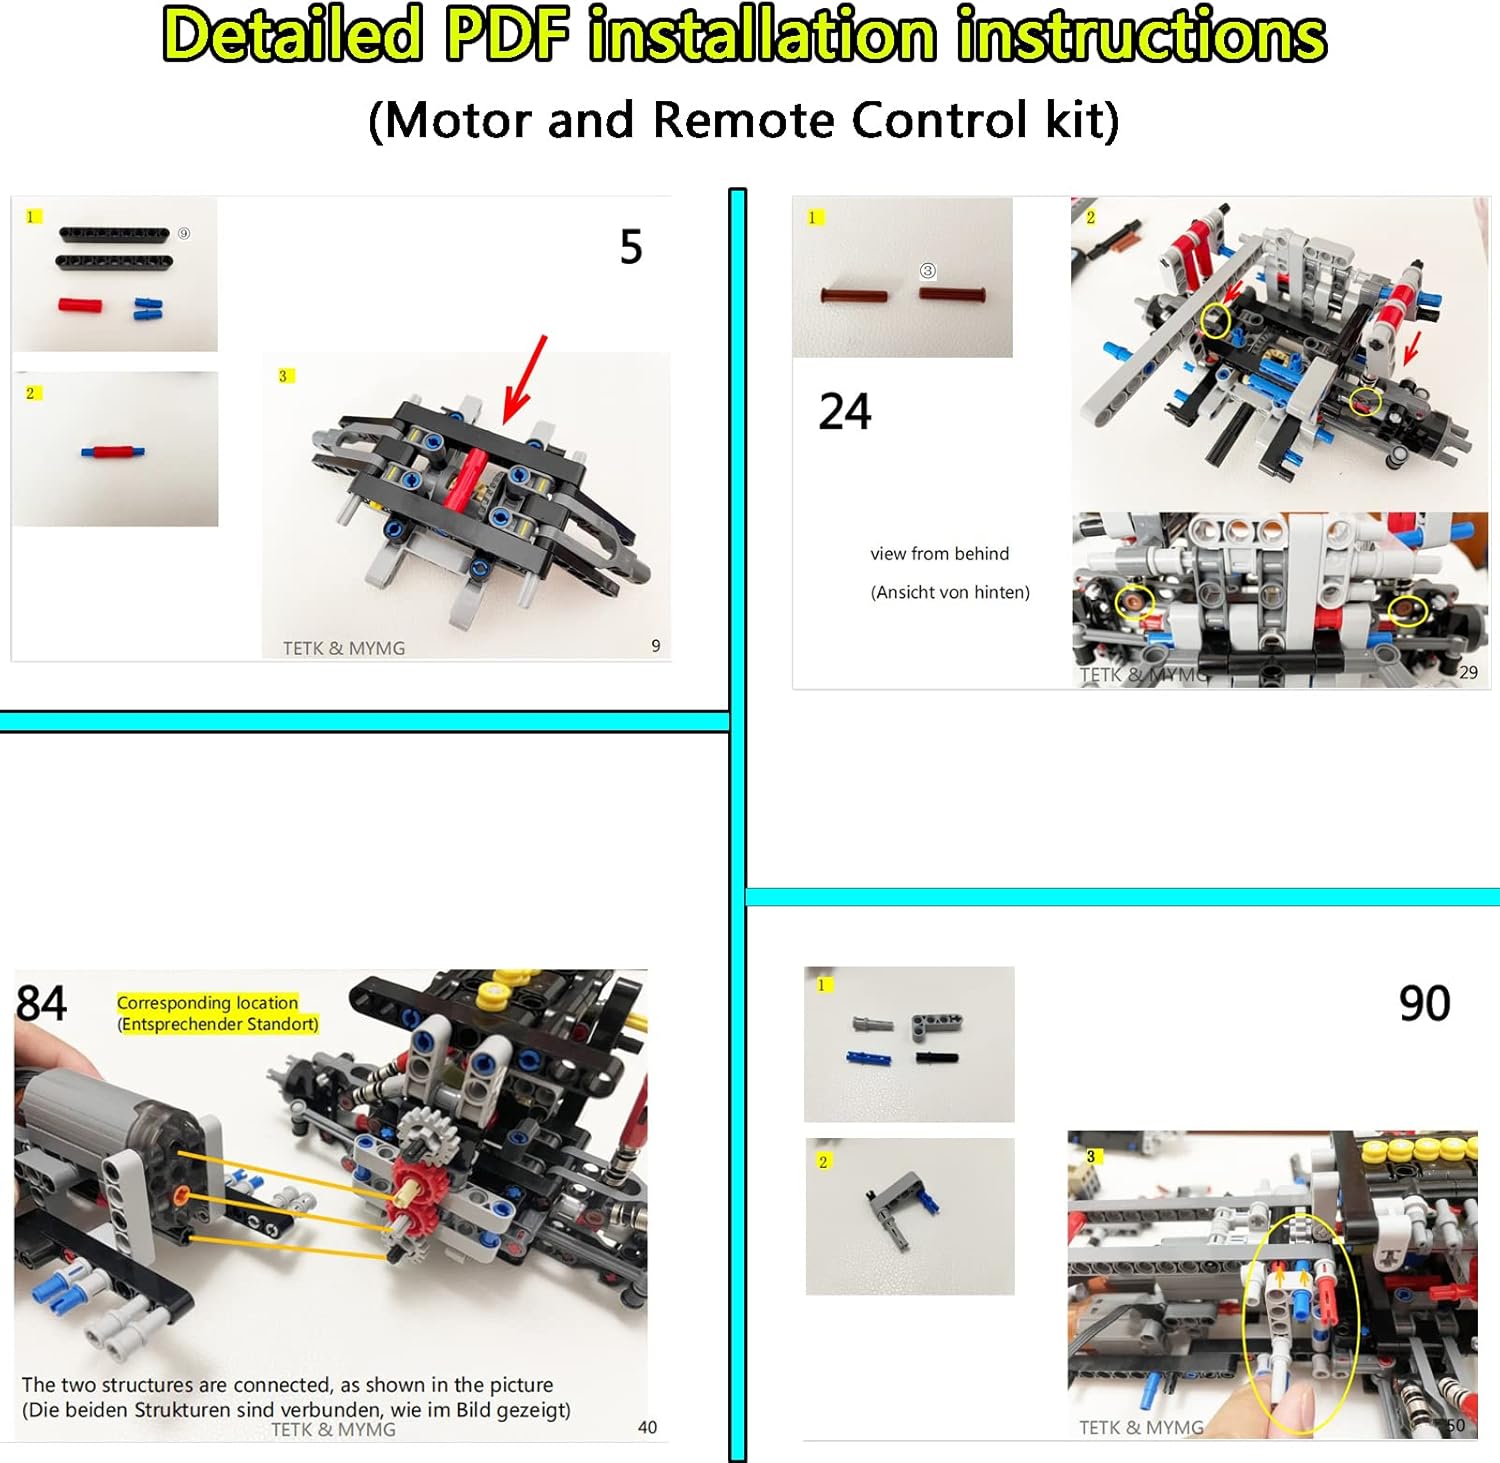
Figure 4: Example pages from the detailed PDF installation instructions for the Motor and Remote Control kit.

Figure 5: Example pages from the detailed PDF installation instructions for the Light kit.
4. Operating Instructions
4.1 Motor Control
The motor kit is controlled by the included remote control. Ensure the rechargeable lithium battery for the motor kit is fully charged and connected, and the AAA battery is installed in the remote control.
- Power On: Turn on the power switch on the motor control unit (usually located near the battery pack).
- Driving: Use the joysticks or directional buttons on the remote control to move the vehicle forward, backward, left, and right.
- Steering: The Super Servo Motors control the steering mechanism. Adjust the steering sensitivity if applicable via the remote or control unit settings (refer to PDF manual for advanced settings).
4.2 Light Control
The light kit is controlled by its dedicated remote control. Ensure the lithium battery for the light kit is charged and connected.
- Power On/Off: Use the designated button on the light remote control to turn the lights on or off.
- Brightness Adjustment: Some light kits may offer brightness control. Use the '+' and '-' buttons on the remote to adjust light intensity.
- Light Modes: If multiple light modes are available (e.g., flashing, steady), cycle through them using the mode button on the remote.
5. Maintenance
- Battery Charging: Regularly charge the rechargeable lithium batteries using the provided USB cables. Avoid overcharging.
- Battery Replacement: Replace the AAA battery in the motor remote control when its performance diminishes.
- Cleaning: Keep the model and its electronic components free from dust and debris. Use a soft, dry cloth for cleaning. Avoid water or cleaning solutions directly on electronic parts.
- Component Check: Periodically inspect all connections and gears for wear or looseness. Ensure all wires are securely routed and not pinched.
6. Troubleshooting
| Problem | Possible Cause | Solution |
|---|---|---|
| Motors not responding | Low battery, remote not paired, loose connection, power switch off. | Charge battery, ensure remote has fresh AAA battery, re-pair remote, check all wire connections, turn on power switch. |
| Lights not working | Low battery, loose connection, damaged LED. | Charge battery, check all light connections, inspect for damaged wires or LEDs. Contact support if a component is faulty. |
| Gears slipping or poor movement | Incorrect gear assembly, loose gears on motor shafts, obstruction. | Refer to the PDF manual to verify correct gear assembly. Ensure gears are firmly attached to motor shafts. Check for any Lego pieces obstructing movement. |
| Missing parts upon arrival | Packaging error. | Contact customer support immediately for free replacement parts. |
7. Specifications
- Product Dimensions (L x W x H): 27 x 16 x 5 cm (approx. 10.6 x 6.3 x 2 inches)
- Weight: 575 grams (approx. 1.27 lbs)
- Recommended Age: 14+ years (Manufacturer's recommendation for the upgrade kit)
- Educational Value: Stacking skill, engineering principles
- Main Material: Plastic
- Battery Type (Included): CR2, AAA, Lithium-ion
- Special Feature: Battery operated, Remote Control
- Model Name: 42110 Super Motor and Remote Control and Lighting Upgrade Kit
8. Warranty and Support
MYMG (TETK) is committed to providing quality service. If you encounter any issues or have questions regarding your product, please refer to the following support options:
- Missing Parts: If any parts are missing from your kit, please contact customer service immediately for a free replacement.
- Electronic Manual: An electronic version of the upgrade manual is available. Scan the QR code in the box to obtain it.
- General Inquiries: For any questions after receiving the product, please contact us. We aim to respond within 24 hours.
- Contact Information: Please refer to the contact details provided in your product packaging or on the retailer's website for direct support.
Your satisfaction is important to us. We are dedicated to assisting you with any concerns.


