1. Important Safety Instructions
Please read these instructions carefully before operating the appliance and keep them for future reference. Failure to follow these instructions may result in electric shock, fire, or serious injury.
- Do not operate the oven if the door or door seals are damaged.
- Do not heat liquids or other foods in sealed containers as they are liable to explode.
- Only use utensils that are suitable for use in microwave ovens.
- The oven should be cleaned regularly and any food deposits removed.
- Failure to maintain the oven in a clean condition could lead to deterioration of the surface that could adversely affect the life of the appliance and possibly result in a hazardous situation.
- Do not use harsh abrasive cleaners or sharp metal scrapers to clean the oven door glass since they can scratch the surface, which may result in shattering of the glass.
- This appliance is intended for household use only.
2. Product Overview
The Severin MW 7773 is a versatile 3-in-1 appliance combining microwave, grill, and hot air convection functions. It features a digital display, multiple power levels, and automatic cooking programs for convenient food preparation.

Figure 2.1: Front view of the Severin MW 7773 3-in-1 Microwave Oven. The appliance features a black and silver finish with a large viewing window and a control panel on the right side.
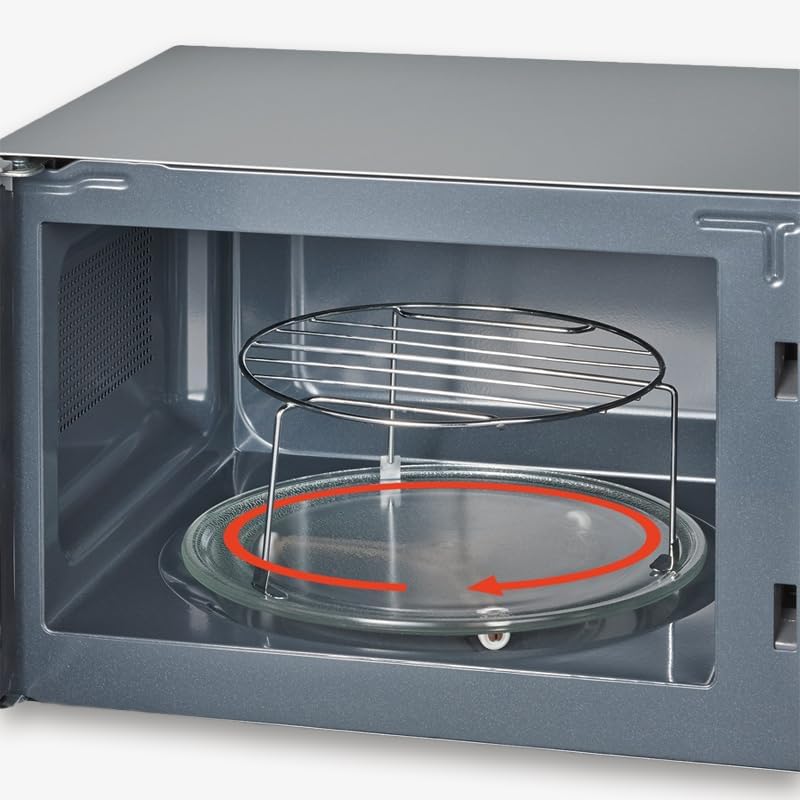
Figure 2.2: Interior view of the microwave oven, showing the glass turntable and the included metal grill grate. The turntable rotates to ensure even cooking.
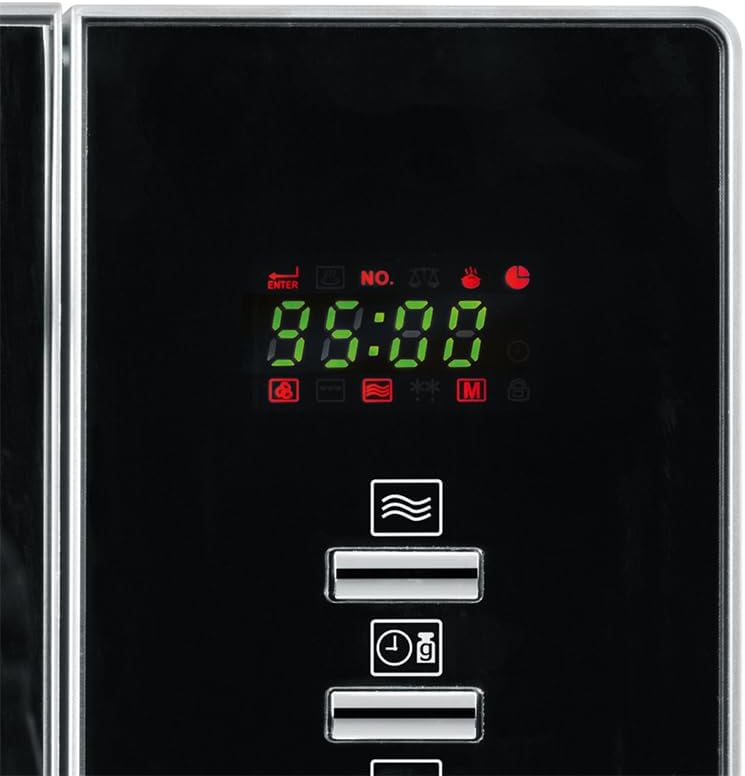
Figure 2.3: Close-up of the digital control panel, featuring an LCD display, various function buttons, and a rotary knob for setting time and power levels.
3. Setup and Installation
3.1 Unpacking
Carefully remove the microwave oven from its packaging. Retain the packaging materials for future transport or storage if necessary. Check for any damage during transit. If the appliance appears damaged, do not operate it and contact customer support.
3.2 Placement
- Place the oven on a flat, stable surface capable of supporting its weight (approximately 14.2 kg).
- Ensure adequate ventilation. Leave a minimum of 20 cm (7.9 inches) clearance above the oven, 10 cm (3.9 inches) at the rear, and 5 cm (2 inches) on both sides.
- Do not block any ventilation openings on the oven.
- Keep the oven away from heat sources, strong magnetic fields, and areas with high humidity.
3.3 Turntable and Grill Grate Assembly
- Place the roller ring in the center of the oven cavity.
- Position the glass turntable securely on top of the roller ring. Ensure it sits correctly in the center hub.
- For grilling or convection cooking, place the appropriate grill grate (small or large) on the turntable as required by your recipe.
3.4 Electrical Connection
Plug the power cord into a grounded electrical outlet. Ensure the voltage of your power supply matches the rating label on the appliance (2.3E+2 Volts AC).
4. Operating Instructions
4.1 Control Panel Functions
Refer to Figure 2.3 for a visual representation of the control panel.
- LCD Display: Shows time, power level, cooking mode, and program indicators.
- Function Buttons: Select microwave, grill, hot air, or combination modes.
- Rotary Knob: Adjusts cooking time, power level, and selects automatic programs.
- Start/Quick Button: Initiates cooking or provides instant start at full power.
- Stop/Cancel Button: Stops cooking or clears settings.
- Child Safety Lock: Activates to prevent unintended operation.
4.2 Setting the Clock
When the oven is first plugged in, the display will show "0:00".
- Press the "Clock" button (if available, otherwise consult specific model manual for clock setting).
- Turn the rotary knob to set the hour.
- Press the "Clock" button again.
- Turn the rotary knob to set the minutes.
- Press the "Clock" button to confirm.
4.3 Microwave Cooking
- Place food in a microwave-safe container on the turntable.
- Close the oven door.
- Press the "Microwave" button.
- Turn the rotary knob to select the desired power level (10 levels available).
- Turn the rotary knob again to set the cooking time.
- Press the "Start" button to begin cooking.
4.4 Grill Cooking
Use the included grill grate for best results.
- Place food on the grill grate.
- Close the oven door.
- Press the "Grill" button.
- Turn the rotary knob to set the cooking time.
- Press the "Start" button to begin grilling.
4.5 Hot Air (Convection) Cooking
Preheating may be required for optimal results.
- Place food in an oven-safe dish.
- Close the oven door.
- Press the "Hot Air" button.
- Turn the rotary knob to select the desired temperature.
- Turn the rotary knob again to set the cooking time.
- Press the "Start" button to begin convection cooking.
4.6 Combination Cooking
The appliance offers various combination modes (e.g., Microwave + Grill, Microwave + Hot Air) for versatile cooking. Consult the specific combination program details in your appliance's full manual for precise instructions.
4.7 Automatic Programs
The oven features 9 automatic cooking programs, including a pizza function. To use:
- Press the "Auto Menu" or "Program" button.
- Turn the rotary knob to select the desired program number (P1-P9).
- Press "Start". The oven will automatically set the appropriate power and time.
4.8 Defrost Function
The defrost function allows for quick and efficient thawing of frozen foods.
- Place frozen food on the turntable.
- Press the "Defrost" button.
- Turn the rotary knob to select defrost by weight or time.
- Press "Start".
4.9 Child Safety Lock
To activate the child safety lock, press and hold the "Stop/Cancel" button for approximately 3 seconds until a lock indicator appears on the display. To deactivate, repeat the process.
5. Maintenance and Cleaning
Regular cleaning helps maintain the performance and longevity of your microwave oven.
5.1 General Cleaning
- Always unplug the oven from the power outlet before cleaning.
- Clean the oven cavity, door, and door seals regularly with a damp cloth and mild detergent.
- Do not use abrasive cleaners, steel wool, or harsh chemicals, as these can damage the surfaces.
- For stubborn food residues, place a bowl of water with lemon slices inside the oven and microwave on high for 5-10 minutes. The steam will loosen the residue, making it easier to wipe away.
5.2 Turntable and Grill Grate
The glass turntable and metal grill grates can be removed for cleaning. Wash them in warm, soapy water or in a dishwasher. Ensure they are completely dry before placing them back in the oven.
5.3 Exterior Cleaning
Wipe the exterior surfaces with a soft, damp cloth. For stainless steel parts, use a specialized stainless steel cleaner if necessary, wiping in the direction of the grain.
6. Troubleshooting
| Problem | Possible Cause | Solution |
|---|---|---|
| Oven does not start. | Power cord not plugged in; Door not closed properly; Fuse blown or circuit breaker tripped. | Ensure plug is firmly in outlet; Close door securely; Check household fuse/circuit breaker. |
| Food not cooking evenly. | Food not stirred or turned; Turntable not rotating. | Stir or turn food halfway through cooking; Ensure turntable and roller ring are correctly placed and clean. |
| Excessive steam inside oven. | High moisture content in food. | This is normal for some foods. Wipe interior after use. |
| Oven light not working. | Light bulb needs replacement. | Contact qualified service personnel for bulb replacement. Do not attempt to replace yourself. |
If the problem persists after attempting these solutions, please contact Severin customer support.
7. Specifications
| Brand: | Severin |
| Model: | MW 7773 |
| Type: | 3-in-1 Microwave Oven with Grill and Hot Air Function |
| Capacity: | 20 Liters |
| Microwave Power: | 800 W |
| Grill Power: | 1350 W |
| Hot Air Power: | 1350 W |
| Power Levels: | 10 |
| Automatic Programs: | 9 |
| Installation Type: | Countertop |
| Color: | Black & Silver |
| Material: | Stainless Steel |
| Product Dimensions (W x D x H): | Approx. 17.99" x 15.75" x 10.35" (45.7 cm x 40 cm x 26.3 cm) |
| Item Weight: | Approx. 14.2 kg (31 lbs) |
| Included Components: | Glass Turntable, Roller Ring, 2 Grill Grates |
8. Warranty and Support
Severin products are manufactured to high quality standards. For information regarding warranty terms and conditions, please refer to the warranty card included with your purchase or visit the official Severin website.
For technical support, spare parts, or service inquiries, please contact Severin customer service. Contact details can typically be found on the Severin website or in your purchase documentation.


