1. Introduction and Product Overview
The Einhell TE-CD 18/2 Li-i +64 cordless impact driver is a versatile tool designed for screwing, drilling, and impact drilling tasks. It is part of the Einhell Power X-Change battery system, allowing compatibility with other Power X-Change batteries and chargers. This manual provides essential information for safe and effective use, setup, operation, and maintenance of your tool.
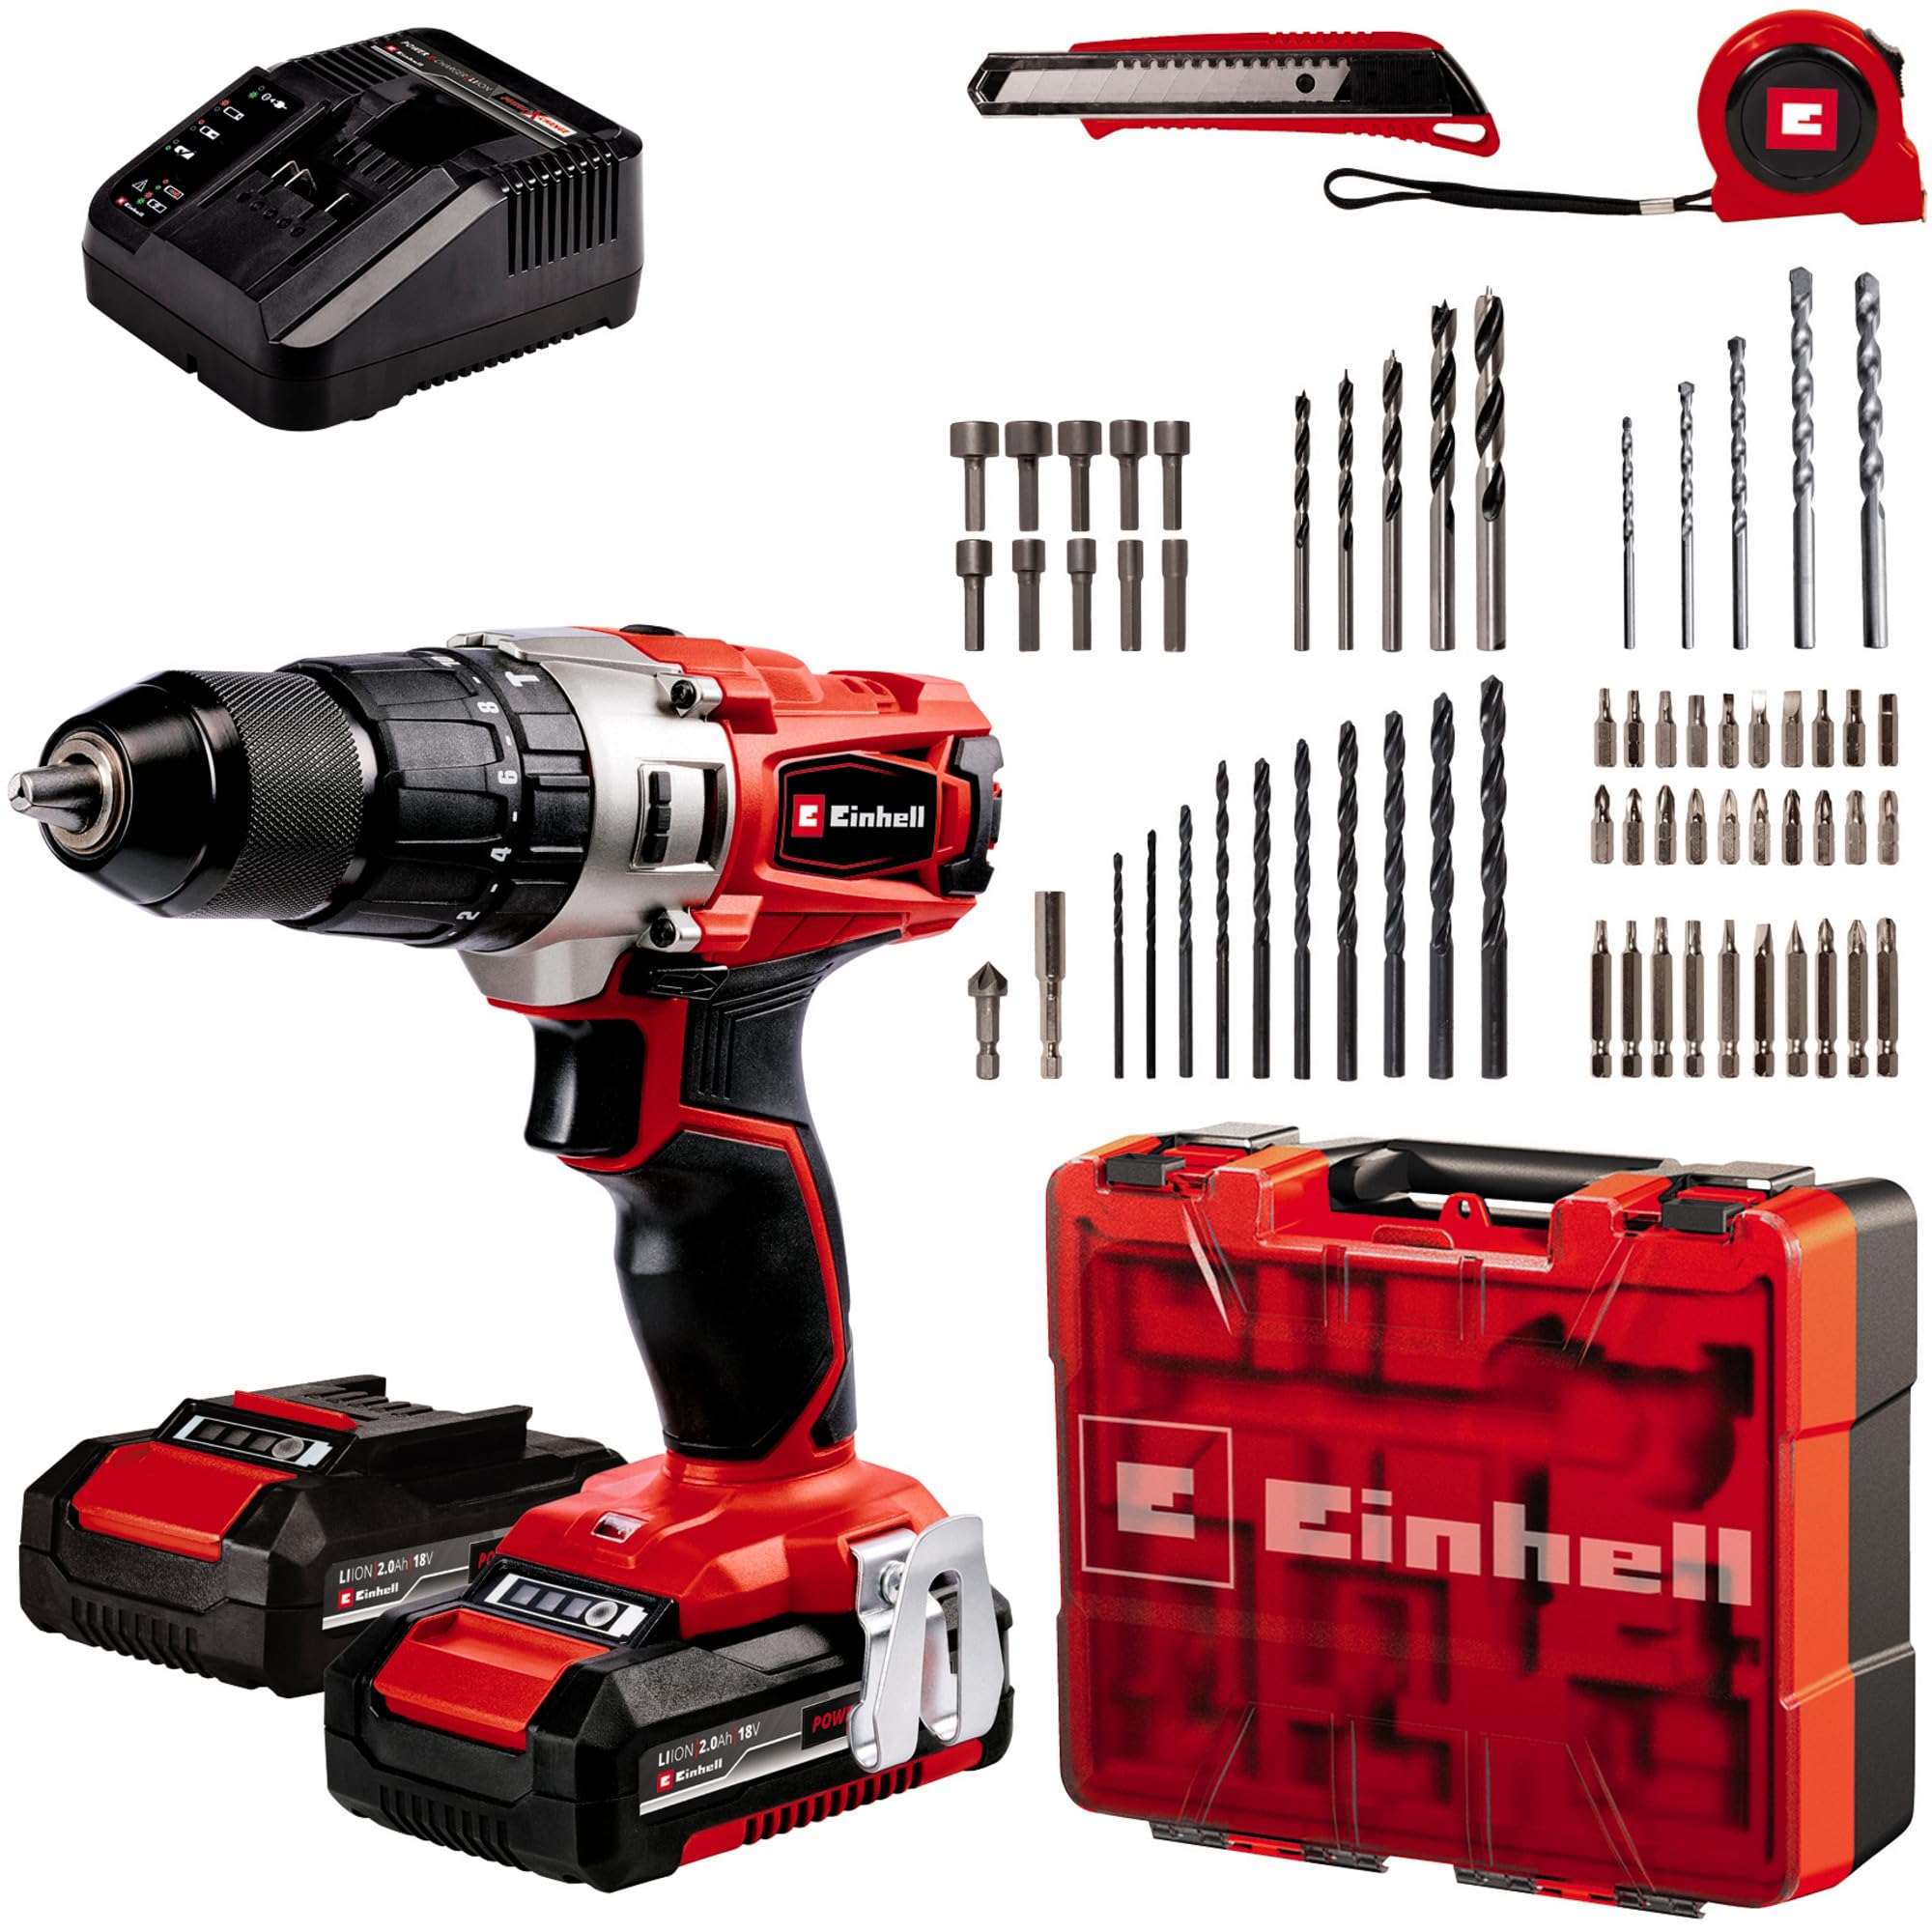
Figure 1: Einhell Cordless Impact Driver TE-CD 18/2 Li-i +64. This image shows the main unit of the cordless impact driver with a battery attached, highlighting its ergonomic design and key controls.
Key Features:
- Power X-Change System: Compatible with all Einhell Power X-Change batteries and chargers.
- Powerful 2-Speed Gear: Enables efficient screwing and drilling with or without percussion, offering up to 44Nm of torque across 20 levels.
- Self-Tightening Chuck: A 13 mm single-socket chuck with automatic shaft lock for quick accessory changes.
- Electronic Dimmer: Allows optimal adaptation of speed to the material and application for precise results.
- Integrated LED Lamp: Provides perfect visibility and optimal illumination in dark or confined work areas.
- Ergonomic Design: Features soft grip surfaces for secure and comfortable handling during prolonged use.
2. Safety Instructions
Always observe general safety regulations when using power tools. Read all safety warnings, instructions, illustrations, and specifications provided with this power tool. Failure to follow all instructions listed below may result in electric shock, fire, and/or serious injury.
General Power Tool Safety Warnings:
- Work Area Safety: Keep the work area clean and well-lit. Cluttered or dark areas invite accidents. Do not operate power tools in explosive atmospheres, such as in the presence of flammable liquids, gases, or dust.
- Electrical Safety: Power tool plugs must match the outlet. Never modify the plug in any way. Do not use any adapter plugs with earthed (grounded) power tools. Avoid body contact with earthed or grounded surfaces.
- Personal Safety: Stay alert, watch what you are doing, and use common sense when operating a power tool. Do not use a power tool while you are tired or under the influence of drugs, alcohol, or medication. Always wear eye protection. Use personal protective equipment such as dust masks, non-skid safety shoes, hard hats, or hearing protection when appropriate.
- Power Tool Use and Care: Do not force the power tool. Use the correct power tool for your application. Disconnect the plug from the power source and/or remove the battery pack, if detachable, from the power tool before making any adjustments, changing accessories, or storing power tools.
- Battery Tool Use and Care: Recharge only with the charger specified by the manufacturer. Use power tools only with specifically designated battery packs.
- Service: Have your power tool serviced by a qualified repair person using only identical replacement parts. This will ensure that the safety of the power tool is maintained.
3. Package Contents
Carefully unpack the product and check that all items listed below are present and undamaged. If any parts are missing or damaged, contact your retailer immediately.

Figure 2: Einhell Cordless Impact Driver Kit Contents. This image displays the cordless impact driver along with the two 2.0Ah batteries, charger, and the comprehensive 64-piece accessory kit in its storage case.
Included Components:
- 1 x Einhell Cordless Impact Driver TE-CD 18/2 Li-i +64
- 2 x 2.0Ah Power X-Change Batteries
- 1 x Fast Charger
- 1 x Storage Hook
- 1 x Blow Molded Case with separate insert
- 10 x Socket Wrenches (4/5/6/7/8/9/10/11/12/13 mm)
- 5 x Concrete Drill Bits (4/5/6/8/10mm)
- 10 x 50 mm Screwdriver Bits (S4/S5/S6/PZ1/PZ2/PZ3/T15/T20/T25/T30)
- 20 x 25mm Screwdriver Bits (PH1/2x PH2/PH3/PZ1/3x PZ2/PZ3/H3/H4/H5/H6/T15/T20/T25/T30/S4/S5/S6)
- 5 x Wood Drill Bits (4/5/6/8/10mm)
- 10 x HSS Drill Bits (1.5/2/2.5/3/3.5/4/4.5/5/6/6.5mm)
- 1 x Milling Drill
- 1 x Strong Magnet Bit Holder
- 1 x Cutter
4. Setup
4.1 Charging the Battery
- Remove the battery pack from the tool by pressing the release button and sliding the battery out.
- Connect the charger to a suitable power outlet.
- Slide the battery pack onto the charger. Ensure it clicks into place.
- The charger's indicator light will show the charging status. Refer to the charger's specific instructions for light indications.
- Once fully charged, remove the battery from the charger.
4.2 Installing the Battery
- Align the charged battery pack with the battery slot on the tool.
- Slide the battery into the tool until it clicks securely into place. Ensure it is fully seated to prevent accidental disconnection during operation.
4.3 Installing/Changing Drill Bits or Screwdriver Bits
- Ensure the tool is switched off and the battery is removed for safety.
- Rotate the chuck sleeve counter-clockwise to open the chuck jaws.
- Insert the desired drill bit or screwdriver bit into the chuck. Ensure the bit is inserted as far as possible for maximum grip.
- Rotate the chuck sleeve clockwise to tighten the chuck jaws firmly around the bit. The self-tightening mechanism will secure the bit.
- Gently pull on the bit to confirm it is securely fastened.
5. Operating Instructions
5.1 Selecting Operating Mode
The TE-CD 18/2 Li-i +64 offers three operating modes: Screwing, Drilling, and Impact Drilling. Rotate the mode selector ring (located behind the chuck) to choose the appropriate symbol for your task:
- Screwing Mode: Use for driving screws. The torque setting can be adjusted in this mode.
- Drilling Mode: Use for drilling into wood, plastic, or metal without impact.
- Impact Drilling Mode: Use for drilling into harder materials like masonry or concrete.
5.2 Adjusting Torque and Speed
- Torque Setting (Screwing Mode): Rotate the torque setting ring (numbered 1-20) to select the desired torque level. Lower numbers are for smaller screws and softer materials, higher numbers for larger screws and harder materials.
- Speed Selection: The tool features a 2-speed gearbox. Use the speed selector switch (usually on top of the tool) to choose between:
- Speed 1 (Low Speed): For high torque applications like driving large screws or drilling large holes.
- Speed 2 (High Speed): For faster drilling with smaller bits or when less torque is required.
- Electronic Speed Control: The trigger switch provides variable speed control. Press the trigger gently for lower speeds and harder for higher speeds.
5.3 Forward/Reverse Rotation
The forward/reverse switch (located above the trigger) controls the direction of rotation. Push it to the left for forward rotation (screwing in, drilling) and to the right for reverse rotation (removing screws, backing out bits). Ensure the switch is in the center position to lock the trigger and prevent accidental starting.
5.4 Using the LED Work Light
The integrated LED light automatically illuminates the work area when the trigger is pressed, providing improved visibility in dimly lit conditions.
6. Maintenance
Regular maintenance ensures optimal performance and extends the lifespan of your tool.
6.1 Cleaning
- Always remove the battery pack before cleaning.
- Keep the ventilation slots clean to prevent overheating. Use a soft brush or compressed air to clear dust and debris.
- Wipe the tool housing with a soft, damp cloth. Do not use harsh chemicals or abrasive cleaners.
- Clean the chuck jaws regularly to ensure proper grip on bits.
6.2 Battery Care
- Store batteries in a cool, dry place away from direct sunlight and extreme temperatures.
- Do not store fully discharged batteries for extended periods. Recharge them periodically if not in use.
- Avoid exposing batteries to water or moisture.
6.3 Storage
Store the tool and accessories in their original case in a dry, secure location, out of reach of children.
7. Troubleshooting
If you encounter issues with your Einhell Cordless Impact Driver, refer to the following common problems and solutions:
| Problem | Possible Cause | Solution |
|---|---|---|
| Tool does not start | Battery not charged or improperly installed. Forward/reverse switch in center (locked) position. | Charge battery and ensure it is securely installed. Move forward/reverse switch to forward or reverse position. |
| Reduced power or short run time | Battery charge is low. Battery is old or damaged. | Recharge the battery. Consider replacing the battery if it no longer holds a charge effectively. |
| Bit slips in chuck | Chuck not tightened sufficiently. Bit shank is dirty or damaged. | Ensure chuck is fully tightened. Clean or replace the bit. |
| Tool overheats | Ventilation slots blocked. Continuous heavy use. | Clean ventilation slots. Allow the tool to cool down during prolonged use. |
If the problem persists after attempting these solutions, contact customer support.
8. Specifications
| Specification | Value |
|---|---|
| Brand | Einhell |
| Model Number | 4514221 |
| Power Source | Battery Powered (Power X-Change) |
| Voltage | 18 Volts |
| Battery Capacity | 2 Amp Hours (per battery) |
| Maximum Torque | 44 Newton Meters |
| Number of Speeds | 2 |
| Maximum Rotational Speed | 18759 RPM |
| Maximum Chuck Size | 13 Millimeters |
| Drill Type | Hammer Drill |
| Drilling Capacity Wood | 10 Millimeters |
| Drilling Capacity Metal | 10 Millimeters |
| Material | Plastic, Metal, Rubber |
| Product Dimensions (L x W x H) | 7.8" x 2.83" x 7.09" |
| Item Weight | 1.45 Kilograms (3.19 pounds) |
9. Warranty and Support
Einhell products are manufactured to high-quality standards and undergo strict quality controls. This product is covered by a manufacturer's warranty. Please refer to the warranty card included in your package for specific terms and conditions, including warranty period and coverage details.
For technical support, spare parts, or warranty claims, please contact Einhell customer service. Contact information can typically be found on the Einhell website or in the documentation provided with your product.
When contacting support, please have your product model number (TE-CD 18/2 Li-i +64) and serial number (if applicable) ready.