1. Introduction
This manual provides detailed instructions for the installation, operation, and maintenance of your Bluavido Dual 1080P Car Mirror DVR Camera with Radar Parktronic System. Please read this manual thoroughly before using the device to ensure proper functionality and safety. This device is designed to enhance driving safety and provide reliable video recording capabilities for your vehicle.

Image 1.1: Overview of the Bluavido Dual 1080P Car Mirror DVR Camera. This image displays the main mirror DVR unit with its integrated front camera and a separate rear camera module.
2. Package Contents
Please verify that all items listed below are included in your package:
- 1x Mirror DVR Unit
- 1x Car Charger
- 1x Rear Camera
- 1x 5.7 meters Rear Camera Cable
- 1x Radar Sensor (Optional, included with specific models)
- 2x Rubber Rings (for mirror attachment)
3. Product Features
The Bluavido Car Mirror DVR Camera offers a range of advanced features designed for comprehensive vehicle monitoring and driving assistance:
- Dual 1080P Recording: Simultaneously records video from both front and rear cameras in Full HD 1080P resolution, capturing a wide 140-degree front view and a 120-degree rear view.
- 10-Inch IPS Full Touch Screen: Provides a high-resolution, user-friendly interface for easy operation and vivid display of recorded footage and live views.
- Multiple Display Modes: Supports 1:1 split view of front and rear, full front view, full rear view, and picture-in-picture display.
- Safer Parking Reverse: Automatically switches to the rear camera view with parking guidelines when the vehicle is in reverse gear, assisting with safe parking maneuvers.
- Automatic Power ON/OFF: The DVR powers on and begins recording automatically when the car engine starts, and powers off after a 10-second delay when the engine is turned off, protecting the car battery.
- 24-Hour Parking Monitor: With an optional OBD buck cable (sold separately), the device can monitor your vehicle for 24 hours, recording incidents even when parked.
- Reverse Radar System: Integrated radar sensors (if included) provide proximity alerts during reversing, enhancing parking safety.
- Loop Recording: Continuously records video, overwriting the oldest files when the memory card is full, ensuring uninterrupted recording.
- Night Vision: Enhanced low-light performance for clear recordings in challenging lighting conditions.
- G-Sensor: Automatically detects sudden movements or collisions and locks the current video file to prevent it from being overwritten.
- Interference Shielding: Designed with technology to minimize interference with car radio and other electronic systems.
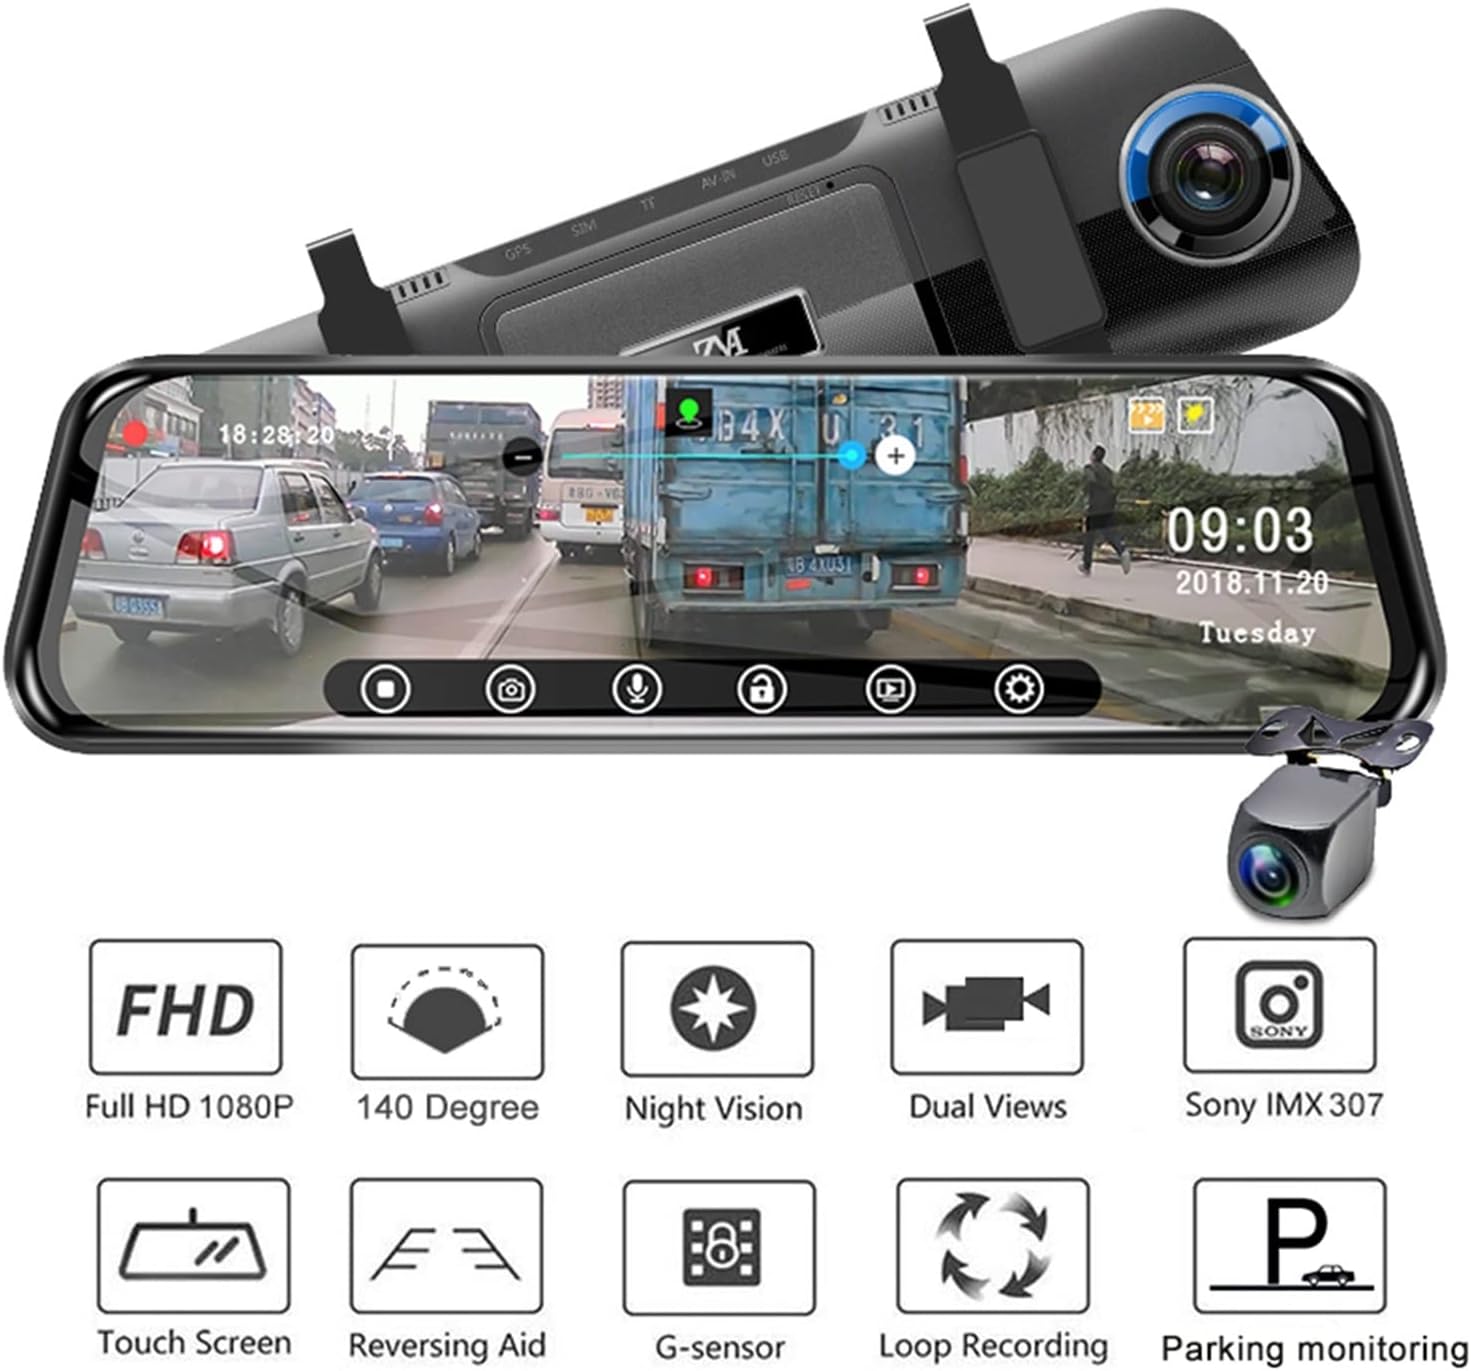
Image 3.1: Visual representation of key features including Full HD 1080P, 140-degree wide angle, Night Vision, Dual Views, Sony IMX 307 sensor, Touch Screen, Reversing Aid, G-sensor, Loop Recording, and Parking Monitoring.

Image 3.2: Illustration of the dual camera system, showing the wide viewing angles of the front (140°) and rear (120°) cameras for comprehensive coverage.
4. Setup and Installation
Proper installation is crucial for the optimal performance of your DVR system. Follow these steps carefully:
4.1. Mirror DVR Installation
- Attach the Mirror DVR unit to your vehicle's existing rearview mirror using the provided rubber rings. Ensure it is securely fastened and does not obstruct your view.
- Insert a compatible TF (microSD) card into the DVR's TF card slot. A 32GB card is recommended.
4.2. Rear Camera Installation
- Mount the rear camera at the back of your vehicle, typically above the license plate or on the rear bumper. Ensure it has a clear view of the road behind.
- Route the 5.7-meter rear camera cable from the rear camera to the Mirror DVR unit. Connect the cable to the AV IN port on the DVR.
- For the reversing aid function, connect the rear camera's red trigger wire to your vehicle's reverse light power supply. This will enable automatic display switching when reversing.
4.3. Power Connection
- Connect the provided car charger to the DVR's USB power port and then into your vehicle's cigarette lighter socket.
- For 24-hour parking monitoring, an optional OBD buck cable (5V convert adapter) is required. This cable connects the DVR directly to your car's battery ACC fuse, allowing continuous power supply even when the engine is off. Please contact support to purchase this accessory if needed.
4.4. Radar Sensor Installation (If Applicable)
If your model includes the radar sensor system:
- Install the radar sensors on your vehicle's rear bumper. The diagram below illustrates a typical installation method.
- Connect the radar sensors to the main radar control unit, and then connect the control unit to the Mirror DVR system as per the provided wiring diagram.

Image 4.1: Diagram showing the product dimensions and an illustration of how to install the radar sensors on the car's bumper. The image also highlights the USB, AV IN, TF card, and GPS ports on the DVR unit.

Image 4.2: The Mirror DVR unit displayed alongside the radar sensor module and individual sensors, indicating the components of the radar parktronic system.
5. Operating Instructions
5.1. Power On/Off
- Automatic: The DVR will power on and start recording automatically when the vehicle engine is started. It will power off automatically after a 10-second delay when the engine is turned off.
- Manual: Press and hold the power button on the DVR unit to manually turn it on or off.
5.2. Display Modes
The 10-inch touch screen supports various display modes. Tap the screen or use the on-screen icons to switch between them:
- Front Camera Only: Displays the full view from the front camera.
- Rear Camera Only: Displays the full view from the rear camera.
- 1:1 Split View: Shows both front and rear camera views side-by-side.
- Picture-in-Picture: Displays the main camera view with a smaller inset view of the other camera.
5.3. Recording
- Start Recording: Recording typically starts automatically when the device powers on. A recording indicator (e.g., a red dot or timer) will appear on the screen.
- Loop Recording: Videos are recorded in segments (e.g., 1, 3, or 5 minutes). When the memory card is full, the oldest unprotected files are overwritten.
- Emergency Recording (G-Sensor): In case of a sudden impact or collision, the G-sensor will trigger an emergency recording, locking the current video file to prevent it from being overwritten.
5.4. Parking Assistance
- Reverse Parking Aid: When the vehicle is shifted into reverse gear, the DVR automatically displays the rear camera view with parking guidelines on the screen.
- Reverse Radar: If equipped, the radar system will provide audible and visual alerts on the screen, indicating the distance to obstacles behind the vehicle during reversing.

Image 5.1: The DVR screen displaying the rear camera view with parking lines and radar distance indicators (0.3m, 0.5m, 1m, 1.5m, 2m) for safe parking.
5.5. 24-Hour Parking Monitoring
If the optional OBD buck cable is installed, the DVR will enter parking monitoring mode when the vehicle is turned off. In this mode, the device can detect impacts or motion and automatically record, providing surveillance for your parked vehicle.

Image 5.2: An illustration depicting the 24-hour parking monitoring feature, showing the DVR recording activity around a parked car.
6. Maintenance
- Cleaning: Use a soft, dry cloth to clean the DVR screen and camera lenses. Avoid using abrasive cleaners or solvents.
- Memory Card: Regularly format the TF card (at least once a month) within the DVR settings to ensure optimal performance and prevent data corruption. Replace the card if it shows signs of degradation or errors.
- Firmware Updates: Check the manufacturer's website periodically for firmware updates to improve performance and add new features.
- Temperature: Avoid exposing the device to extreme temperatures for prolonged periods, as this can affect battery life and component longevity.
7. Troubleshooting
- DVR not powering on: Ensure the car charger is securely connected to both the DVR and the vehicle's cigarette lighter. Check if the vehicle's cigarette lighter socket is receiving power.
- Recording issues: Ensure a compatible TF card is inserted and formatted. Check if the card is full or corrupted. Try formatting the card or using a new one.
- Rear camera not displaying: Verify that the rear camera cable is securely connected to the DVR's AV IN port. If using the reversing aid, ensure the trigger wire is correctly connected to the reverse light power.
- 24-hour parking monitor not working: This feature requires an optional OBD buck cable for continuous power. Ensure it is correctly installed and connected to the car's ACC fuse.
- Radar sensors not detecting: Check all connections of the radar sensors to the control unit and the DVR. Ensure sensors are clean and unobstructed.
- Screen flickering or freezing: Try restarting the device. If the issue persists, format the TF card or perform a factory reset via the DVR settings.
8. Specifications
| Feature | Specification |
|---|---|
| Brand | Generic (Bluavido) |
| Model Number | BAUZABZRJ |
| Screen Size | 10 Inches |
| Video Capture Resolution | 1080p (Front & Rear) |
| Front Camera Angle | 140 Degrees |
| Rear Camera Angle | 120 Degrees |
| Special Features | Loop Recording, Night Vision, Touch Screen, G-Sensor, Parking Monitor, Reverse Radar |
| Control Method | Touch |
| Connectivity Technology | USB |
| Item Weight | 600 Grams (approx. 1.32 pounds) |
| Included Components | Mirror DVR, Car Charger, Rear Camera, Rear Camera Cable, Rubber Rings, Radar Sensor (optional) |
9. Warranty and Support
For warranty information and technical support, please refer to the documentation provided with your purchase or contact your retailer. Keep your proof of purchase for any warranty claims.


