1. Introduction
This manual provides essential information for the assembly, operation, maintenance, and troubleshooting of your HONEY JOY 6V Kids Electric Chopper Motorcycle. Please read all instructions carefully before use to ensure safe and proper operation.

Image 1.1: The HONEY JOY 6V Kids Electric Chopper Motorcycle in use, highlighting the importance of supervision.
2. Safety Information
Your HONEY JOY Kids Electric Chopper Motorcycle is designed for safe play when used correctly. It is CPC and ASTM approved, ensuring it meets safety standards. Adult supervision is required at all times.
2.1 General Safety Guidelines
- Always supervise children during operation.
- Ensure the child wears appropriate safety gear, including a helmet.
- Do not operate on public roads, near motor vehicles, steep inclines, swimming pools, or other bodies of water.
- Operate only on flat, dry surfaces such as sidewalks, driveways, or playgrounds.
- Keep hands, hair, and clothing away from moving parts.
- Do not exceed the maximum weight capacity of 66 lbs.
- Ensure all bolts and fasteners are securely tightened before each use.

Image 2.1: Safety certifications and features of the motorcycle.
3. Setup and Assembly
Follow these steps to assemble your HONEY JOY Kids Electric Chopper Motorcycle. Refer to the assembly video for visual guidance.
3.1 Assembly Video
Video 3.1: Official assembly guide for the HONEY JOY Kids Electric Chopper Motorcycle.
This video demonstrates the step-by-step process of assembling the motorcycle, including attaching the handlebars, front wheel, and backrest.
3.2 Step-by-Step Assembly Instructions
- Attach Handlebars: Insert the handlebar assembly into the front fork. Secure it using the provided M6*30 bolts and M6 nuts. Ensure the handlebars are firmly in place.
- Install Front Fender: Slide the pink front fender onto the front fork assembly.
- Mount Front Wheel: Place the front wheel between the forks. Insert the axle (parts 10+11+12) through the wheel and forks, securing it with the M5 nuts on both sides.
- Connect Headlight Wiring: Connect the wiring from the headlight assembly to the main body of the motorcycle.
- Secure Headlight: Attach the headlight assembly to the front of the motorcycle using the M5*37 bolts and M5 nuts.
- Install Backrest: Insert the backrest into its designated slot at the rear of the seat. Secure it by tightening the 2*M3.5*12 screw bolts from underneath the seat.
- Attach Rearview Mirrors: Screw the rearview mirrors into the designated holes on the handlebars. Tighten them securely.

Image 3.2: The fully assembled electric chopper motorcycle.
4. Operating Instructions
Familiarize yourself with the controls before allowing a child to operate the motorcycle.
4.1 Controls Overview
- General Power Switch: Located on the dashboard, turns the motorcycle on or off.
- Forward/Reverse Switch: Selects the driving direction.
- Foot Pedal: Press to accelerate, release to brake or slow down.
- Horn Button: Activates the horn sound.
- Music Button: Plays pre-installed music.
- Headlight: Provides illumination.

Image 4.1: Dashboard controls for the electric motorcycle.
4.2 Starting and Driving
- Ensure the motorcycle is fully charged.
- Turn on the General Power Switch.
- Select either Forward or Reverse using the switch.
- Press the Foot Pedal to begin moving. Release the pedal to stop.
- Use the Horn Button and Music Button for entertainment.

Image 4.2: A child driving the motorcycle, illustrating the 'real driving experience'.
5. Maintenance
Regular maintenance ensures the longevity and safe operation of your electric motorcycle.
5.1 Charging the Battery
- Locate the charging input socket, typically near the foot pedal.
- Connect the charger to the socket and then plug it into a standard wall outlet.
- Charge the 6V battery for 8-12 hours before first use, and for 8-12 hours after each use, or until fully charged. Do not overcharge.
- Disconnect the charger once charging is complete.

Image 5.1: Key features including the charging input socket.
5.2 Cleaning and Storage
- Wipe the motorcycle with a soft, damp cloth. Do not use abrasive cleaners or solvents.
- Avoid spraying water directly onto electrical components.
- Store the motorcycle in a dry, cool place away from direct sunlight and moisture.
- If storing for an extended period, charge the battery fully every 30 days to maintain battery life.
6. Troubleshooting
If you encounter issues, refer to the following common problems and solutions.
| Problem | Possible Cause | Solution |
|---|---|---|
| Motorcycle does not move | Battery is low or dead Power switch is off Loose wiring connection | Charge the battery Turn on the power switch Check all wiring connections |
| Motorcycle moves slowly | Low battery charge Overloaded (exceeds weight capacity) Operating on uneven or soft surfaces | Recharge the battery Ensure rider weight is within limits Move to a flat, hard surface |
| No sound from horn/music | Loose wiring Component malfunction | Check wiring connections Contact customer support if issue persists |
7. Specifications
| Feature | Detail |
|---|---|
| Product Dimensions | 36 x 19 x 25 inches (L x W x H) |
| Item Weight | 14 pounds |
| Battery | DC 6 V, 4.5AH (1 Nonstandard Battery required) |
| Speed | 1.6-1.9 mph |
| Weight Capacity | 66 lbs |
| Recommended Age | 3 years and up |
| Material | PP + Metal |
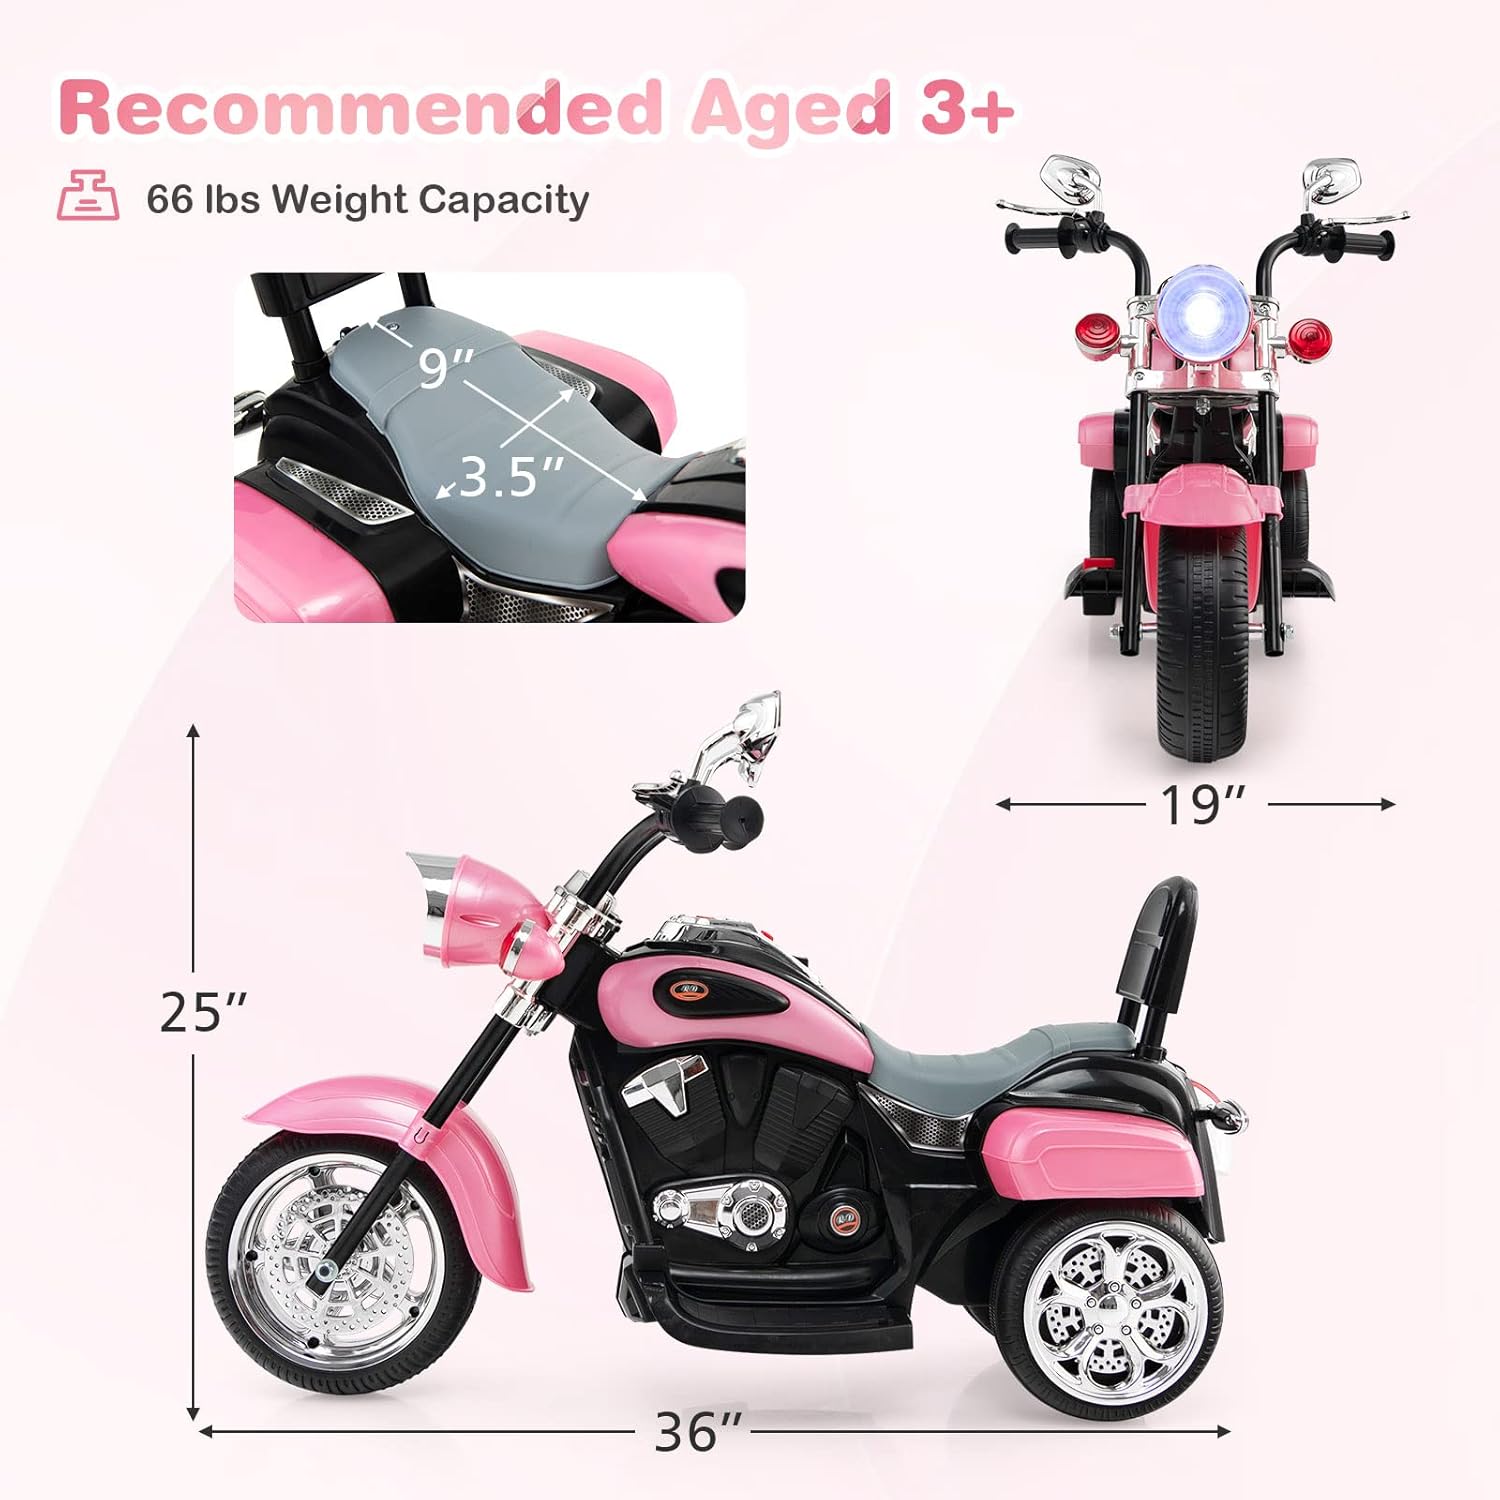
Image 7.1: Product dimensions and specifications.
8. Warranty and Support
For warranty information or technical support, please contact HONEY JOY customer service. Keep your purchase receipt as proof of purchase.
- Refer to the product packaging or the seller's website for specific warranty terms and contact details.
- When contacting support, please have your model number (B0B74K6JZP) and purchase date available.


