
1. Introduction
The Oster Oven Fryer 12L 3-in-1 electric air fryer is designed for preparing lighter and healthier meals. This versatile appliance combines the functions of an air fryer, oven, and dehydrator, offering an expanded capacity suitable for daily family use. It provides practical and quick options for a variety of healthy preparations.

This image illustrates the key features: 3-in-1 functionality (Air Fryer, Oven, Dehydrator), 12 liters capacity, and 1800W power.
2. Important Safety Instructions
Please read all instructions carefully before using the appliance. Failure to follow these instructions may result in electric shock, fire, or serious injury.
- Electrical Safety: Ensure the voltage of your power outlet matches the voltage specified on the appliance. Do not immerse the cord, plug, or appliance in water or other liquids.
- Hot Surfaces: The appliance surfaces become hot during use. Always use oven mitts or gloves when handling hot components or accessories. Do not touch hot surfaces directly.
- Placement: Place the appliance on a stable, heat-resistant surface, away from walls and other heat sources. Ensure adequate ventilation around the unit.
- Supervision: Close supervision is necessary when any appliance is used by or near children. Do not leave the appliance unattended during operation.
- Accessories: Only use accessories recommended by the manufacturer. Using unapproved accessories may cause injury or damage to the appliance.
- Maintenance: Unplug the appliance from the outlet when not in use and before cleaning. Allow it to cool completely before handling or cleaning parts.
- Damage: Do not operate any appliance with a damaged cord or plug, or after the appliance malfunctions or has been damaged in any manner. Contact customer service for examination, repair, or adjustment.
- Intended Use: This appliance is for household use only. Do not use outdoors.
3. Product Components
The Oster Oven Fryer comes with the following components:
- Main Unit (Oven Fryer)
- 2 x Airflow Racks (Grids)
- 1 x Rotisserie Basket
- 1 x Accessory Removal Hook
- 1 x Rotisserie Spit
- 1 x Drip Tray
- 1 x Instruction Manual
- 1 x Warranty and Technical Assistance Leaflet
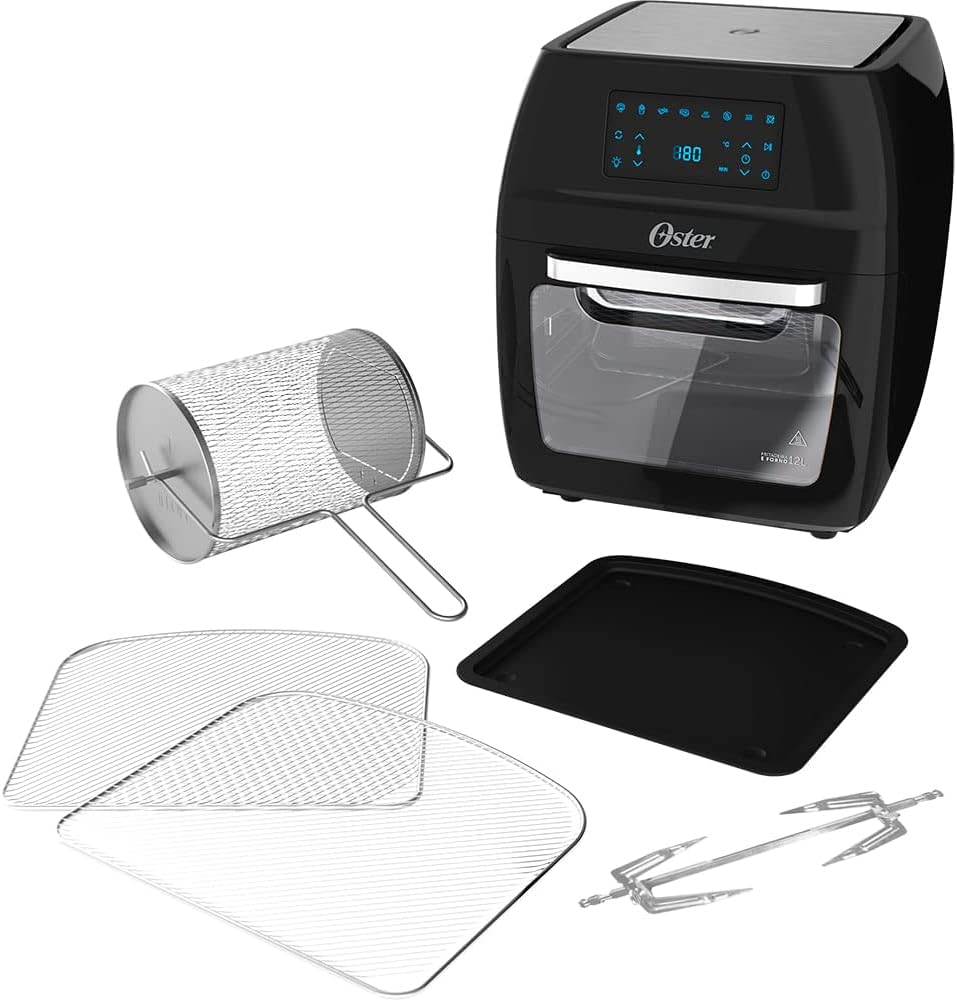
This image displays all included accessories alongside the main Oven Fryer unit.
4. Setup Guide
4.1 Unpacking
- Carefully remove all components from the packaging.
- Remove any protective film or stickers from the appliance and accessories.
- Keep packaging materials for future storage or disposal.
4.2 Initial Cleaning
- Wash the airflow racks, rotisserie basket, rotisserie spit, and drip tray with warm, soapy water. Rinse thoroughly and dry completely.
- Wipe the interior and exterior of the main unit with a damp cloth. Do not use abrasive cleaners.
4.3 Placement
- Place the Oven Fryer on a stable, level, and heat-resistant surface.
- Ensure there is at least 10-15 cm (4-6 inches) of clear space around the back and sides of the appliance for proper ventilation.
- Do not place the appliance near flammable materials or under cabinets.
4.4 First Use (Burn-off)
- Plug the appliance into a grounded 220V electrical outlet.
- Run the appliance empty for approximately 10-15 minutes at 180°C (350°F). This helps to burn off any manufacturing residues and eliminate initial odors. A slight odor or smoke during this process is normal.
- Ensure the area is well-ventilated during this initial burn-off.
5. Operating Instructions
5.1 Control Panel Overview
The Oster Oven Fryer features an intuitive touch control panel. The digital display shows temperature and time settings, while various icons represent pre-programmed functions and customizable settings.

The touch control panel allows for easy selection of cooking functions and adjustments.
5.2 Pre-programmed Functions
The appliance includes 4 pre-programmed functions for common dishes:
- Vegetables: Optimized settings for cooking various vegetables.
- French Fries: Ideal for crispy French fries.
- Poultry: Suitable for chicken, turkey, and other poultry.
- Meats: For cooking different types of meat.

These icons represent the four pre-programmed cooking functions.
5.3 Customizable Functions
In addition to pre-programmed options, you can customize settings using these 5 functions:
- Dehydrate: For drying fruits, vegetables, and meats.
- Air Fry: For oil-free frying.
- Roast: For roasting various foods.
- Reheat: For warming up previously cooked meals.
- Rotisserie: For cooking whole poultry or large cuts of meat with continuous rotation.
5.4 Temperature and Time Adjustment
- The temperature can be adjusted from 40°C to 200°C (105°F to 400°F).
- The timer allows for precise cooking durations and features an automatic shut-off for safety and convenience.
5.5 Using Accessories
Always place the drip tray at the bottom of the oven to catch any oil or food particles.
5.5.1 Airflow Racks
- Insert the airflow racks into the desired slots within the oven.
- These are suitable for general air frying, roasting, or dehydrating.
- When using multiple racks, rotate them halfway through cooking for even results, especially with larger items.

The interior of the Oven Fryer showing the placement of two airflow racks.
5.5.2 Rotisserie Basket
- Place smaller items like French fries or vegetables into the rotisserie basket.
- To install, first insert the left side of the basket into the motor drive socket, then secure the right side into its support.
- Select the 'Rotisserie' function for continuous 360° rotation, ensuring even cooking.
- Use the accessory removal hook to safely remove the hot basket after cooking.
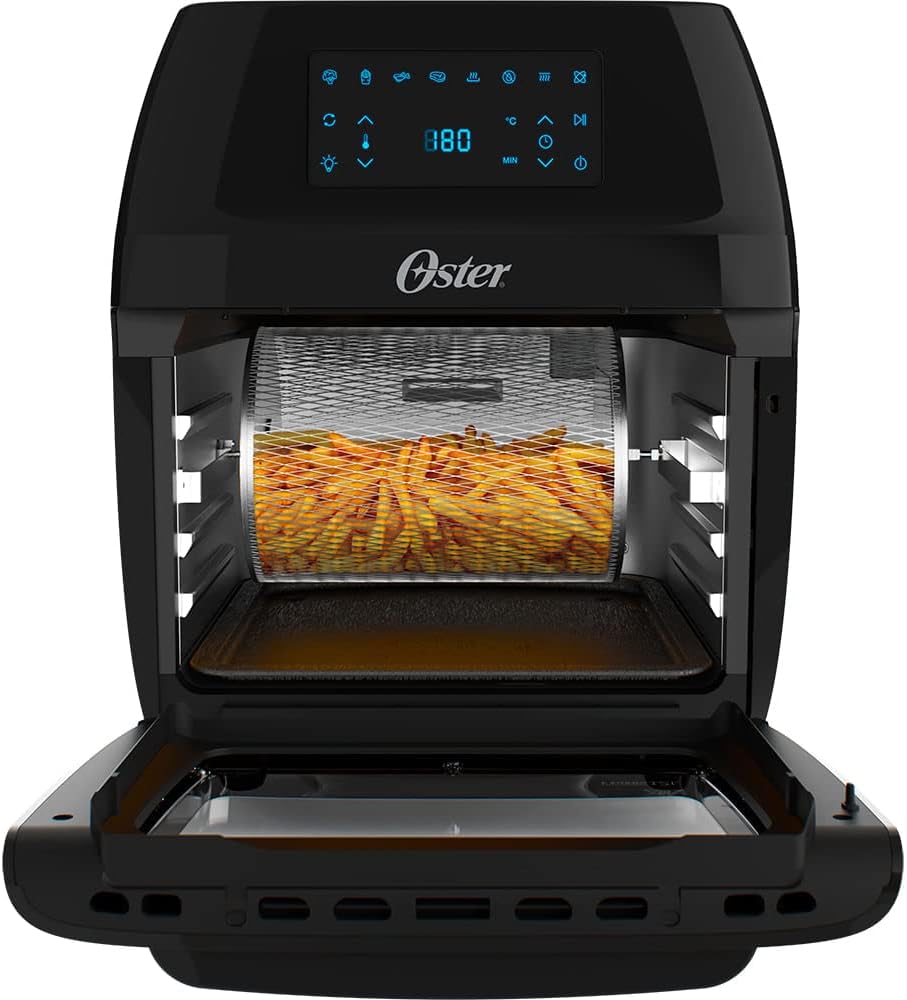
The rotisserie basket is ideal for achieving crispy results on items like French fries.
5.5.3 Rotisserie Spit
- Secure a whole chicken or large roast onto the rotisserie spit.
- Insert the left side of the spit into the motor drive socket, then secure the right side into its support.
- Activate the 'Rotisserie' function for 360° rotation, which ensures uniform cooking and browning.
- Use the accessory removal hook to safely remove the hot spit and food after cooking.

A whole chicken cooking evenly on the rotisserie spit inside the Oven Fryer.
5.6 Starting and Pausing
- After selecting your desired function and settings, press the Play/Pause button to start cooking.
- Press the Play/Pause button again to temporarily stop cooking. You can then adjust settings or check food.
- The appliance also features a reprogram function to change settings mid-cycle if needed.
5.7 Internal Illumination
The transparent door and internal illumination allow you to monitor the cooking process without opening the door, helping to maintain consistent temperature.
6. Cleaning and Maintenance
Proper cleaning and maintenance ensure the longevity and optimal performance of your Oster Oven Fryer.
- Unplug and Cool: Always unplug the appliance from the power outlet and allow it to cool completely before cleaning.
- Accessories: Remove all accessories (airflow racks, rotisserie basket, rotisserie spit, drip tray). Wash them with warm, soapy water using a non-abrasive sponge. Rinse thoroughly and dry completely. Note: These accessories are not dishwasher safe.
- Interior: Wipe the interior walls with a damp cloth and mild detergent. For stubborn food residues, a soft brush can be used. Avoid using metal scouring pads or harsh abrasive cleaners, as they can damage the non-stick coating.
- Exterior: Wipe the exterior of the appliance with a damp cloth. Do not use abrasive cleaners or immerse the main unit in water.
- Storage: Ensure all parts are clean and dry before storing the appliance. Store in a cool, dry place.
7. Troubleshooting Guide
If you encounter any issues with your Oster Oven Fryer, please refer to the following common problems and solutions:
| Problem | Possible Cause | Solution |
|---|---|---|
| Appliance does not turn on. | Not plugged in; power outlet issue; appliance malfunction. | Ensure the power cord is securely plugged into a working 220V outlet. Check the circuit breaker. If the issue persists, contact customer support. |
| Food is not cooking evenly. | Overcrowding; incorrect temperature/time; improper accessory placement. | Do not overcrowd the racks or basket. Cook in smaller batches if necessary. Adjust temperature and time as per recipe. Ensure racks are rotated or food is shaken/flipped halfway through cooking. Verify rotisserie accessories are correctly installed. |
| White smoke coming from the appliance. | Grease or food residue on heating element or drip tray. | Unplug the appliance and let it cool. Clean the heating element and drip tray thoroughly. Ensure the drip tray is always in place. |
| Unusual odor during cooking. | First use burn-off; food residue. | A slight odor is normal during initial uses. Ensure the appliance is clean. If the odor is strong or persistent, unplug and contact support. |
| Rotisserie basket/spit not rotating. | Incorrect installation; 'Rotisserie' function not selected. | Ensure the left side of the accessory is fully engaged in the motor drive socket and the right side is secured. Select the 'Rotisserie' function on the control panel. |
8. Product Specifications
Here are the technical specifications for the Oster Oven Fryer 12L 3-in-1:
- Model Name: OFRT780-220V
- Capacity: 12 Liters
- Power Output: 1800 Watts
- Voltage: 220 Volts
- Dimensions (D x W x H): 34.7 cm x 39 cm x 42.8 cm (13.66 in x 15.35 in x 16.85 in)
- Item Weight: 5.9 Kilograms (13 lbs)
- Material: Plastic, Glass (exterior); Plastic (interior)
- Control Method: Touch Panel
- Air Frying Technology: Hot Air Circulation
- Special Features: Programmable, Dehydrate Function, Automatic Shut-off Timer, Non-stick coating
- Recommended Uses: Roasting, Dehydrating, Frying
- Dishwasher Safe: No (for main unit and accessories)
- Country of Origin: China
9. Warranty and Support
9.1 Warranty Information
This Oster Oven Fryer comes with a 12-month warranty against manufacturing defects. Please retain your proof of purchase for warranty claims. The warranty covers defects in materials and workmanship under normal household use.
9.2 Customer Support
For technical assistance, warranty claims, or any questions regarding your product, please refer to the contact information provided in the included Warranty and Technical Assistance leaflet. You may also visit the official Oster website for support resources.


