1. Introduction
The KETOTEK KT4000 is a digital plug-in temperature controller designed for precise temperature regulation in various environments. It features dual relay outputs for both heating and cooling devices, making it suitable for applications such as aquariums, fish tanks, incubators, and greenhouses. This manual provides detailed instructions for the safe and effective use of your KT4000 temperature controller.
2. Product Features
- Plug-and-Play Design: Easy to set up and use with dual relay outputs for heating and cooling.
- High-Precision Temperature Control: Supports heating and cooling modes with an automatic switch, offering a temperature range from -50°C to 99°C.
- User-Friendly Interface: Simple 3-button operation for setting desired temperature and parameters.
- Cooling Delay Setting: Prevents compressor overload in cooling applications.
- Real-time Temperature Monitoring: Easy-to-read display can be mounted prominently.
- Safe and Reliable: Constructed with fire-resistant, durable materials and features an integrated buzzer alarm for abnormal conditions.
- Waterproof NTC Sensor: Includes a 2-meter waterproof NTC temperature sensor for accurate real-time ambient temperature monitoring.
- Memory Function: Retains settings during power interruptions.
- Temperature Calibration: Allows adjustment to match the displayed temperature with the actual temperature.
- Reset Function: Enables quick restoration of factory settings.

Figure 2.1: Overview of KETOTEK KT4000 features and an example setup in an aquarium.
3. Package Contents
Upon opening the package, verify that all items are present and in good condition:
- 1 x KETOTEK KT4000 Digital Temperature Controller
- 1 x 2-meter Waterproof NTC Temperature Sensor
- 2 x Double-sided adhesive tapes for display mounting
- 1 x Instruction Manual (this document)

Figure 3.1: Contents of the KETOTEK KT4000 package.
4. Setup
- Mount the Display: Use the provided double-sided adhesive tapes to fix the display unit in a prominent and easily viewable location. Ensure the surface is clean and dry before applying the tape.
- Connect the Sensor: Insert the 2-meter waterproof NTC temperature sensor into the designated port on the display unit. Position the sensor in the environment where temperature needs to be monitored (e.g., aquarium, incubator, greenhouse). A suction cup is provided for securing the probe if needed.
- Connect to Power: Plug the main power cord of the KT4000 controller into a standard 220V AC power outlet.
- Connect Devices:
- Plug your heating device (e.g., heater) into the heating outlet (typically marked for heating).
- Plug your cooling device (e.g., fan, chiller) into the cooling outlet (typically marked for cooling).

Figure 4.1: KETOTEK KT4000 main unit and components.

Figure 4.2: Components for mounting and sensor placement.
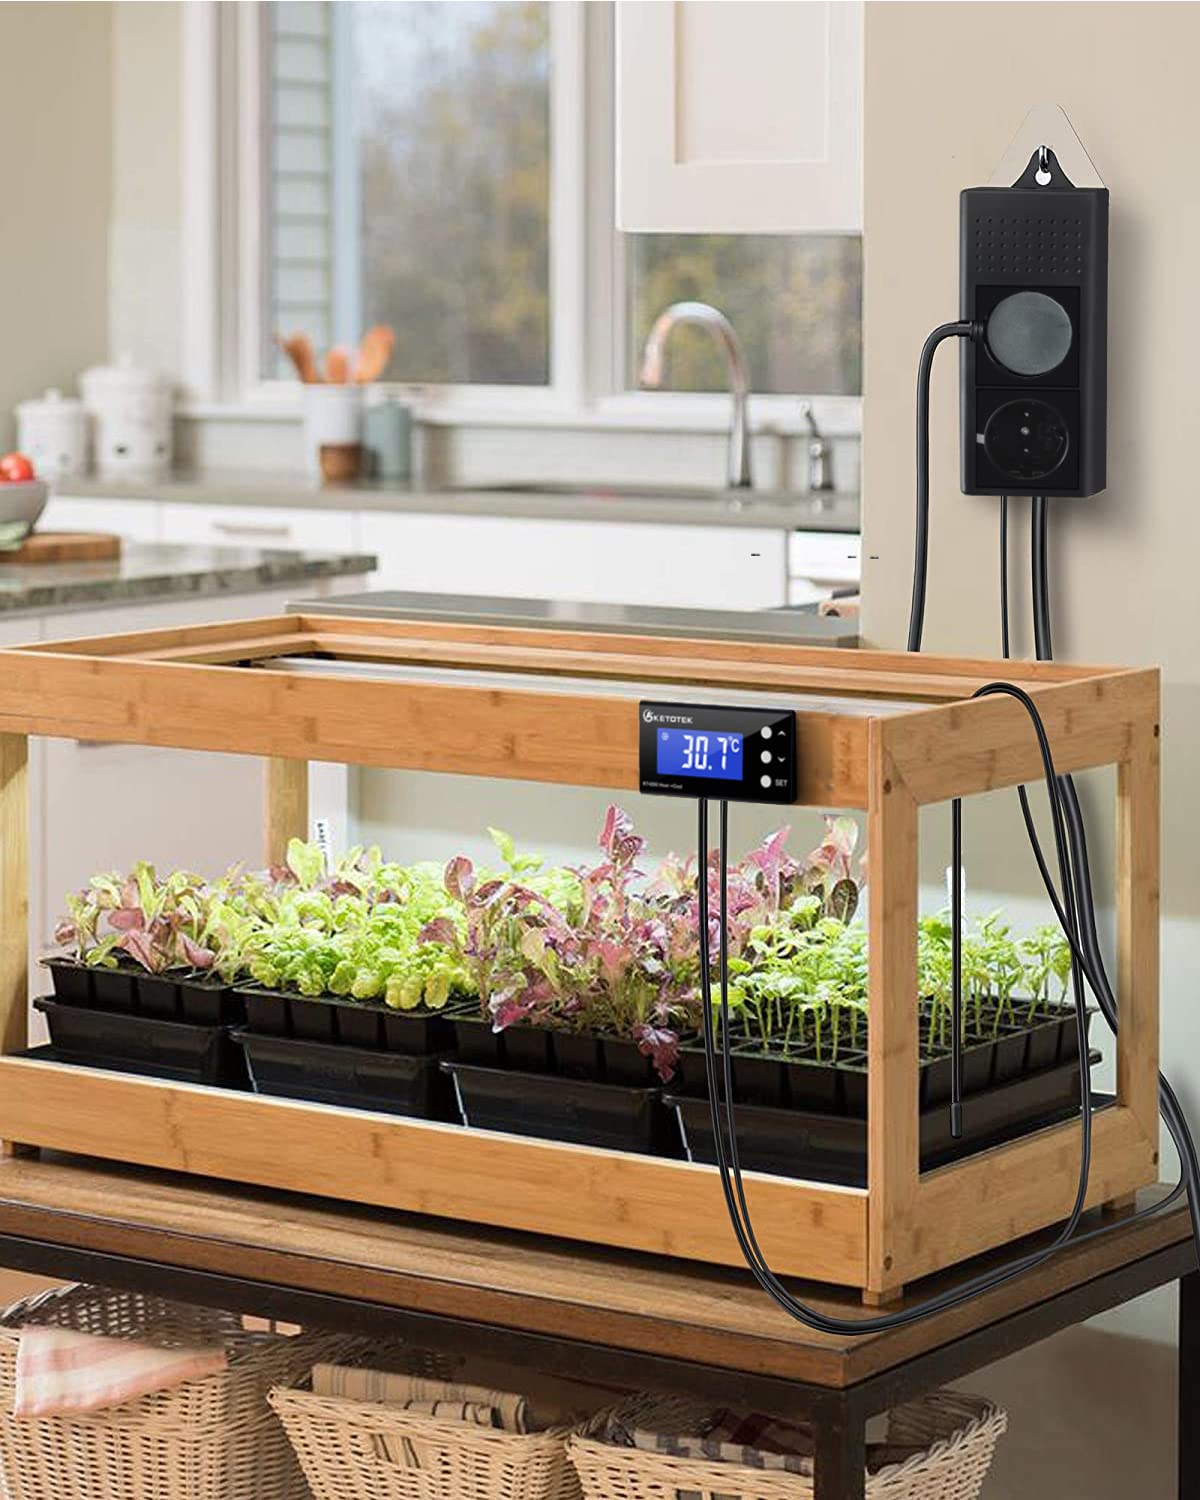
Figure 4.3: Example setup in a greenhouse.
5. Operating Instructions
The KT4000 controller uses three buttons for operation: SET, UP (▲), and DOWN (▼).
5.1. Parameter Settings Overview
The following table lists the available parameters and their functions:
| Code | Function | Set Range | Default |
|---|---|---|---|
| LS | Target Temperature | -50°C ~ 99°C | 20°C |
| Hd | Heating Differential Value | 0.5°C ~ 20°C | 2°C |
| Cd | Cooling Differential Value | 0.5°C ~ 20°C | 2°C |
| AH | High Temperature Alarm Value | -50°C ~ 99°C | 99°C |
| AL | Low Temperature Alarm Value | -50°C ~ 99°C | -50°C |
| CA | Temperature Calibration | -10°C ~ 10°C | 0 |
| PL | Cooling Delay Start | 0 ~ 10 minutes | 1 minute |
| BL | Backlight | ON/OFF/10 minutes | 10 minutes |

Figure 5.1: KT4000 Parameter Settings Table.
5.2. Setting Temperature Parameters (LS, Hd, Cd)
To set the target temperature (LS), heating differential (Hd), and cooling differential (Cd), follow these steps. This example demonstrates setting a target temperature range between 28°C and 33°C.
- Phase 1: Set Target Temperature (LS)
Press and hold the SET button for 3 seconds. The screen will display "LS". Use the UP (▲) or DOWN (▼) buttons to adjust the LS value to your desired target temperature, for example, 30°C.
- Phase 2: Set Heating Differential Value (Hd)
Press the SET button again. The screen will display "Hd". Use the UP (▲) or DOWN (▼) buttons to adjust the Hd value, for example, to 2°C. This means heating will activate when the temperature drops 2°C below LS (28°C) and stop when it reaches LS (30°C).
- Phase 3: Set Cooling Differential Value (Cd)
Press the SET button once more. The screen will display "Cd". Use the UP (▲) or DOWN (▼) buttons to adjust the Cd value, for example, to 3°C. This means cooling will activate when the temperature rises 3°C above LS (33°C) and stop when it reaches LS (30°C).
- Save Settings:
After setting all desired parameters, press and hold the SET button until the display returns to the current temperature reading to save the settings.
Example Logic (LS=30°C, Hd=2°C, Cd=3°C):
- If temperature drops below 28°C (LS - Hd), heating starts.
- If temperature reaches 30°C (LS), heating stops.
- If temperature rises above 33°C (LS + Cd), cooling starts.
- If temperature drops to 30°C (LS), cooling stops.
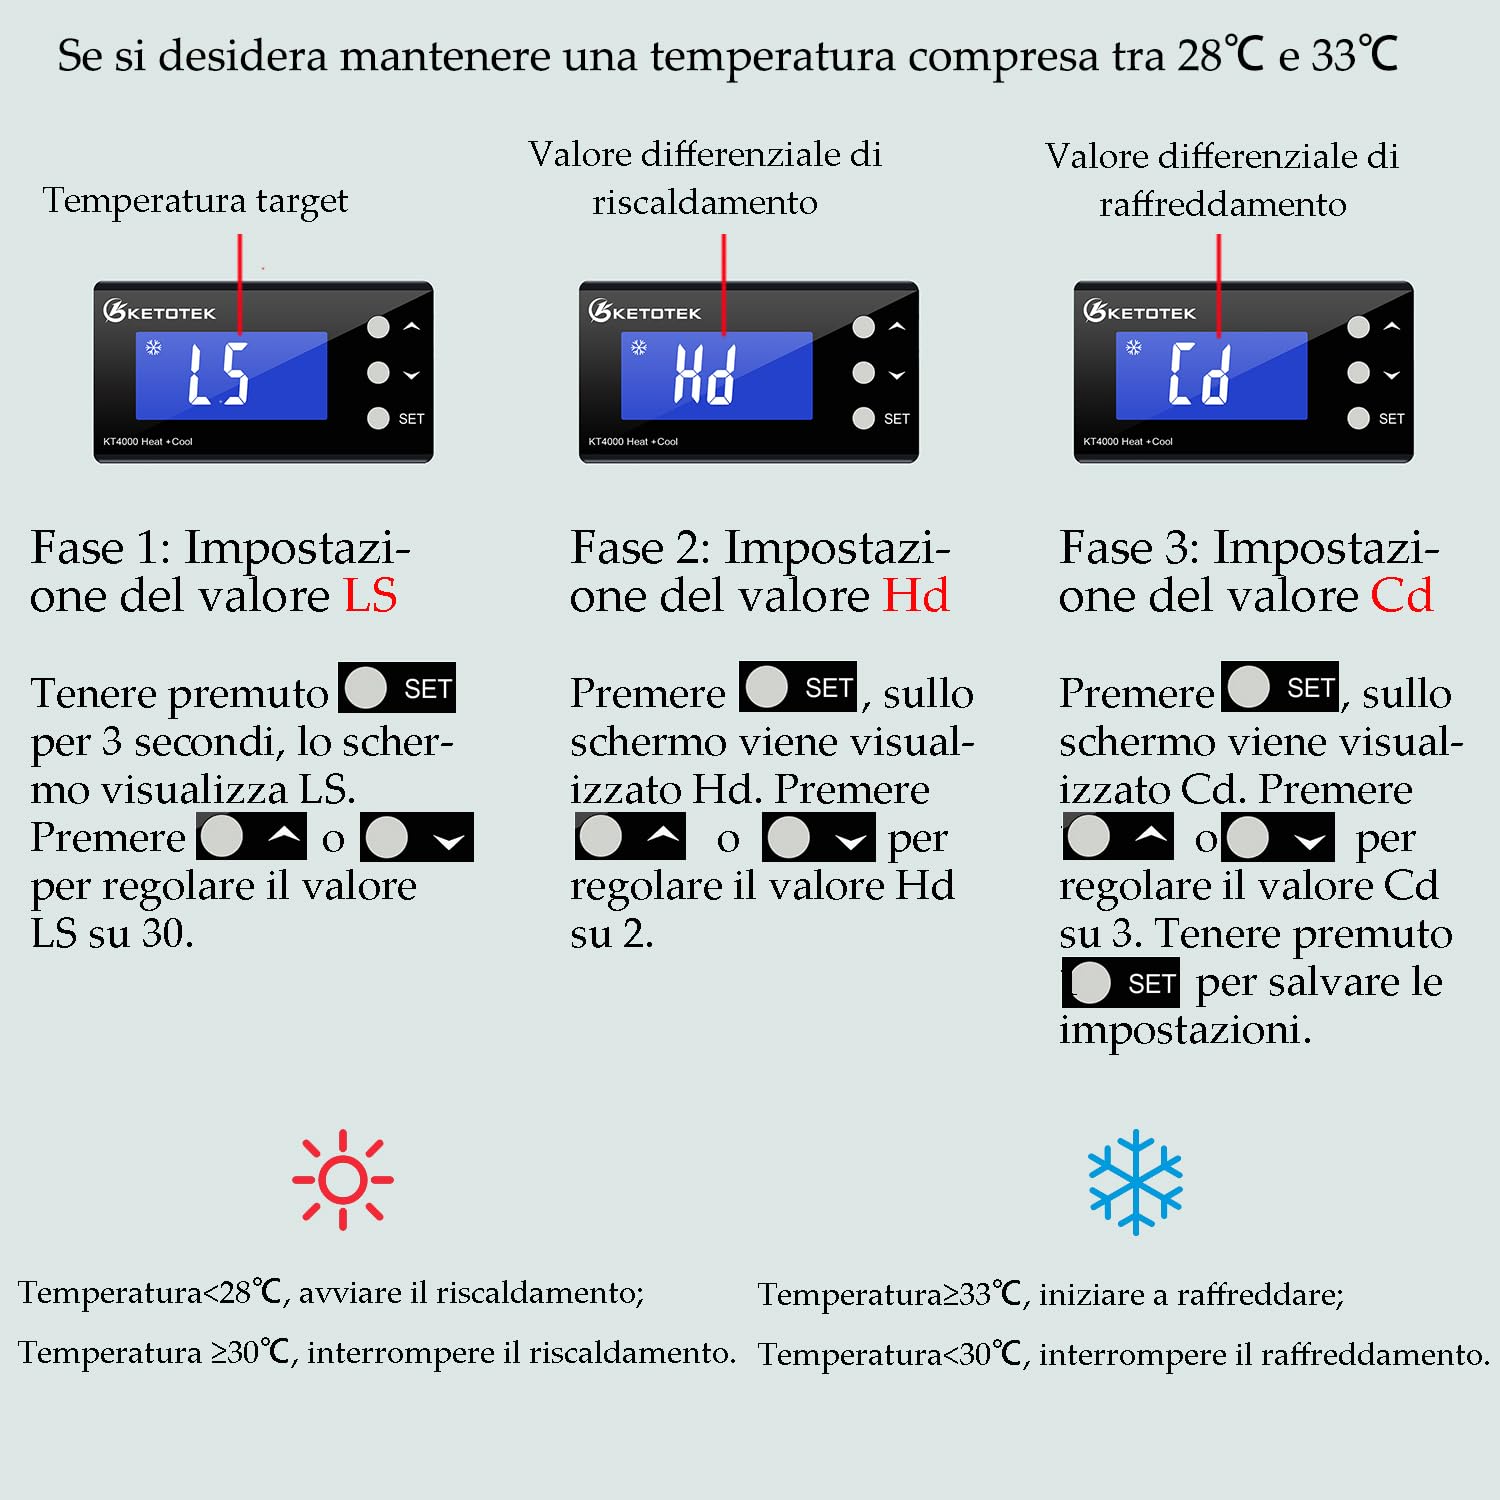
Figure 5.2: Example of setting temperature parameters.
5.3. Other Functions
- High/Low Temperature Alarm (AH/AL): Set the maximum (AH) and minimum (AL) temperature thresholds. If the measured temperature exceeds AH or falls below AL, the buzzer will sound.
- Temperature Calibration (CA): If you notice a discrepancy between the displayed temperature and a known accurate thermometer, you can adjust the calibration value (CA) to correct it.
- Cooling Delay Start (PL): This setting introduces a delay before the cooling device activates, protecting the compressor from frequent on/off cycles.
- Backlight (BL): Adjust the backlight behavior (ON, OFF, or timed).
- Reset to Factory Settings: To reset all parameters to their default values, refer to the specific instructions in the full manual or contact support.
6. Maintenance
- Cleaning: Wipe the display and controller unit with a soft, dry cloth. Do not use abrasive cleaners or immerse the unit in water.
- Sensor Care: Ensure the waterproof sensor is clean and free from debris. Periodically check the sensor cable for any signs of damage.
- Power Connections: Regularly inspect power cords and plugs for any damage or loose connections.
7. Troubleshooting
| Problem | Possible Cause | Solution |
|---|---|---|
| Display is blank or not turning on. | No power supply; loose connection. | Check if the controller is properly plugged into a live 220V outlet. Ensure all connections are secure. |
| Temperature reading is inaccurate. | Sensor not properly placed; sensor damaged; calibration needed. | Ensure the sensor is fully immersed or correctly positioned. Check for physical damage to the sensor. Use the Temperature Calibration (CA) function to adjust the reading. |
| Heating/Cooling device not activating. | Incorrect temperature settings (LS, Hd, Cd); device not plugged in; device malfunction. | Verify that LS, Hd, and Cd parameters are set correctly. Ensure the heating/cooling device is properly plugged into the correct outlet on the controller. Test the heating/cooling device independently. Check for cooling delay (PL) if applicable. |
| Buzzer alarm sounds frequently. | AH/AL alarm thresholds set too close to operating temperature; rapid temperature fluctuations. | Adjust the High (AH) and Low (AL) temperature alarm values to be further from your target temperature range. Ensure stable environmental conditions. |
| Settings are lost after power outage. | This model features a memory function. If settings are lost, it may indicate a rare internal issue. | Re-enter settings. If the issue persists, contact KETOTEK support. |
8. Specifications
- Model: KT4000
- Brand: KETOTEK
- Product Dimensions: 7.5 x 8.6 x 3.5 cm
- Weight: 616 grams
- Input Voltage: 220V AC
- Output Power: Max 10A 220Vac per outlet
- Temperature Control Range: -50°C to 99°C
- Temperature Sensor: 2-meter Waterproof NTC Sensor
- Color: Black
- Country of Origin: China
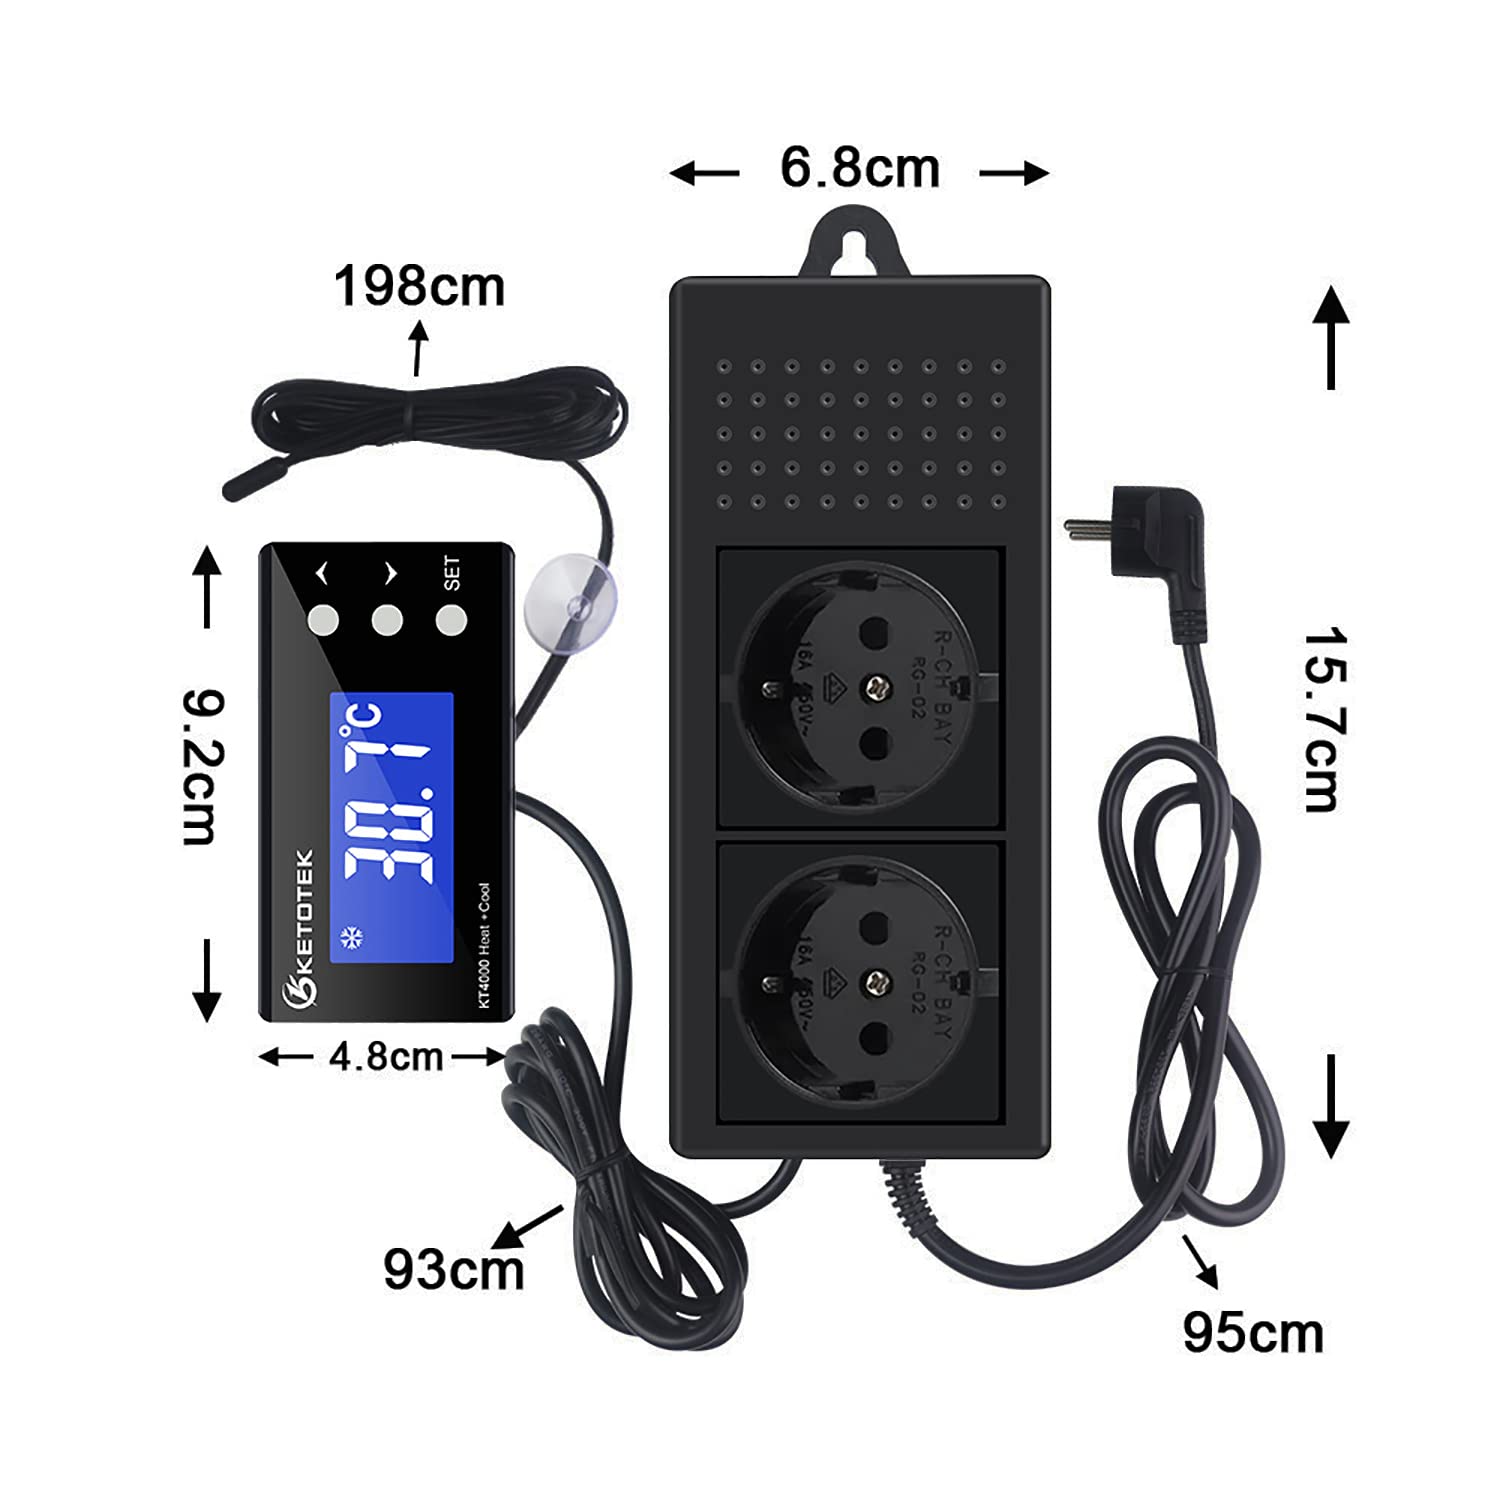
Figure 8.1: KETOTEK KT4000 Dimensions.
9. Warranty and Support
KETOTEK products are designed for reliability and performance. For warranty information, technical support, or service inquiries, please refer to the official KETOTEK website or contact your retailer. Keep your purchase receipt as proof of purchase.
For further assistance, you may visit the KETOTEK brand page on Amazon: KETOTEK Official Store


