
1. Introduction
This manual provides essential information for the installation, operation, and maintenance of your Tapa Ignition Coil and Ignition Control Module. This component is designed as a replacement part for specific inverter generator models. Please read this manual thoroughly before attempting any installation or maintenance.
This product is compatible with certain Harbor Freight Predator 3500 Watt Inverter Generators (models 56720, 63584) and Powerhorse 3500 Watt Inverter Generators.
2. Safety Information
- Always disconnect the generator's battery and spark plug wire before performing any service or maintenance to prevent accidental starting.
- Wear appropriate personal protective equipment, including safety glasses and gloves.
- Ensure the generator is cool before working on engine components.
- Working with electrical components can be hazardous. If you are unsure about any step, consult a qualified technician.
- Keep children and pets away from the work area.
3. Product Overview and Components
The Tapa Ignition Coil and Control Module set includes the following components:
- Ignition Coil
- Ignition Control Module
- Spark Plug (for regular maintenance)
- Mounting Bolts

Figure 3.1: Complete Tapa Ignition Coil and Control Module Assembly. This image displays the entire unit, including the ignition coil, control module, and associated wiring with connectors.

Figure 3.2: Close-up view of the Ignition Coil. This component is responsible for generating the high voltage needed for the spark plug.
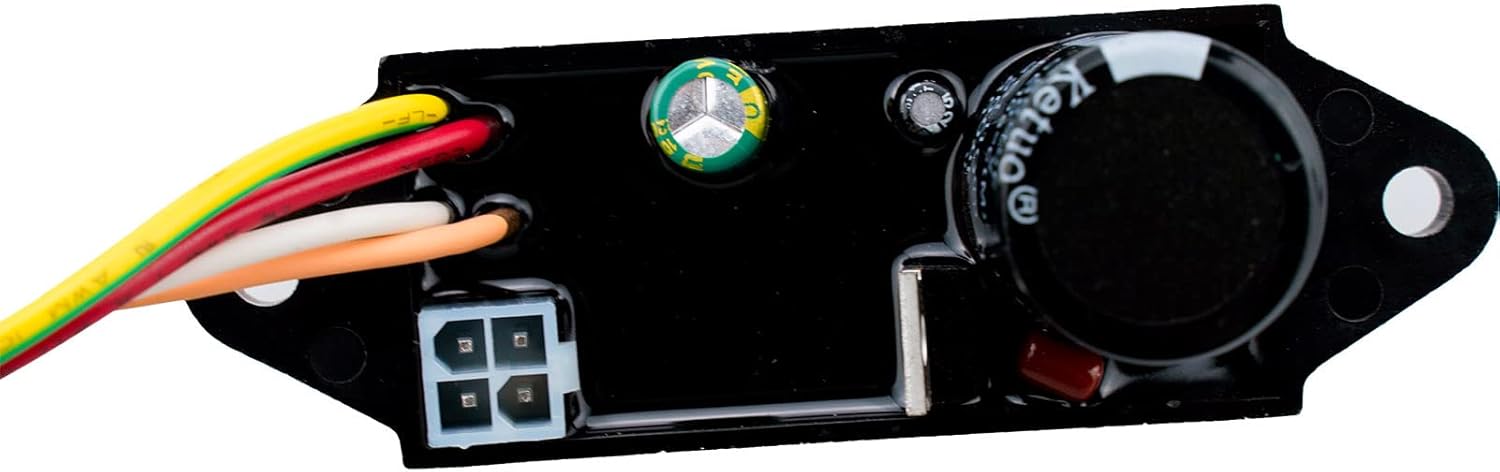
Figure 3.3: Close-up view of the Ignition Control Module. This module manages the timing and delivery of the ignition spark.

Figure 3.4: Close-up view of the Spark Plug Boot. This rubber boot connects the ignition coil wire to the spark plug, providing insulation and protection.

Figure 3.5: Close-up view of a wiring connector. These connectors ensure secure electrical connections within the ignition system.
4. Compatibility
This ignition coil and control module set is designed for specific generator models. It is crucial to verify compatibility with your generator before installation.
- Harbor Freight Predator 3500 Watt Inverter Generator: Compatible with models 56720 and 63584.
- Powerhorse 3500 Watt Inverter Generator: Fully compatible.
Replaces Part Numbers:
- Predator 3500 generator ignition coil: 270920364-0001
- Predator 3500 generator ignition control module: TJ113-2009-1
- Replaces Loncin LC3000i, LC3300i, LC3500i Generator ignition coil.
Note: There are variations in ignition coils and control modules for Predator 3500 inverter generators. Always compare the physical details of this product with your existing components to ensure correct fitment.
5. Installation
Installation of the ignition coil and control module is a bolt-on process. However, it can be labor-intensive and may require a familiar skill level, as the generator engine often needs to be removed or partially disassembled to access these components.
General Installation Steps (Consult your generator's specific service manual for detailed instructions):
- Preparation: Ensure the generator is turned off, cooled down, and the spark plug wire is disconnected. Disconnect the battery.
- Access: Carefully remove any covers or components necessary to gain access to the existing ignition coil and control module. This may involve removing the engine from its housing.
- Disconnection: Disconnect all wiring harnesses from the old ignition coil and control module. Note the routing of the wires for reassembly.
- Removal: Unbolt and remove the old ignition coil and control module.
- Installation of New Components: Install the new Tapa ignition coil and control module using the provided mounting bolts. Ensure they are securely fastened.
- Wiring: Connect the wiring harnesses to the new components. Ensure all connections are firm and correctly seated. Refer to the original wiring configuration.
- Reassembly: Reinstall any removed covers or components.
- Final Check: Reconnect the spark plug wire and battery. Perform a test start to ensure proper operation.
If you are not confident in performing this installation, it is recommended to seek assistance from a qualified service technician.
6. Operation
Once correctly installed, the Tapa Ignition Coil and Control Module operate automatically as part of your generator's ignition system. They are responsible for generating and timing the spark required for engine combustion.
No user intervention is required for the operation of these specific components after installation. Proper function is indicated by the generator starting and running smoothly.
7. Maintenance
The ignition coil and control module themselves typically do not require routine maintenance beyond ensuring their connections remain clean and secure. However, regular maintenance of the overall ignition system is important for generator longevity.
- Spark Plug Replacement: The included spark plug is for regular maintenance. Consult your generator's manual for recommended spark plug replacement intervals. A worn or fouled spark plug can lead to poor engine performance or starting issues.
- Wiring Inspection: Periodically inspect all wiring and connections for signs of wear, corrosion, or looseness. Secure any loose connections.
- Cleanliness: Keep the area around the ignition components clean and free of debris, oil, and moisture.
8. Troubleshooting
If your generator experiences issues after installing the new ignition coil and control module, consider the following:
- No Spark or Weak Spark:
- Ensure all electrical connections are secure and clean.
- Check the spark plug for proper gap and condition. Replace if necessary.
- Verify the kill switch or ignition switch is in the 'ON' position.
- Generator Runs Unstably (Fast then Slow):
- This could indicate an issue with the ignition timing or fuel delivery. Double-check all wiring connections to the control module.
- Ensure the new components are correctly installed and not loose.
- Consider other potential generator issues such as carburetor problems or fuel quality.
- Generator Fails to Start:
- Beyond ignition, check fuel level, engine oil level, and air filter condition.
- Confirm the spark plug is firing correctly.
If troubleshooting steps do not resolve the issue, it is advisable to consult a professional generator technician.
9. Specifications
| Feature | Specification |
|---|---|
| Brand | Tapa |
| Item Dimensions (L x W x H) | 2.76 x 2.17 x 1.97 inches |
| Item Weight | 0.5 Pounds |
| Vehicle Service Type | Generator |
| Connector Gender | Male |
| Installation Type | Bolt-On |
| Included Components | Ignition coil, control module, spark plug |
10. Warranty and Support
Warranty Information:
This Tapa product comes with a 1-year manufacturer's warranty from the date of purchase. This warranty covers defects in materials and workmanship under normal use. It does not cover damage resulting from improper installation, misuse, neglect, accidents, or unauthorized modifications.
Customer Support:
For technical assistance, warranty claims, or further inquiries regarding this product, please contact the manufacturer or your point of purchase. When contacting support, please have your product details and purchase information available.