
Important Safety Instructions
Please read this manual carefully before operating your portable air conditioner. Keep it for future reference. Always follow basic safety precautions to reduce the risk of fire, electric shock, or injury.
- Ensure the power supply matches the voltage specified on the rating label.
- Do not operate the unit with a damaged cord or plug. If the supply cord is damaged, it must be replaced by the manufacturer or a qualified service agent.
- Do not block air inlets or outlets. Maintain at least 20 inches (50 cm) clearance from walls or other objects.
- Do not insert fingers or foreign objects into the air inlet/outlet.
- Always unplug the unit before cleaning or servicing.
- This appliance is not intended for use by persons (including children) with reduced physical, sensory or mental capabilities, or lack of experience and knowledge, unless they have been given supervision or instruction concerning use of the appliance by a person responsible for their safety.
- Do not use the unit in wet environments such as bathrooms or laundry rooms.
- Use only the accessories provided by the manufacturer.
Product Overview
The Midea MAP10S1WBL portable air conditioner is a versatile 3-in-1 unit providing cooling, dehumidifying, and fan functions for rooms up to 450 square feet. It features smart connectivity for remote control via the MideaAir app and voice control compatibility with Amazon Alexa and Google Assistant.
Main Components
- Portable Air Conditioner Unit
- Exhaust Hose
- Window Slide Kit
- Remote Control
- Drain Hose (for continuous draining in dehumidifier mode)
Control Panel
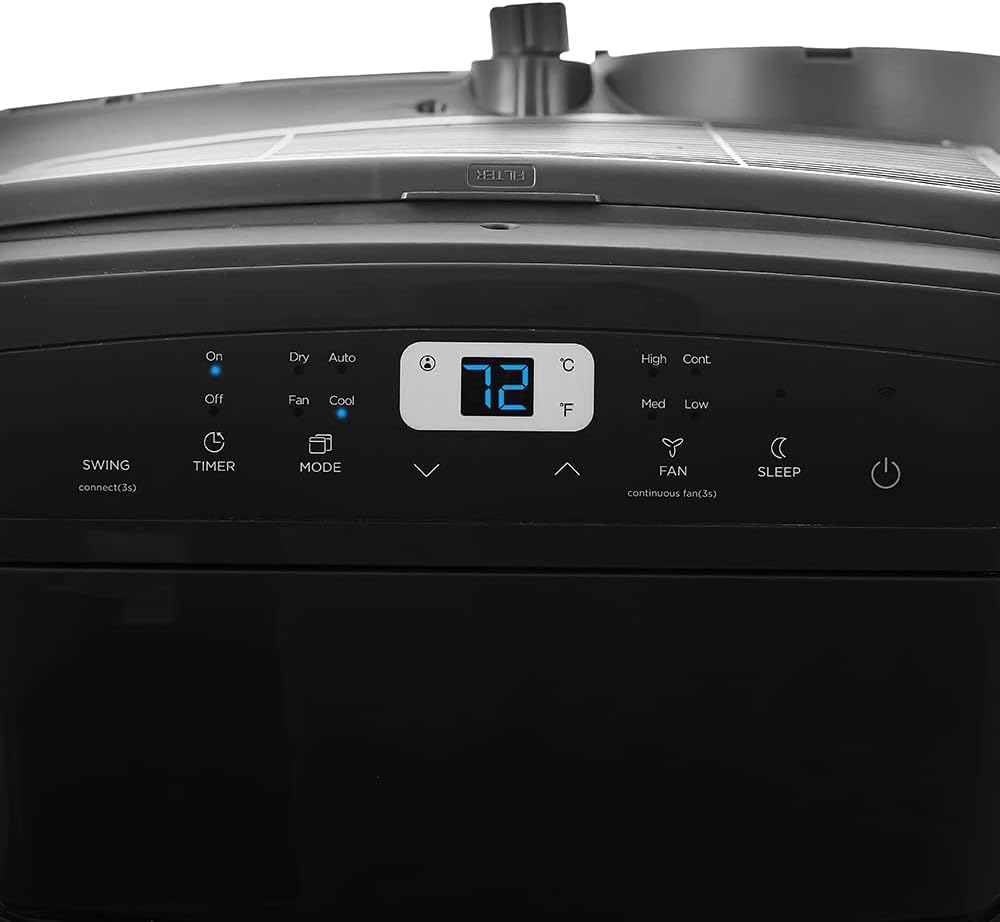
Image: Close-up view of the Midea portable air conditioner's top control panel, showing various buttons and the digital display.
The control panel provides access to all functions of the air conditioner. Below is a description of each button and indicator:
- On/Off Button: Powers the unit on or off.
- Timer Button: Sets the auto-on or auto-off time (up to 24 hours).
- Mode Button: Cycles through operating modes: Cool, Dry (Dehumidify), Fan, and Auto.
- Temperature Up/Down Arrows: Adjusts the desired temperature setting. The digital display shows the set temperature in Celsius or Fahrenheit.
- Fan Speed Buttons (High, Med, Low, Cont.): Selects the fan speed. "Cont." likely refers to Continuous Fan mode.
- Sleep Button: Activates Sleep mode for quiet operation and gradual temperature adjustment during sleep.
- Swing Button: Activates or deactivates the automatic louver swing for wider air distribution. Press and hold for 3 seconds to connect to Wi-Fi.
- Digital Display: Shows the set temperature or timer settings.
- Filter Indicator: Illuminates when the air filter needs cleaning.
Installation Guide
Proper installation is crucial for the efficient operation of your portable air conditioner. This unit is designed for use with a window exhaust kit.
Window Kit Installation
- Prepare the Window: Open the window and place the window slide kit into the window opening. The kit is adjustable to fit window widths between 19.4 inches and 62.2 inches, and a minimum height of 6.4 inches.
- Secure the Kit: Extend the adjustable panels to fit the window frame snugly. Use the provided screws or clamps to secure the kit in place, ensuring a tight seal to prevent air leakage.
- Attach Exhaust Hose to Adapter: Connect one end of the exhaust hose to the hose adapter that will fit into the window kit. Twist or snap into place as per the design.
- Attach Exhaust Hose to Unit: Connect the other end of the exhaust hose to the exhaust port on the back of the portable AC unit. Ensure a secure connection.
- Insert Hose into Window Kit: Insert the hose adapter with the attached exhaust hose into the opening in the window slide kit. Ensure it is firmly seated to prevent hot air from re-entering the room.
- Position the Unit: Place the portable AC unit on a flat, stable surface, ensuring there is at least 20 inches (50 cm) of clearance around the unit for proper airflow.
Note: For optimal performance, minimize bends in the exhaust hose and keep its length as short as possible to ensure efficient heat expulsion.
Operating Instructions
This section details how to operate your Midea portable air conditioner using the control panel or remote control.
Power On/Off
- Plug the unit into a grounded electrical outlet.
- Press the On/Off button on the control panel or remote control to turn the unit on or off.
Selecting Operating Mode
Press the MODE button repeatedly to cycle through the available modes:
- Cool Mode: For cooling the room. Adjust temperature using the Up/Down arrows.
- Dry Mode (Dehumidify): Reduces humidity in the room. The fan operates at a low speed.
- Fan Mode: Circulates air without cooling. Select fan speed (High, Med, Low).
- Auto Mode: The unit automatically selects the operating mode (Cool, Dry, or Fan) based on the ambient room temperature.
Temperature and Fan Speed Adjustment
- Temperature: In Cool or Auto mode, use the Up or Down arrows to set your desired temperature.
- Fan Speed: In Cool or Fan mode, press the Fan Speed button to cycle through High, Medium, Low, or Continuous Fan (Cont.) settings.
Timer Function
The Timer function allows you to set a time for the unit to automatically turn on or off.
- To set Auto-Off: With the unit running, press the TIMER button. Use the Up/Down arrows to set the desired number of hours (1-24) after which the unit will turn off.
- To set Auto-On: With the unit off, press the TIMER button. Use the Up/Down arrows to set the desired number of hours (1-24) after which the unit will turn on.
- To cancel the timer, press the TIMER button again before the set time expires.
Sleep Mode
Press the SLEEP button to activate Sleep mode. In this mode, the unit operates quietly, and the set temperature will gradually increase (in Cool mode) or decrease (in Heat mode, if applicable) over several hours to maintain comfort while saving energy.
Swing Function
Press the SWING button to activate the automatic louver swing, which helps distribute cool air more evenly throughout the room. Press again to stop the swing at a desired angle.
Smart Features and Voice Control
Your Midea portable air conditioner is equipped with smart features, allowing you to control it remotely via the MideaAir app and integrate with voice assistants.
Connecting to Wi-Fi (MideaAir App)
- Download the MideaAir app from your smartphone's app store (iOS or Android).
- Create an account or log in.
- Ensure your portable AC unit is plugged in and powered on.
- In the MideaAir app, follow the on-screen instructions to add a new device.
- On the unit's control panel, press and hold the SWING button for 3 seconds until the Wi-Fi indicator starts blinking, indicating it's in pairing mode.
- Follow the remaining steps in the app to connect your unit to your home Wi-Fi network.
Once connected, you can remotely control the unit, set schedules, change modes, and monitor its status from your smartphone.
Voice Control (Amazon Alexa & Google Assistant)
After successfully connecting your unit to the MideaAir app, you can link it to your Amazon Alexa or Google Assistant account.
- Open the Amazon Alexa app or Google Home app.
- Navigate to the "Skills & Games" (Alexa) or "Works with Google" (Google Home) section.
- Search for the "MideaAir" skill/service and enable it.
- Link your MideaAir account when prompted.
- Discover devices. Your portable AC should now appear as a controllable device.
You can now use voice commands such as: "Alexa, turn on the air conditioner," "Hey Google, set the AC to 72 degrees," or "Alexa, what mode is the air conditioner in?"
Maintenance and Care
Regular maintenance ensures optimal performance and extends the lifespan of your portable air conditioner. Always unplug the unit before performing any maintenance.
Cleaning the Air Filter
The air filter should be cleaned every two weeks or when the "Filter" indicator light illuminates.
- Turn off and unplug the unit.
- Locate the air filter panel (usually on the back or side of the unit).
- Remove the filter.
- Clean the filter using a vacuum cleaner to remove dust, or wash it gently with warm water and mild detergent.
- Rinse thoroughly and allow the filter to air dry completely before reinstalling. Do not expose to direct sunlight.
- Reinstall the dry filter into the unit.
Draining Water
This unit features evaporative technology, which typically re-evaporates most condensed water. However, in high humidity conditions, the internal water tank may fill up. The unit will stop operating and display an error code (e.g., "FL" for Full Tank) when the tank is full.
- Turn off and unplug the unit.
- Place a shallow pan or bucket under the drain port (usually located at the bottom rear of the unit).
- Remove the drain plug/cap.
- Allow all water to drain completely.
- Replace the drain plug/cap securely.
For continuous draining in Dry (Dehumidify) mode, attach the provided drain hose to the continuous drain port and route it to a floor drain or bucket.
Storage
If storing the unit for an extended period:
- Drain all condensed water from the unit.
- Clean the air filter.
- Run the unit in Fan mode for a few hours to dry the interior.
- Unplug the power cord and coil it neatly.
- Store the unit in a cool, dry place, away from direct sunlight and extreme temperatures.
Troubleshooting
Before contacting customer service, please refer to the following table for common issues and their solutions.
| Problem | Possible Cause | Solution |
|---|---|---|
| Unit does not turn on. | No power; Power cord unplugged; Circuit breaker tripped; Full water tank. | Ensure unit is plugged in; Check circuit breaker; Drain water tank if "FL" error is displayed. |
| Unit does not cool sufficiently. | Air filter dirty; Room too large; Doors/windows open; Exhaust hose not properly installed; Temperature setting too high. | Clean air filter; Ensure room size is within specifications (450 sq ft); Close all doors/windows; Check exhaust hose for kinks or leaks; Lower temperature setting. |
| Unit is noisy. | Unit not on a level surface; Air filter dirty; Obstruction in fan. | Place unit on a flat, stable surface; Clean air filter; Check for and remove any obstructions. |
| "FL" or "P1" error code displayed. | Internal water tank is full. | Drain the water tank as per the "Draining Water" section. |
| Wi-Fi connection issues. | Incorrect Wi-Fi password; Unit too far from router; Router issues. | Re-enter Wi-Fi password; Move unit closer to router; Restart router; Ensure 2.4GHz Wi-Fi network is used. |
Specifications
| Feature | Detail |
|---|---|
| Brand | Midea |
| Model Number | MAP10S1WBL |
| Cooling Capacity (ASHRAE) | 13,500 BTU |
| Cooling Capacity (SACC) | 10,300 BTU (10,000 British Thermal Units) |
| Dehumidifying Capacity | 44 Pints/Day |
| Coverage Area | Up to 450 Square Feet |
| Power Source | 115V, Corded Electric |
| Noise Level | 56 dB |
| Refrigerant Type | R-32 |
| Product Dimensions (D x W x H) | 30.12" x 18.39" x 15.63" |
| Net Weight | 76.74 lbs |
| Min/Max Window Opening Width | 19.4 / 62.2 inches |
| Min Window Opening Height | 6.4 inches |
| Special Features | Remote Controlled, Portable, Wi-Fi Enabled, Voice Control (Alexa, Google Assistant) |
| Filter Type | Air Fresh Filter |
Warranty and Support
Midea products are manufactured to the highest quality standards. For specific warranty details regarding your MAP10S1WBL portable air conditioner, please refer to the warranty card included with your product or visit the official Midea website.
If you encounter any issues not covered in the troubleshooting section or require further assistance, please contact Midea Customer Support. Contact information can typically be found on the Midea website or in your product packaging.