1. Introduction
The Briidea Powered Anode Rod is an advanced solution designed to protect your water heater tank from corrosion, reduce limescale accumulation, and eliminate unpleasant odors such as the rotten egg/sulfur smell often associated with hot water. Unlike traditional sacrificial anode rods, this powered titanium rod offers a longer service life and requires minimal maintenance, ensuring clean and clear hot water for your household.

Figure 1.1: Overview of Briidea Powered Anode Rod benefits including odor removal, limescale reduction, and corrosion protection.

Figure 1.2: Comparison illustrating the superior protection and longevity of the Powered Anode Rod over traditional anode rods.
2. Safety Information
Please read and follow all instructions carefully before installation and use. Failure to do so can result in property damage, personal injury, or death. This product should be installed by a qualified person in accordance with all local and national plumbing and electrical codes.
- Power Off: Always turn off the electrical power to your water heater at the circuit breaker before beginning any installation or maintenance.
- Water Shut-Off: Close the cold water supply valve to the water heater before proceeding.
- Hot Water Hazard: Water inside the tank can be extremely hot. Wear appropriate personal protective equipment, including gloves and eye protection, when handling components or draining water.
- Pressure Relief: Relieve water pressure from the tank by opening a hot water faucet in your home before draining.
- Grounding: Ensure proper grounding of the powered anode rod system to prevent electrical hazards.
- Leak Check: After installation, carefully check for any leaks before restoring full power and water supply.
3. Package Contents
Verify that all items are included in your package:
- 1x Briidea Powered Anode Rod (Titanium with Ruthenium-Iridium coating)
- 1x Power Adapter with LED indicator
- 1x Connection Wire with crimp terminals
- 1x Roll of Teflon Tape
Video 3.1: Unboxing the Briidea Powered Anode Rod, showing the components included in the package.
4. Setup & Installation
4.1. Tools Needed
- 1-1/16 inch socket (for removing old anode rod)
- Breaker bar or impact wrench (for stubborn old anode rods)
- Crescent wrench or channel lock (for tightening new anode rod)
- Bucket (for draining water)
- Gloves and eye protection
- Screwdriver (for ground wire attachment)
4.2. Pre-Installation Steps
- Turn off Power: Locate your water heater's circuit breaker and turn off the power supply.
- Shut off Water: Close the cold water supply valve to your water heater.
- Relieve Pressure & Drain Water: Open a hot water faucet in your home to relieve pressure. Drain approximately 1-2 gallons of water from the water heater using the drain valve at the bottom of the tank. This will lower the water level below the anode rod opening.
4.3. Removing the Old Anode Rod
- Locate the existing anode rod, usually found on the top of the water heater.
- Using a 1-1/16 inch socket and a breaker bar or impact wrench, carefully loosen and remove the old anode rod. Be prepared for potential resistance as old rods can be very tight.
- Carefully extract the old rod. If space is limited, you may need to bend or cut the old rod in sections to remove it.
Video 4.1: Demonstration of removing an old anode rod and showing its corroded state.
4.4. Installing the New Briidea Powered Anode Rod
- Remove any plastic wrapping from the threads of the new Briidea Powered Anode Rod.
- Apply the provided Teflon tape clockwise around the threads of the new anode rod to ensure a watertight seal.
- Carefully insert the new anode rod into the opening on top of the water heater.
- Hand-tighten the rod until snug, then use a crescent wrench or channel lock to fully tighten it. Do not overtighten.
- Connect the red terminal of the provided connection wire to the terminal on top of the anode rod. Crimp it securely with pliers.
- Attach the looped ground terminal of the connection wire to an existing panel screw on the water heater. Ensure good metal-to-metal contact.
- Route the power adapter cable ensuring it does not touch any hot pipes or surfaces.
- Slowly open the cold water supply valve to refill the water heater. Once the tank is full, check for any leaks around the newly installed anode rod.
- Plug the power adapter into a standard electrical outlet. The LED indicator on the adapter should illuminate green, indicating proper function.

Figure 4.1: Step-by-step visual guide for installing the Briidea Powered Anode Rod.
Video 4.2: Detailed installation process, including water shut-off, old rod removal, new rod insertion, and power connection.
5. Operating Instructions
Once installed and powered, the Briidea Powered Anode Rod continuously works to protect your water heater. The green LED on the power adapter indicates that the system is active and functioning correctly. You should notice a significant reduction or complete elimination of sulfur smell in your hot water within 24 hours of activation.
6. Maintenance
The Briidea Powered Anode Rod is designed to be largely maintenance-free, offering a service life of up to 20 years. However, periodic checks are recommended:
- LED Indicator: Periodically check the green LED on the power adapter to ensure it remains illuminated, confirming the rod is active.
- Leak Inspection: Occasionally inspect the area around the anode rod connection for any signs of water leakage.
7. Troubleshooting
- Sulfur Smell Persists:
- Ensure the water heater tank is completely full and the power adapter's green LED is on.
- Allow up to 24 hours for the sulfur smell to fully dissipate after installation.
- Verify all connections are secure and the ground wire is properly attached. - Power Adapter LED is Off:
- Check if the power adapter is securely plugged into a working outlet.
- Ensure the connection wire from the adapter to the anode rod is secure.
- Confirm the anode rod is properly installed and submerged in water. - Water Leakage Around Anode Rod:
- Turn off water supply and power to the water heater immediately.
- Re-tighten the anode rod connection, ensuring the Teflon tape is correctly applied.
- If leakage persists, consult a qualified plumber.
8. Specifications
| Brand | Briidea |
| Model Number | HARW-01 |
| Compatible Tank Capacity | 40-89 Gallons |
| Product Dimensions | 1"W x 12.3"H |
| Item Weight | 1.52 pounds |
| Anode Rod Material | Titanium with Ruthenium-Iridium coating |
| Tube Material | Stainless Steel (3/4'' NPT) |
| Pipe Material | HDPE Plastic |
| Power Source | Corded Electric |
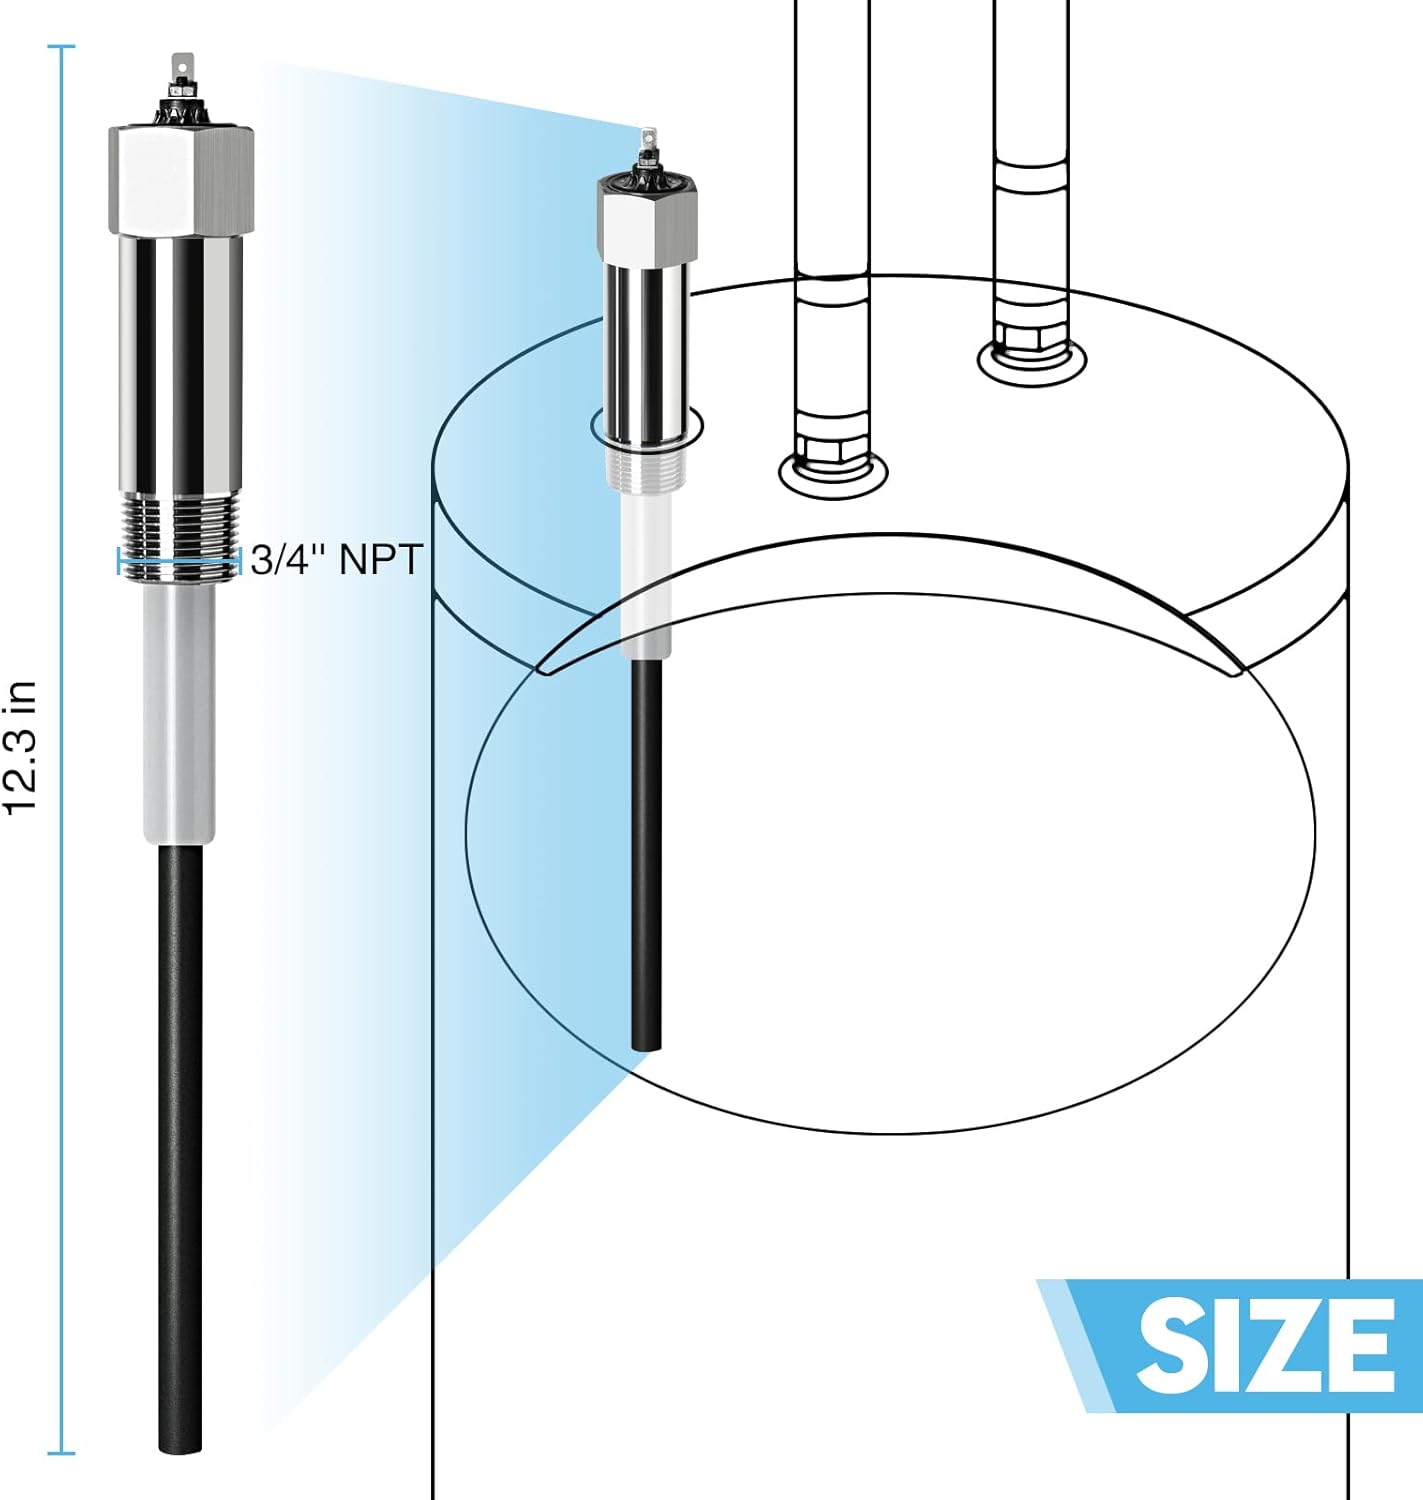
Figure 8.1: Dimensions of the Briidea Powered Anode Rod.
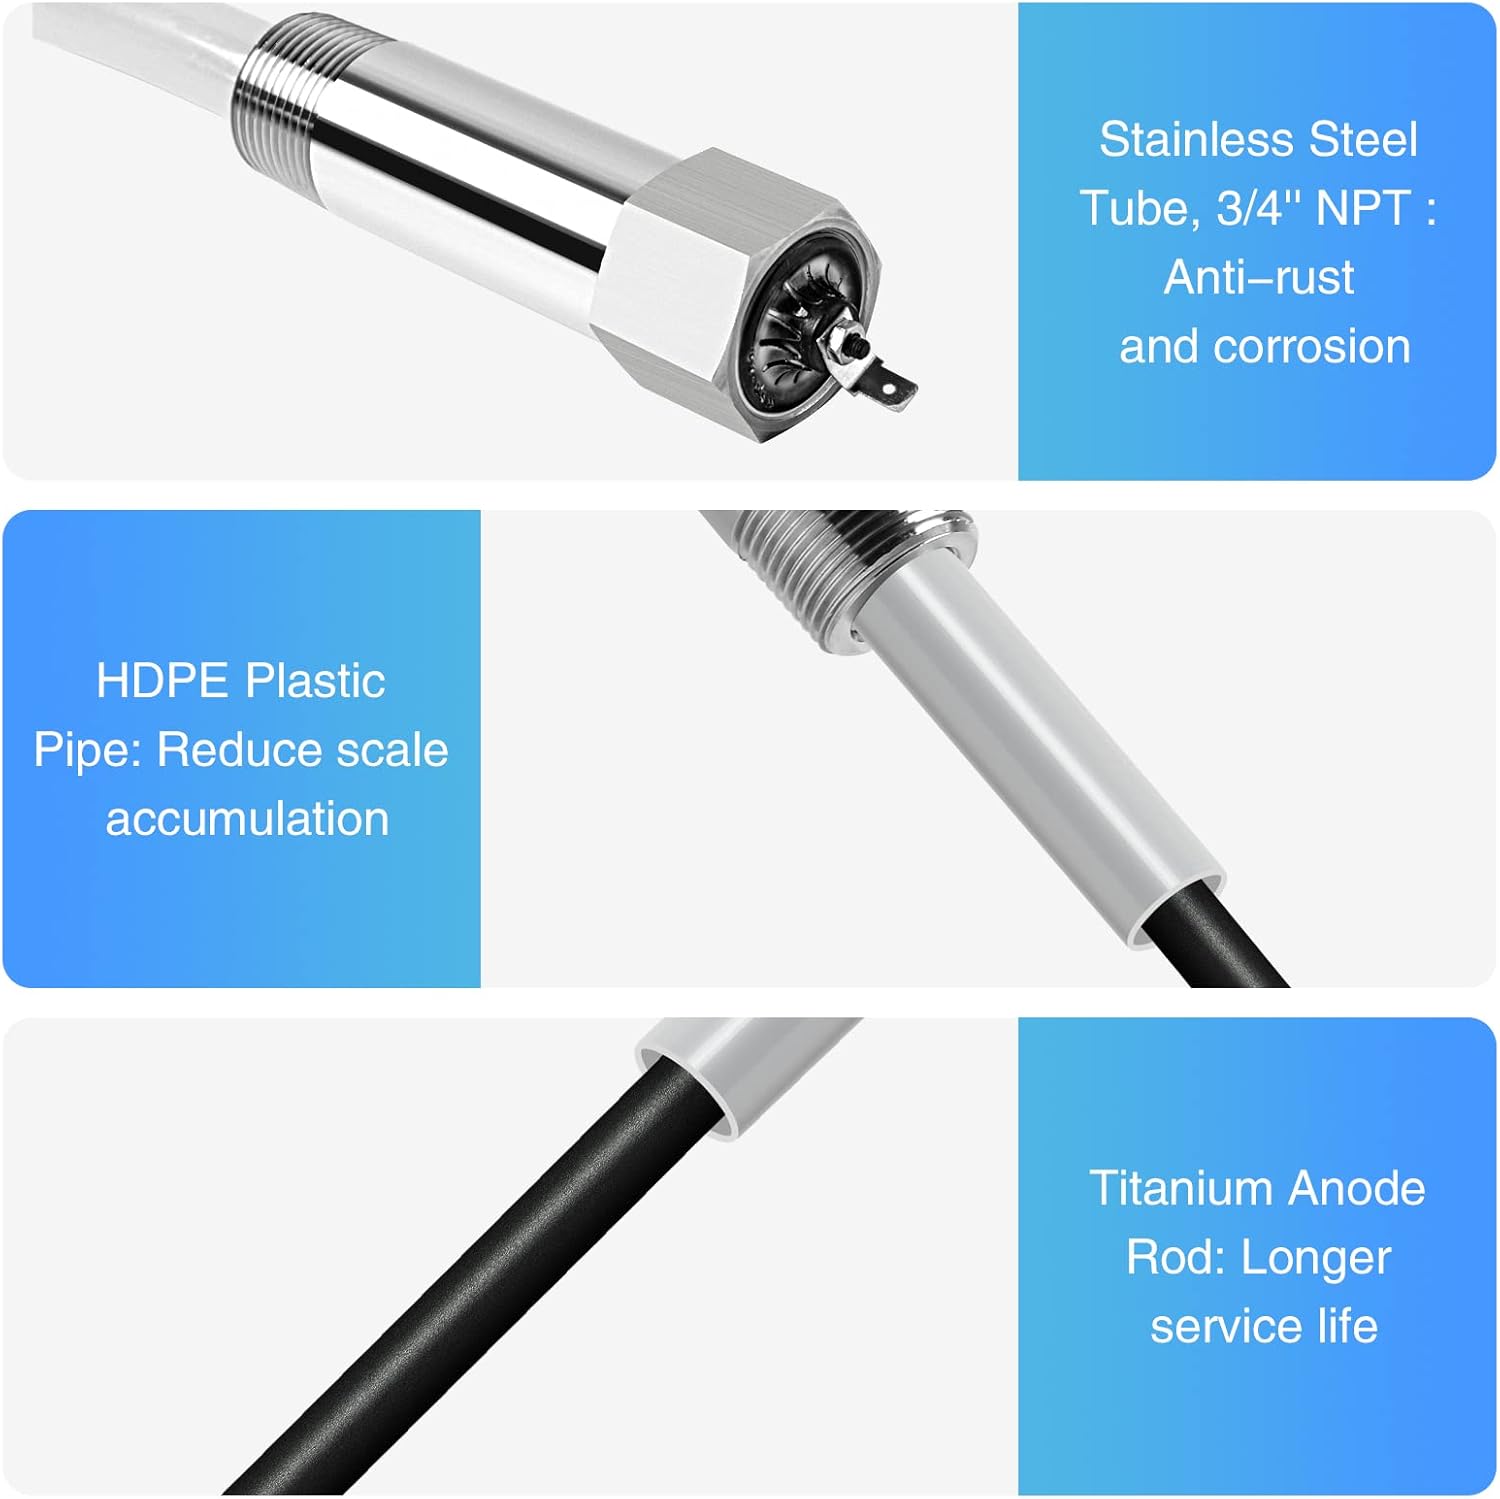
Figure 8.2: Detailed view of the anode rod's construction materials.
9. Warranty & Support
The Briidea Powered Anode Rod is designed for a long service life, with some models offering up to a 20-year warranty. Please refer to your product packaging for specific warranty details.
For technical support or further assistance, please contact Briidea customer service through their official website or the retailer where the product was purchased.


