
1. Introduction
Thank you for choosing the TOOLPORT 3x3m Folding Gazebo Tent. This manual provides essential information for the safe and efficient assembly, operation, and maintenance of your gazebo. Please read these instructions carefully before use and retain them for future reference.
This gazebo is designed for portable weather protection, featuring a robust steel frame with a scissor mechanism and click system for quick setup. The roof tarp is made from 350 g/m² high-performance polyester with an additional PVC coating, ensuring 100% waterproofing and effective protection against various weather conditions.
2. Safety Instructions
WARNING: Failure to follow these safety instructions may result in injury or damage to the product.
- Wind and snow loads have not been tested for this product.
- Ensure the folding gazebo is installed correctly and securely anchored to prevent movement.
- Immediately clear any light snowfall from the roof to prevent accumulation and potential collapse.
- In case of strong winds, heavy rain, or significant snowfall, temporary disassembly of the gazebo is strongly recommended to prevent damage.
- Keep the tarp material away from all heat sources and open flames to avoid fire hazards.
- Always supervise children around the gazebo.
- Do not hang heavy objects from the gazebo frame.
- Regularly inspect all components for wear or damage. Do not use if any parts are compromised.
3. Package Contents
Verify that all components are present before beginning assembly:
- Folding Gazebo Frame (steel structure with pop-up/scissor mechanism)
- Roof Tarp (100% waterproof, PVC coated polyester)
- Sidewalls (with windows, quantity may vary)
- Additional Tension Ropes
- Pegs for anchoring
- Robust Transport Bag
- Assembly Instructions (this manual)
4. Setup Instructions
The gazebo is designed for easy assembly by 1 to 2 people without tools.
- Unpack the Frame: Remove the folded gazebo frame from its transport bag. Place it in the desired location.
- Partially Expand the Frame: With a person on each side, gently pull the outer legs of the frame outwards until it is partially expanded.
- Attach the Roof Tarp: Carefully place the roof tarp over the partially expanded frame. Ensure the tarp is correctly oriented and secured at all corners.
- Fully Expand the Frame: Continue pulling the outer legs until the scissor mechanism fully extends and the frame locks into place using the click system. Ensure all locking pins are engaged.
- Adjust Height: Use the height adjustment mechanism on each leg to set the desired height. Ensure all legs are set to the same height for stability.
- Attach Sidewalls (Optional): If using sidewalls, attach them to the frame using the integrated fasteners (e.g., Velcro, zippers). Ensure windows are correctly positioned.
- Anchor the Gazebo: Secure the gazebo to the ground using the provided pegs and tension ropes. This is crucial for stability, especially in windy conditions.

Image: The folded gazebo frame, ready for expansion.
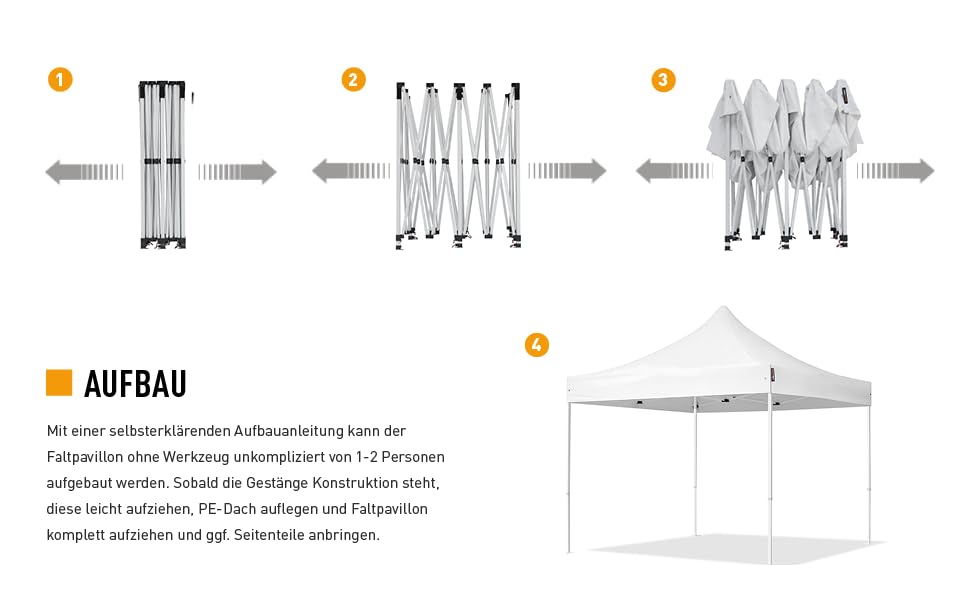
Image: Graphic illustrating the quick assembly process of the gazebo.

Image: Close-up of the robust frame connection points, showing the scissor mechanism.
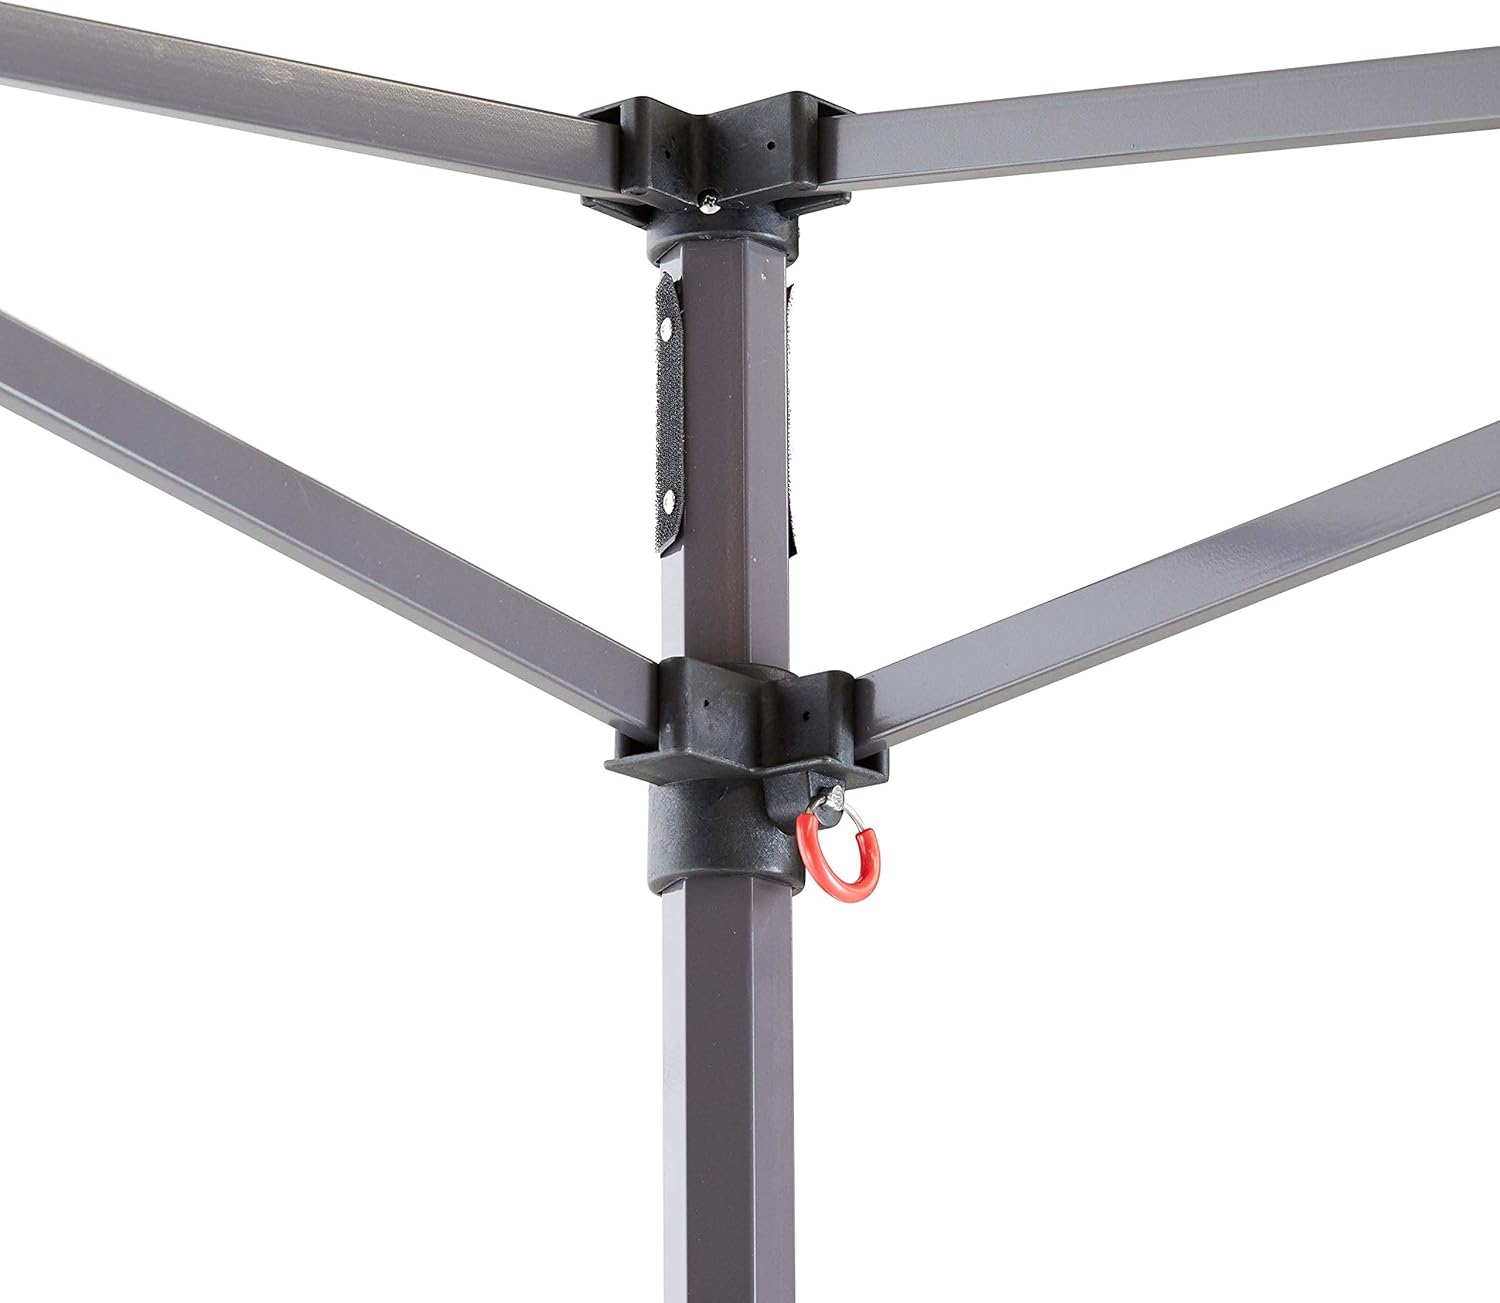
Image: Detail of the top frame connection, highlighting the red ring for secure locking.

Image: The sturdy base plate of a gazebo leg, designed for anchoring.
5. Operating Instructions
5.1 Height Adjustment
The gazebo can be adjusted to 5 different height positions. To adjust the height:
- Locate the red ring mechanism on each leg.
- Press the button or pull the ring to release the locking pin.
- Carefully slide the inner leg up or down to the desired height.
- Ensure the locking pin re-engages securely in one of the 5 pre-drilled holes.
- Repeat for all four legs, ensuring they are all set to the same height for stability.

Image: Close-up of the leg showing the red ring mechanism for height adjustment.
5.2 Sidewall Usage
The provided sidewalls can be attached to fully enclose the gazebo. They feature robust arched windows made of transparent multi-layer PVC, offering a decorative look and a bright, friendly atmosphere. Depending on the gazebo size, sidewalls may include one or more zippered doors for easy access.
6. Maintenance
6.1 Cleaning
- Frame: Wipe the steel frame with a damp cloth and mild detergent. Dry thoroughly to prevent rust.
- Tarp and Sidewalls: Clean the polyester/PVC tarp and sidewalls with a soft brush or cloth and mild soapy water. Rinse thoroughly with clean water and allow to air dry completely before folding and storing. Do not use harsh chemicals or abrasive cleaners.

Image: Water droplets beading on the waterproof gazebo fabric, demonstrating its protective qualities.
6.2 Storage
For prolonged product life, especially during off-season or adverse weather conditions:
- Disassemble the gazebo following the reverse of the setup instructions.
- Ensure all fabric components (tarp, sidewalls) are completely dry before folding to prevent mold and mildew.
- Store the frame and fabric components in the robust transport bag provided.
- Store in a cool, dry place, away from direct sunlight and extreme temperatures.

Image: A person easily transporting the folded gazebo in its wheeled storage bag.
7. Troubleshooting
This section addresses common issues you might encounter:
- Gazebo is unstable: Ensure all legs are fully extended and locked at the same height. Verify that the gazebo is properly anchored with pegs and tension ropes. Check for uneven ground.
- Water pooling on roof: Ensure the roof tarp is taut and correctly installed. Adjust the height if necessary to create proper tension and allow water runoff.
- Difficulty expanding/folding frame: Check for any obstructions or misaligned parts. Ensure all locking pins are disengaged when folding. Apply a silicone-based lubricant to moving parts if necessary.
- Tears in fabric: Small tears can often be repaired with a suitable repair kit for PVC/polyester fabrics. For larger damage, replacement parts may be required.
8. Specifications
| Feature | Detail |
|---|---|
| Model Number | 600107 |
| Product Dimensions (L x W x H) | 300 x 300 x 340 cm (approx. 9.84 x 9.84 x 11.15 ft) |
| Adjustable Height Range | 3.10 m - 3.40 m (10.17 ft - 11.15 ft) |
| Passage Height | 1.79 m - 2.09 m (5.87 ft - 6.86 ft) |
| Item Weight | 53.4 Kilograms |
| Frame Material | Alloy Steel (powder-coated, hexagonal profile legs, approx. 40mm diameter, 1.2mm wall thickness) |
| Roof Tarp Material | Approx. 520 g/m² PES (Polyester) with PVC coating (weight tolerance +/- 10%) |
| Water Resistance Level | Waterproof |
| UV Protection | UV 50+ |
| Color | Black |
| Assembly Required | No (Pop-up mechanism) |

Image: Diagram illustrating the key dimensions of the 3x3m gazebo, including height and width.
9. Warranty and Support
Specific warranty details are not provided in this manual. For information regarding warranty coverage, spare parts availability, or technical support, please contact TOOLPORT customer service directly or visit their official website. Please have your model number (600107) and purchase information ready when contacting support.