
Introduction
Thank you for choosing the TOOLPORT 3x6m Premium Steel Folding Party Tent. This manual provides essential information for the safe and efficient assembly, operation, and maintenance of your tent. Please read these instructions carefully before use and retain them for future reference.
Safety Information
WARNING: Failure to follow these safety instructions may result in injury or damage to the product.
- Always assemble the tent with at least two people.
- Do not use the tent in strong winds, heavy rain, or snow. Disassemble and store the tent during adverse weather conditions.
- Ensure the tent is securely anchored to the ground using ropes and stakes provided.
- Keep all flame and heat sources away from the tent fabric. The fabric is not fireproof.
- Regularly check all connections and components for wear or damage. Replace damaged parts immediately.
- Avoid placing heavy objects on the tent frame or hanging items from it.
Package Contents
Before assembly, ensure all components are present:
- Folding Steel Frame (1 unit)
- Roof Canopy (1 unit)
- Side Panels (quantity may vary based on specific model, this model has no windows)
- Guy Ropes (set)
- Ground Stakes (set)
- Transport Bag (1 unit)
- Instruction Manual (this document)
Setup Instructions
Follow these steps for proper assembly:
- Unpack the Frame: Remove the folded frame from its transport bag. Place it in the desired location. Two people should stand on opposite sides of the frame.
- Partially Expand the Frame: Gently pull the outer legs apart until the frame is partially expanded. Do not fully extend yet.
- Attach the Roof Canopy: Drape the roof canopy over the partially expanded frame. Ensure the corners align with the frame's corners. Secure the canopy to the frame using the hook-and-loop fasteners or clips provided.
- Fully Expand the Frame: With the canopy attached, continue pulling the outer legs apart until the frame is fully extended and the locking mechanisms click into place.
- Adjust Leg Height: Press the red ring on each leg to release the locking pin and extend the legs to the desired height. Ensure all legs are at the same height for stability. Secure the locking pin in place.

Image: Close-up of the tent leg height adjustment mechanism. Press the red ring to adjust the leg height.
- Secure the Tent: Use the provided guy ropes and ground stakes to anchor the tent firmly to the ground. Attach ropes to the tent's corners and mid-points, then stake them into the ground at an angle.
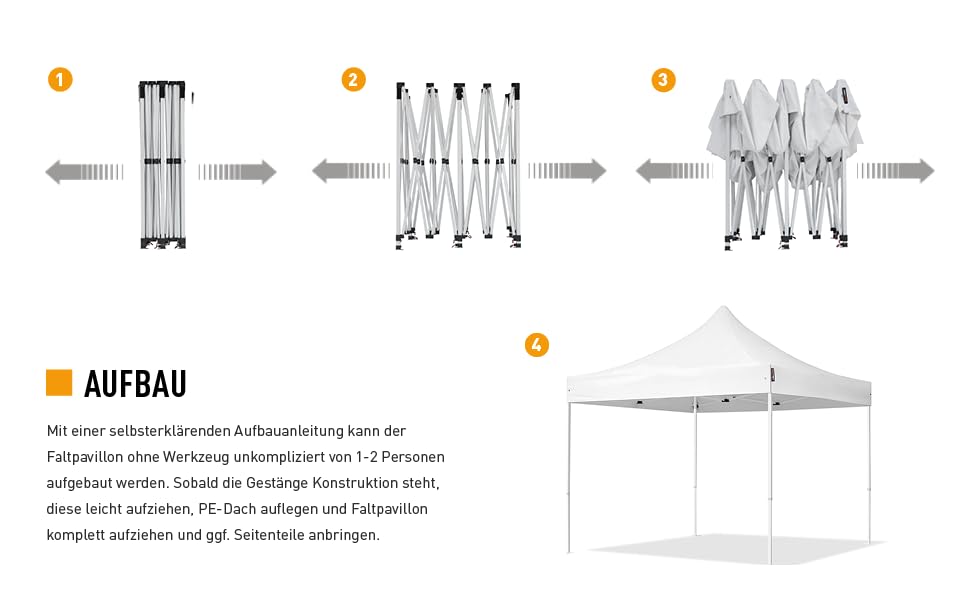
Image: Quick assembly diagram of the tent frame and canopy.
- Attach Side Panels (if applicable): If your model includes side panels, attach them using the hook-and-loop fasteners or zippers along the tent's perimeter.

Image: Detailed view of the folding pavilion's steel frame construction and robust joints.
Operating Guidelines
- Weather Conditions: This tent is designed for temporary use in fair weather. Do not leave it unattended during strong winds or heavy precipitation.
- Height Adjustment: The tent legs can be adjusted to multiple height settings. Always ensure all legs are locked at the same height for stability.
- Ventilation: If using the tent with side panels, ensure adequate ventilation, especially in warm weather.
Maintenance and Storage
- Cleaning the Canopy: Clean the polyester canopy with mild soap and water. Do not use harsh chemicals or abrasive cleaners. Allow the canopy to dry completely before folding and storing to prevent mildew.

Image: Close-up of the waterproof polyester fabric, showing its water-repellent properties.
- Frame Care: Wipe the steel frame with a damp cloth to remove dirt. Inspect the frame for any signs of rust or damage. The frame has an anti-corrosion sealed surface.
- Storage: Disassemble the tent by reversing the setup steps. Ensure all components are clean and dry. Fold the frame and canopy neatly and store them in the provided transport bag in a cool, dry place.

Image: A person easily transporting the folded tent frame in its robust wheeled transport bag.
Troubleshooting
| Problem | Possible Cause | Solution |
|---|---|---|
| Tent is unstable | Not properly anchored; legs uneven; frame not fully locked. | Ensure all legs are locked at the same height. Use all guy ropes and stakes. Check frame locking mechanisms. |
| Water pooling on roof | Insufficient tension on canopy; incorrect setup. | Ensure canopy is taut and properly secured to the frame. Adjust leg height if necessary to create proper slope. |
| Difficulty expanding/folding frame | Frame joints stiff; not enough people assisting. | Apply light lubricant to joints if stiff. Always use two people for assembly/disassembly. |
Specifications
- Model Number: 600125
- Dimensions (L x W x H): 600 x 300 x 350 cm (approx. 19.7 x 9.8 x 11.5 ft)

Image: Dimensional diagram of the tent, showing length, width, and height ranges.
- Weight: 91 kg
- Frame Material: Premium Steel (40mm hexagonal profile)
- Canopy Material: High-performance Polyester with PVC coating (750 N tear strength), 100% waterproof, UV protection 50+
- Color: White
- Water Resistance Level: Waterproof
- Assembly Required: Yes (2 people recommended)
- Country of Origin: Germany
Warranty and Support
For warranty information and customer support, please refer to the documentation provided at the time of purchase or visit the official TOOLPORT website. Keep your purchase receipt as proof of purchase.