Introduction
This manual provides detailed instructions for the proper use and maintenance of your CAMMHD H4-32G Body Camera. Please read this manual thoroughly before operating the device to ensure optimal performance and longevity.
What's in the Box
- 1*H4-32G Body Camera
- 1*Charger and 1*Mini USB cable
- 1* Long Clip and 1* Short Clip

Image: Contents of the CAMMHD H4-32G Body Camera package. Includes the camera, charger, USB cable, long clip, and short clip.
Product Overview
The CAMMHD H4-32G is a compact and versatile body camera designed for various recording needs. It features high-definition video and photo capabilities, night vision, and a long-lasting battery.
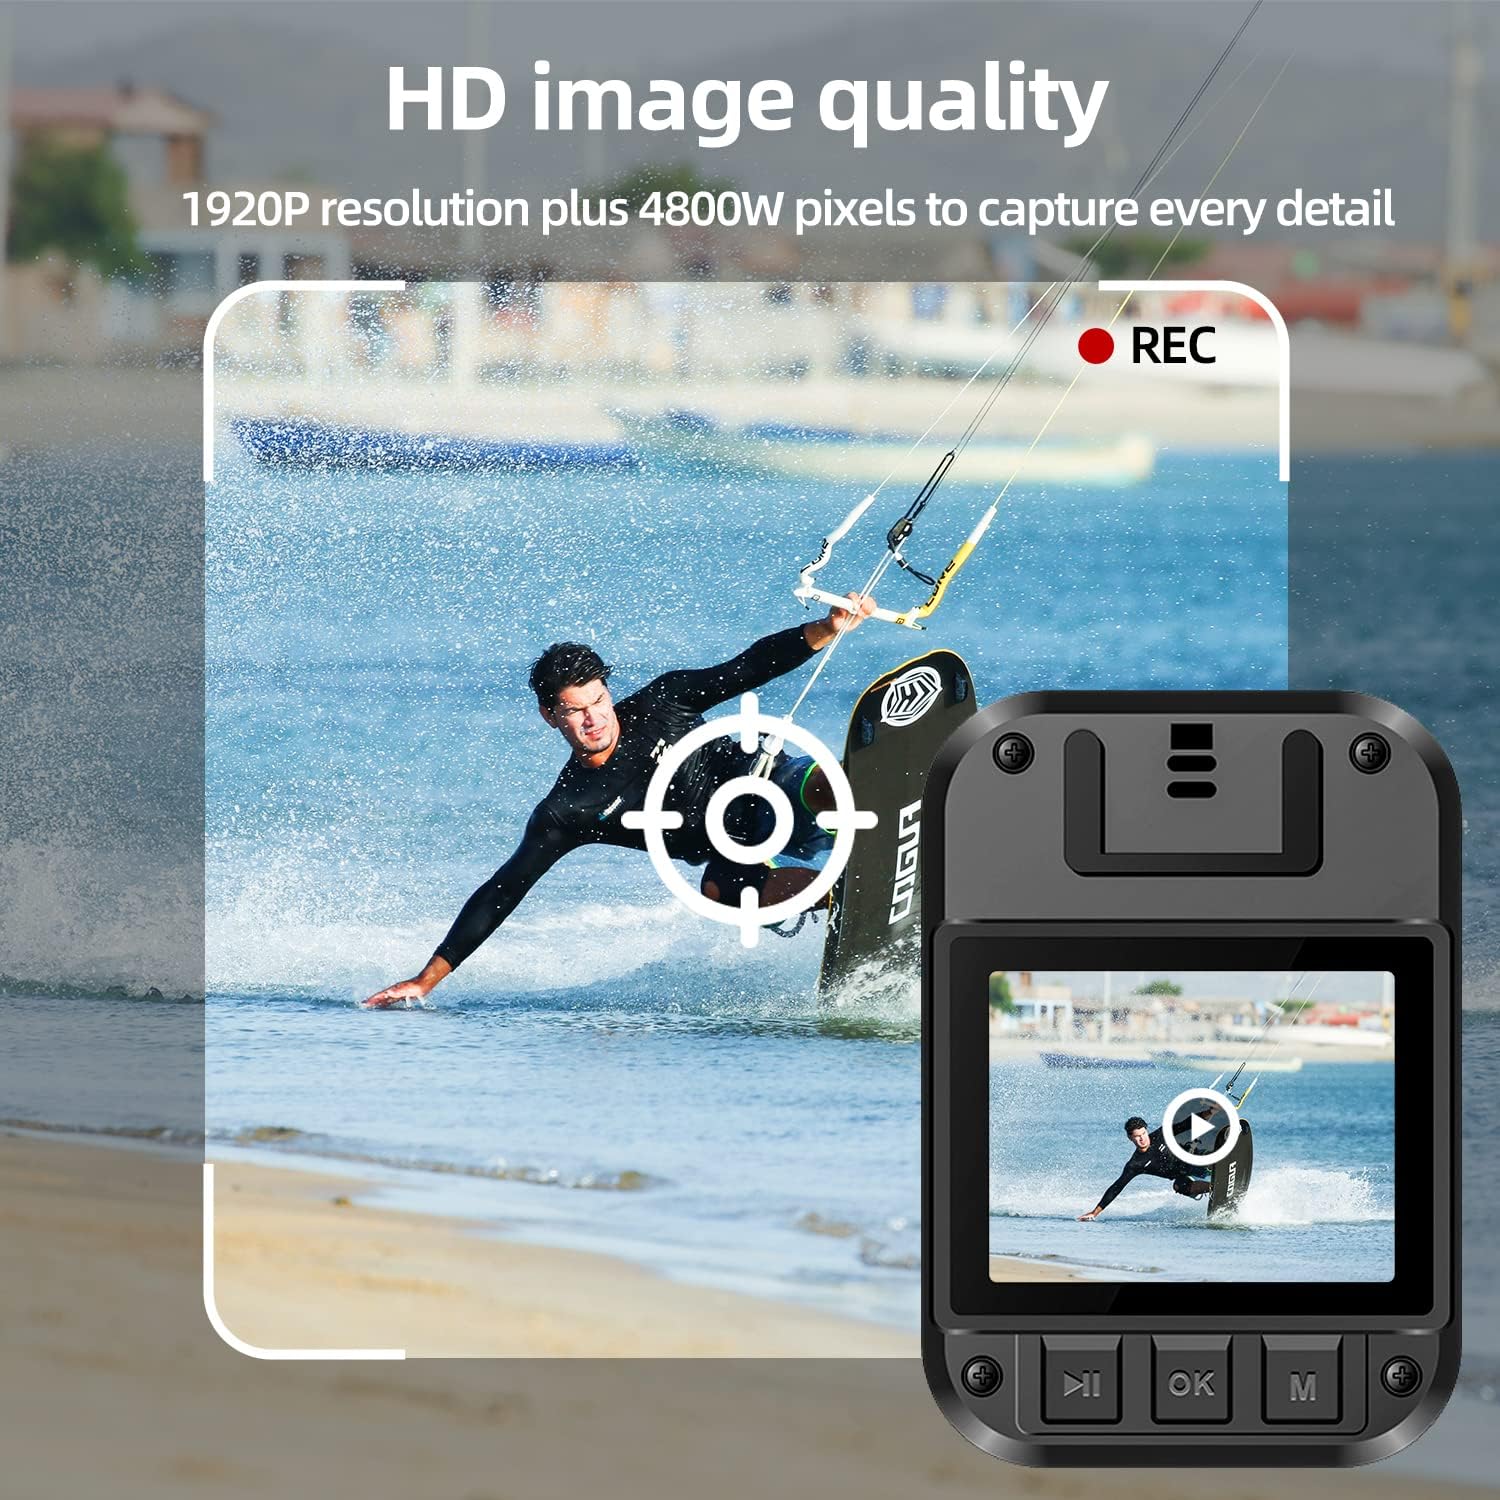
Image: Front view of the CAMMHD H4-32G Body Camera, highlighting the lens, infrared lights, and control buttons.
Key Features
- High-Definition Recording: Captures video at up to 1920P and photos at 48M pixels with a 160-degree wide-angle lens.
- Extended Battery Life: Equipped with a 3000mAh battery, providing up to 9 hours of continuous video recording.
- Integrated Storage: Includes 32GB of internal memory for storing recorded footage.
- Night Vision: Features 8 high-power infrared lights for clear recording up to 50 feet in low-light conditions.
- Motion Detection: Automatically starts recording when motion is detected.
- Loop Recording: Overwrites the oldest footage when memory is full, ensuring continuous recording.
- Security Features: Supports password protection to prevent unauthorized access to recorded data.
- One-Key Operation: Allows for quick activation of video recording in emergency situations.
- Alarm Function: Includes red and blue light alarm capabilities.
- OTG Functionality: Supports On-The-Go (OTG) for direct connection to compatible devices.
Video: An overview of the CAMMHD H4 body camera, demonstrating its features and design.
Setup
1. Charging the Battery
Before first use, fully charge the body camera. Connect the Mini USB cable to the camera and the charger, then plug the charger into a power outlet. The charging indicator light will show the charging status.
2. Attaching the Clip
Select either the long or short clip based on your preference. Align the clip with the slot on the back of the camera and slide it in until it clicks securely into place. Ensure the clip is firmly attached before use.

Image: Demonstrates the process of attaching the clip to the body camera for secure wearing.
3. Powering On/Off
- To Power On: Press and hold the power button until the screen illuminates and the device starts.
- To Power Off: Press and hold the power button until the device shuts down.
4. Initial Settings
Upon first power-on or after a reset, you may need to set the date, time, and preferred recording resolution. Navigate through the menu using the control buttons below the screen. Refer to the "Operating" section for detailed menu navigation.
Operation
1. Video Recording
- Start Recording: From standby mode, press the dedicated video recording button once to start recording. A red indicator light or on-screen icon will confirm recording is active.
- Stop Recording: Press the video recording button again to stop.
- Loop Recording: The camera supports loop recording. When the memory is full, the oldest files will be automatically overwritten by new recordings. This feature can usually be toggled in the settings menu.

Image: Demonstrates the HD image quality of the camera, capturing details in a dynamic scene.
2. Photo Capture
From standby mode, press the dedicated photo button to take a still image. The screen may briefly flash or an icon will indicate a photo has been taken.
3. Night Vision
The camera's infrared night vision can be activated manually or set to automatic mode via the settings. In automatic mode, the camera will switch to night vision when ambient light is low. The 8 infrared lights provide visibility up to 50 feet.

Image: Illustrates the camera's infrared night vision, showing a clear view in a dark environment.
4. Motion Detection
Enable motion detection in the camera's settings menu. When active, the camera will automatically begin recording when movement is detected within its field of view.
5. Password Protection
To protect your recorded data from unauthorized access or deletion, set a password through the camera's menu. This adds an extra layer of security to your footage.
6. OTG Function
The H4 body camera supports OTG (On-The-Go) functionality, allowing you to connect it directly to compatible devices (e.g., smartphones, tablets) to view or transfer files without needing a computer.
7. Red and Blue Light Alarm
Activate the red and blue light alarm function as needed. This feature can be used for signaling or to deter unwanted attention.
8. Playback
To review recorded videos and photos, navigate to the playback menu on the camera. Use the control buttons to select and play files. Videos, audio, and photos are watermarked with time to help restore the real scene.

Image: The camera's screen displaying a recorded video, demonstrating the playback function.
Maintenance
Cleaning
Use a soft, dry cloth to clean the camera body and lens. Avoid using harsh chemicals or abrasive materials, as these can damage the device. Ensure the camera is powered off before cleaning.
Storage
Store the camera in a cool, dry place away from direct sunlight and extreme temperatures. When storing for extended periods, ensure the battery is partially charged (around 50%) to prolong its lifespan.
Troubleshooting
- Camera does not power on:
- Ensure the battery is charged. Connect the camera to the charger and check if the charging indicator lights up.
- If the camera still does not power on after charging, contact customer support.
- Video quality is poor:
- Check the lens for smudges or dirt and clean it gently with a soft cloth.
- Ensure you are recording in the desired resolution setting (e.g., 1920P).
- Cannot transfer files to computer:
- Ensure the USB cable is securely connected to both the camera and the computer.
- Check if the camera is in the correct USB mode (e.g., Mass Storage) if applicable.
- Try a different USB port or cable.
- Battery life is shorter than expected:
- Continuous use of features like night vision or high-resolution recording can consume more power.
- Ensure the camera is fully charged before use.
- Battery performance can degrade over time with repeated charge cycles.
Specifications
| Feature | Specification |
|---|---|
| Model Name | H4 |
| Video Capture Resolution | Up to 1920P (Default 1080P) |
| Photo Resolution | 48M Pixels |
| Wide Angle | 160 degrees |
| Battery Capacity | 3000mAh Lithium Ion |
| Continuous Recording Time | Up to 9 hours |
| Internal Memory | 32GB |
| Night Vision Range | Up to 50 feet (with 8 infrared lights) |
| Connectivity | USB (supports OTG) |
| Item Weight | 3.88 ounces |
| Package Dimensions | 10.16 x 5.35 x 2.17 inches |

Image: Visual representation of the camera's dimensions and key specifications.
Warranty and Support
For warranty information or technical support, please refer to the documentation included with your purchase or visit the official CAMMHD website. If you encounter any issues not covered in this manual, please contact CAMMHD customer service for assistance.
You can visit the CAMMHD Store for more information and support resources.


