1. Introduction
This manual provides detailed instructions for the installation, operation, and maintenance of your Rosewill FBM-X2-400-HELIX Micro ATX Mini Tower PC Case. This versatile case is designed to accommodate Micro ATX and Mini ITX motherboards, offering a compact yet spacious solution for both office and gaming PC builds. It comes equipped with a pre-installed 400W power supply unit and features excellent airflow design.
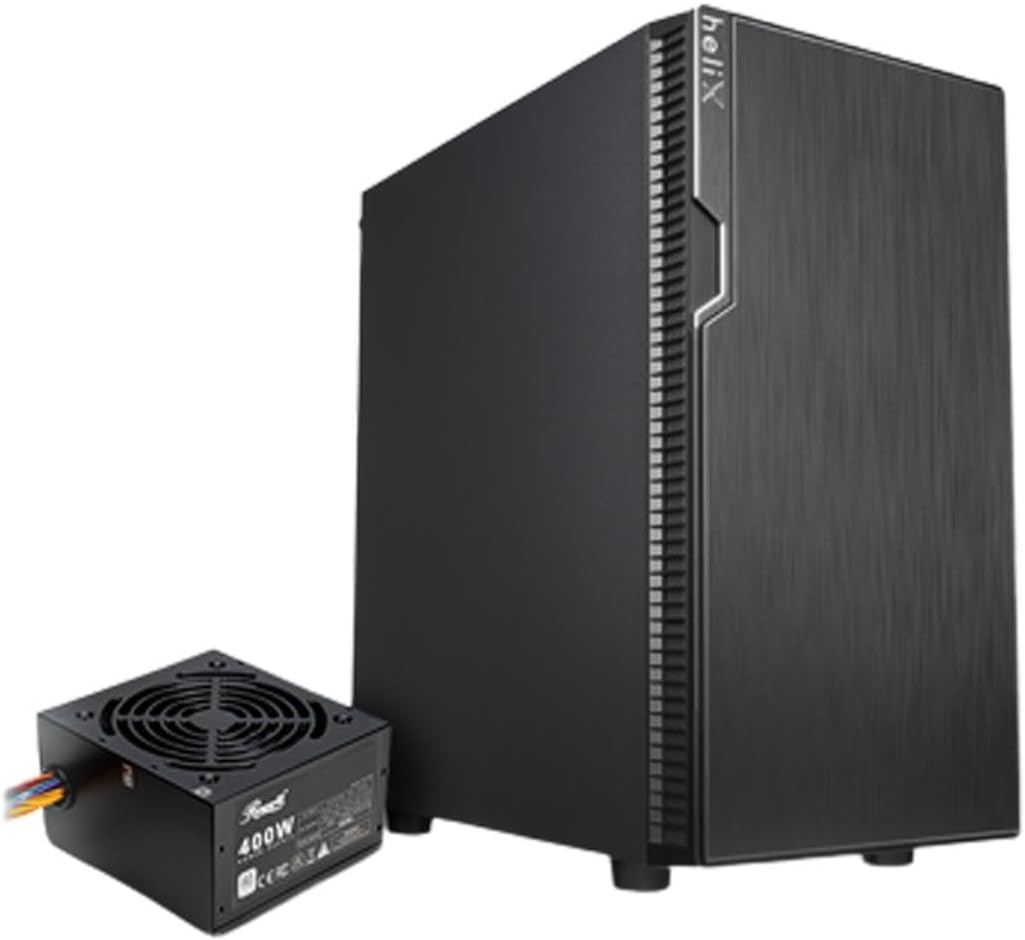
Figure 1: Rosewill FBM-X2-400-HELIX Micro ATX Mini Tower PC Case with included 400W Power Supply Unit.
2. Safety Information
- Always disconnect the power supply from the wall outlet before installing or servicing any components inside the PC case.
- Handle all components with care to prevent damage from electrostatic discharge (ESD). Consider using an anti-static wrist strap.
- Keep small parts and screws away from children.
- Ensure proper ventilation around the PC case to prevent overheating.
- Do not attempt to modify the case or its components, as this may void your warranty and pose safety risks.
3. Key Features
- Sleek Design: A versatile, compact, and sturdy steel/plastic mini case suitable for office or gaming PC systems.
- Spacious Interior: Features four expansion slots, one internal 3.5" drive bay, and three internal 2.5" drive bays. Supports Micro ATX or Mini ITX motherboards.
- Pre-Installed 400W Power Supply Unit: Includes a CE and FCC certified non-modular 400W PSU for convenience.
- Great Cable Management: Designed for easy organization of internal cables and wires.
- Excellent Airflow: Comes with one pre-installed 120mm fan in the rear. Supports two additional 120mm fans in the front and two 120mm fans on top, or one 240mm radiator in the front.
4. Specifications
| Feature | Specification |
|---|---|
| Brand | Rosewill |
| Model Name | FBM-X2-400-HELIX |
| Case Type | Mini-Tower |
| Motherboard Compatibility | Micro ATX, Mini ITX |
| Pre-Installed PSU | 400W (Non-Modular, CE/FCC Certified) |
| External Drive Bays | None |
| Internal 3.5" Drive Bays | 1 |
| Internal 2.5" Drive Bays | 3 |
| Expansion Slots | 4 |
| Front I/O Ports | 2x USB 2.0, 1x USB 3.0, Audio In/Out |
| Pre-Installed Fans | 1x 120mm Rear Fan |
| Fan Support (Front) | 2x 120mm |
| Fan Support (Top) | 2x 120mm |
| Radiator Support (Front) | 1x 240mm |
| Material | Alloy Steel, Plastic |
| Color | Black |
| Dimensions (LxWxH) | 16.75 x 16.65 x 10 inches |
| Item Weight | 11.82 pounds |
5. Package Contents
Please check the package contents upon unboxing to ensure all items are present:
- Rosewill FBM-X2-400-HELIX PC Case
- Pre-installed 400W Power Supply Unit
- Accessory Box (containing screws, standoffs, cable ties, etc.)
- User Manual (this document)
6. Setup and Installation
Follow these steps to assemble your PC within the Rosewill FBM-X2-400-HELIX case.
6.1. Preparation
- Unpack the PC case and place it on a stable, flat surface.
- Remove the side panels by unscrewing the thumbscrews at the rear of the case.
- Gather all necessary components: motherboard, CPU, RAM, storage drives, graphics card (if applicable), and any additional fans or radiators.

Figure 2: Internal layout of the PC case, highlighting the pre-installed power supply and available drive bays.
6.2. Motherboard Installation
- Install the CPU, CPU cooler, and RAM onto your Micro ATX or Mini ITX motherboard before placing it into the case.
- Align the motherboard with the standoffs inside the case. Ensure the I/O shield is properly seated in the rear opening.
- Secure the motherboard with the appropriate screws from the accessory kit.
6.3. Power Supply Unit (PSU)
The 400W PSU is pre-installed in the bottom rear section of the case. Connect the necessary power cables to your motherboard (24-pin ATX, 4/8-pin CPU), graphics card (if required), and storage drives.

Figure 3: Included PSU connectors for various components.
6.4. Storage Drive Installation
The case supports one 3.5" HDD and three 2.5" SSDs/HDDs.
- For 3.5" HDD: Locate the 3.5" drive bay and secure the drive using the provided screws.
- For 2.5" SSD/HDD: Mount the 2.5" drives to the designated mounting points using the provided screws.
- Connect SATA data and power cables to each installed drive.
6.5. Expansion Card Installation
The case provides four expansion slots for graphics cards or other PCI-E devices.
- Remove the necessary slot covers from the rear of the case.
- Insert your graphics card or other expansion card into the appropriate PCI-E slot on the motherboard.
- Secure the card with a screw.
6.6. Cable Management
Utilize the cable routing cutouts and tie-down points behind the motherboard tray to organize cables. This improves airflow and gives your build a cleaner appearance.
6.7. Front Panel Connections
Connect the front panel cables (USB 2.0, USB 3.0, HD Audio, Power Switch, Reset Switch, Power LED, HDD LED) to the corresponding headers on your motherboard. Refer to your motherboard manual for exact header locations.

Figure 4: Front I/O panel with USB 3.0, USB 2.0, and audio ports.
6.8. Cooling System
The case includes one pre-installed 120mm rear fan. Additional fans or a 240mm AIO radiator can be installed for enhanced cooling.
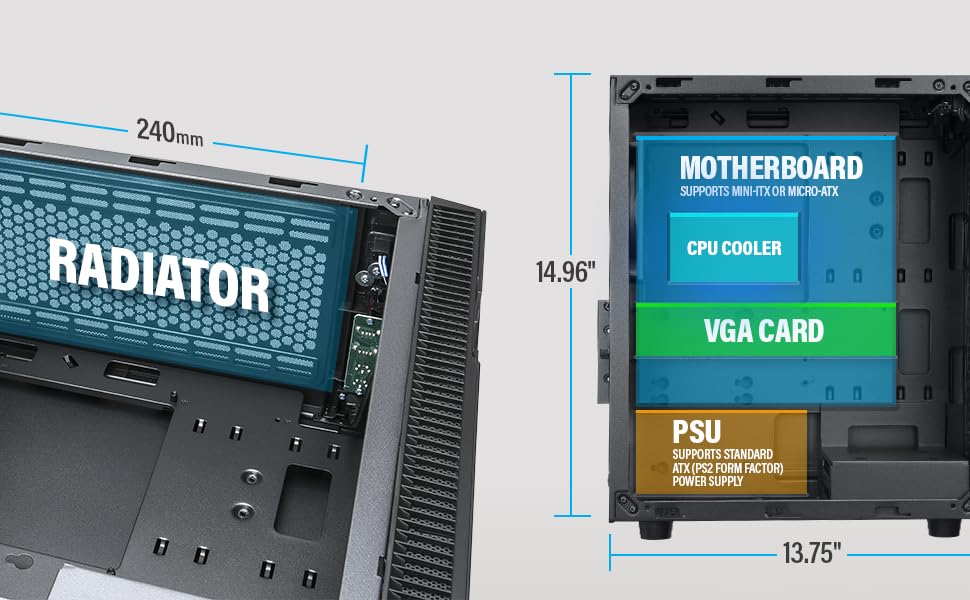
Figure 5: Diagram illustrating component clearance and radiator support.
6.9. Final Assembly
- Once all components are installed and cables are managed, reattach the side panels.
- Connect your monitor, keyboard, mouse, and power cable to the PC.
6.10. Official Product Video: Installation Overview
Video 1: An overview of the Rosewill Micro ATX Mini Tower Case, including its pre-installed 400W PSU and internal features. This video provides a visual guide to the case's design and component layout.
7. Operating Instructions
After completing the setup, you can power on your PC.
- Ensure all external cables (power, monitor, peripherals) are securely connected.
- Press the power button located on the front I/O panel of the case.
- The power LED will illuminate, indicating the system is powered on.
- To shut down, use the operating system's shutdown function or press and hold the power button for a few seconds.
8. Maintenance
Regular maintenance helps ensure optimal performance and longevity of your PC components.
- Dust Filters: Periodically check and clean any removable dust filters (e.g., front, top, bottom) to maintain good airflow and prevent dust buildup inside the case.
- Internal Cleaning: Every few months, open the side panels and use compressed air to gently remove dust from fans, heatsinks, and other components.
- Cable Check: Ensure all internal cables remain securely connected and are not obstructing airflow.
9. Troubleshooting
If you encounter issues, refer to the following common troubleshooting tips:
- No Power: Check if the power cable is securely connected to both the PSU and the wall outlet. Ensure the power switch on the PSU is in the 'ON' position. Verify front panel power switch connection to the motherboard.
- No Display: Ensure your monitor is connected to the graphics card (or motherboard if using integrated graphics) and is powered on. Reseat the graphics card and RAM modules.
- Overheating: Check if all case fans and CPU cooler fans are spinning. Ensure dust filters are clean and there is adequate airflow. Verify thermal paste application on the CPU.
- USB Ports Not Working: Check the front panel USB cable connections to the motherboard. Ensure drivers are installed for your operating system.
10. Warranty and Support
For warranty information, technical support, or service inquiries, please refer to the official Rosewill website or contact their customer service department. Keep your proof of purchase for warranty claims.


