
Easyfone T300
Easyfone T300 4G Flip Phone User Manual
Model: T300
1. Introduction
Thank you for choosing the Easyfone T300 4G Flip Phone. This manual provides essential information for setting up, operating, and maintaining your device. Designed with ease of use in mind, the T300 offers clear communication, enhanced safety features, and a user-friendly interface, making it ideal for seniors.
2. Safety Information
Please read this section carefully before using your phone to ensure safe and proper operation.
- Battery Safety: Use only Easyfone approved batteries and chargers. Do not short-circuit, puncture, or expose the battery to extreme temperatures. Dispose of batteries properly.
- Hearing Protection: Avoid prolonged listening at high volume levels to prevent hearing damage.
- Driving Safety: Do not use your phone while driving. Always prioritize road safety.
- Medical Devices: Maintain a safe distance between the phone and medical devices like pacemakers. Consult your physician and device manufacturer for specific guidelines.
- Water Resistance: This phone is not waterproof. Avoid exposure to liquids.
3. Package Contents
Ensure all items are present in your Easyfone T300 package:

Image: Contents of the Easyfone T300 package, showing the T300 phone, user manual, 1500mAh battery, charging dock, USB cable, charger, and a lanyard.
- Easyfone T300 4G Flip Phone
- User Manual (this document)
- 1500mAh Lithium-ion Battery
- Charging Dock
- USB Cable
- Power Adapter (Charger)
- Lanyard
4. Setup Guide
4.1 Phone Overview

Image: The Easyfone T300 in its open position, displaying the main 2.4-inch screen, the large, clearly labeled keypad, and the side volume and power buttons.
Familiarize yourself with the phone's components:
- External Screen: Displays time, date, battery status, and caller ID when closed.
- Main Screen: 2.4-inch HD display for menus, messages, and calls.
- Keypad: Large, backlit buttons with voice announcement for easy dialing. Includes dedicated keys for SOS, FM radio, and alarm.
- SOS Button: Located on the back for emergency calls and GPS location sharing.
- Volume Buttons: On the side for adjusting call and ringtone volume.
- Charging Port: Micro USB port on the side.
4.2 SIM Card and Battery Installation
- Remove Back Cover: Gently pry open the back cover of the phone.
- Insert SIM Card: Locate the SIM card slot. Insert your 4G compatible SIM card with the gold contacts facing down, ensuring it clicks into place.
- Insert Battery: Align the battery contacts with the phone's terminals and gently press the battery into its compartment.
- Replace Back Cover: Snap the back cover firmly back into place.
4.3 Charging the Phone
The Easyfone T300 comes with a convenient charging dock.

Image: The Easyfone T300 phone securely placed in its charging dock, positioned on a wooden surface, indicating it is ready for charging.
- Connect the USB cable to the power adapter and then to the charging dock.
- Plug the power adapter into a wall outlet.
- Place the Easyfone T300 into the charging dock. Ensure the phone is properly seated; the external screen will show a charging indicator.
- Alternatively, you can charge the phone directly using the Micro USB cable connected to the phone's side port.
5. Operating Instructions
5.1 Power On/Off
- Power On: Press and hold the red End Call/Power button until the screen lights up.
- Power Off: Press and hold the red End Call/Power button until the power off options appear, then select 'Power Off'.
5.2 Making and Receiving Calls
- Making a Call: Dial the number using the large keypad. The phone will announce each digit as you press it. Press the green Call button to initiate the call.
- Receiving a Call: Simply open the flip to answer an incoming call. To end a call, close the flip or press the red End Call button.
5.3 Speed Dial with Photo Contacts
The T300 supports 8 speed dial contacts with associated photos for easy recognition.

Image: An illustration demonstrating the speed dial feature, showing the phone's screen with a contact photo and a visual representation of speed dial numbers (1-9) linked to names like 'Dad', 'Mom', 'Jack', etc.
- Setting Up: Navigate to the 'Contacts' menu, select 'Speed Dial', and assign contacts to numbers 2-9. You can add a photo for each contact.
- Using Speed Dial: Press and hold the assigned number key (2-9) to quickly dial the corresponding contact.
5.4 SOS Emergency Function
The dedicated SOS button provides immediate assistance in emergencies.

Image: The Easyfone T300 phone with a prominent SOS icon, accompanied by a world map indicating GPS location tracking and emergency contact points.
- Setting Up: Go to 'SOS Settings' in the menu to add up to 5 emergency contacts.
- Activating SOS: In an emergency, press and hold the SOS button on the back of the phone for 3 seconds. The phone will automatically call the emergency contacts in sequence and send an SMS with your GPS location.
5.5 FM Radio and Alarm
- FM Radio: Press the dedicated FM radio button to quickly access the radio. Use the navigation keys to tune stations.
- Alarm: Access the 'Alarm' function from the main menu to set multiple alarms.
5.6 Messaging
To send and receive text messages:
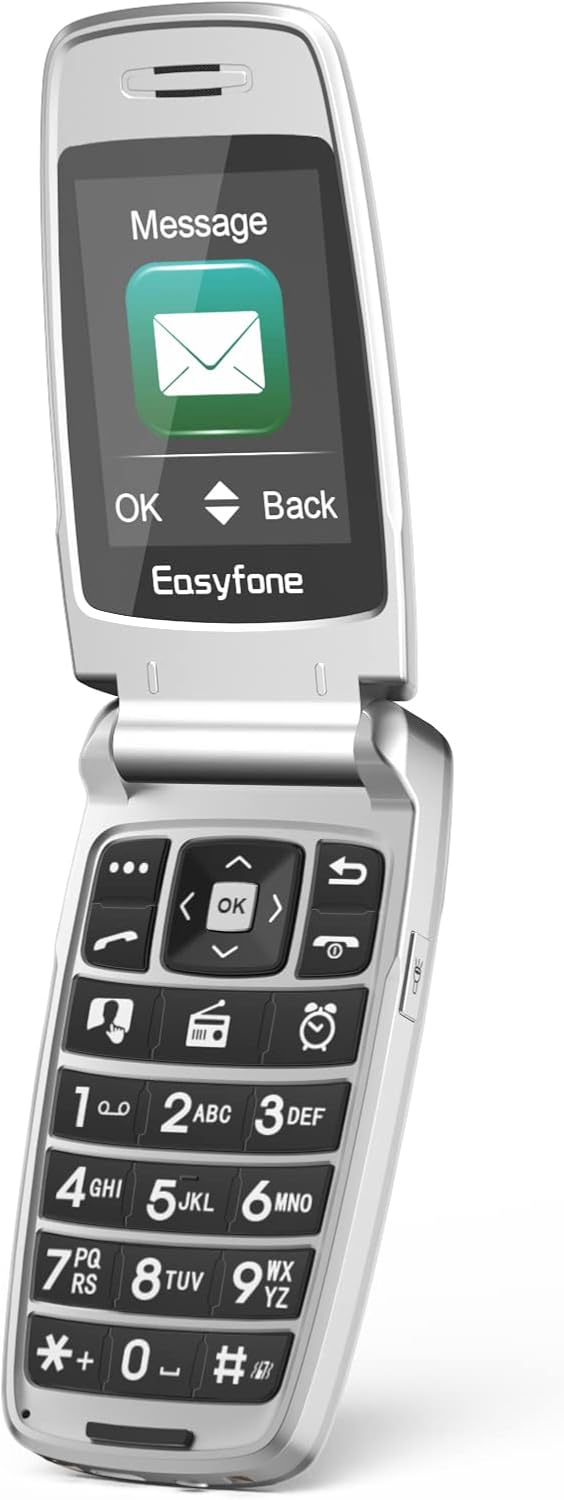
Image: The Easyfone T300 phone opened, showing the main screen displaying the 'Message' menu with a large envelope icon, and 'OK' and 'Back' options.
- Navigate to the 'Messages' menu.
- Select 'Write Message' to compose a new SMS.
- Use the keypad to type your message.
- Select 'Send' and choose the recipient from your contacts or enter a number.
6. Maintenance
- Cleaning: Use a soft, dry cloth to clean the phone's surface. Do not use liquid cleaners or aerosols.
- Battery Care: To prolong battery life, avoid fully discharging the battery frequently. Charge the phone regularly.
- Storage: Store the phone in a cool, dry place away from direct sunlight and extreme temperatures.
- Software Updates: Keep your phone's software updated if prompted, to ensure optimal performance and security.
7. Troubleshooting
If you encounter issues with your Easyfone T300, refer to the following common problems and solutions:
| Problem | Possible Cause | Solution |
|---|---|---|
| Phone does not turn on | Low battery; Battery not inserted correctly | Charge the phone for at least 30 minutes; Re-insert the battery. |
| Cannot make/receive calls | No SIM card; SIM card not active; Out of network coverage | Ensure SIM card is inserted and active; Check network signal; Contact your service provider. |
| Poor call quality | Weak signal; Obstruction; Speaker/microphone issues | Move to an area with better signal; Ensure nothing is blocking the speaker/microphone. |
| Phone not charging | Charger/cable faulty; Phone not seated correctly in dock | Try a different charger/cable; Ensure phone is properly placed in the charging dock. |
| SOS function not working | No emergency contacts set; No network signal | Set up emergency contacts in SOS settings; Ensure phone has network coverage. |
If the problem persists, please contact Easyfone customer support.
8. Specifications
| Feature | Detail |
|---|---|
| Brand | Easyfone |
| Model Name | T300 |
| Operating System | Easyfone OS |
| Main Screen Size | 2.4 Inches |
| External Screen Size | 1.44 Inches |
| Resolution | 320 x 240 pixels |
| Battery Capacity | 1500 mAh Lithium-ion |
| Cellular Technology | 4G (Compatible with 2G/3G/4G operators) |
| Connectivity | Bluetooth, Micro USB |
| Special Features | Integrated GPS, Photo Speed Dial, Charging Dock, Hearing Aid Compatible (M4/T4), SOS Button |
| RAM Size | 64 MB |
| Memory Storage Capacity | 16 GB (Internal, for contacts/messages) |
9. Warranty and Support
Easyfone products are designed for reliability and performance. For warranty information, please refer to the warranty card included in your product packaging or visit the official Easyfone website. For technical support, troubleshooting assistance, or service inquiries, please contact Easyfone customer service through the contact details provided on the official website or your purchase platform.
Related documentsT300


Ask a question about this manual
Ask about setup, troubleshooting, compatibility, parts, safety, or missing instructions. Manuals+ will review the question and use this page’s manual context to help answer it.