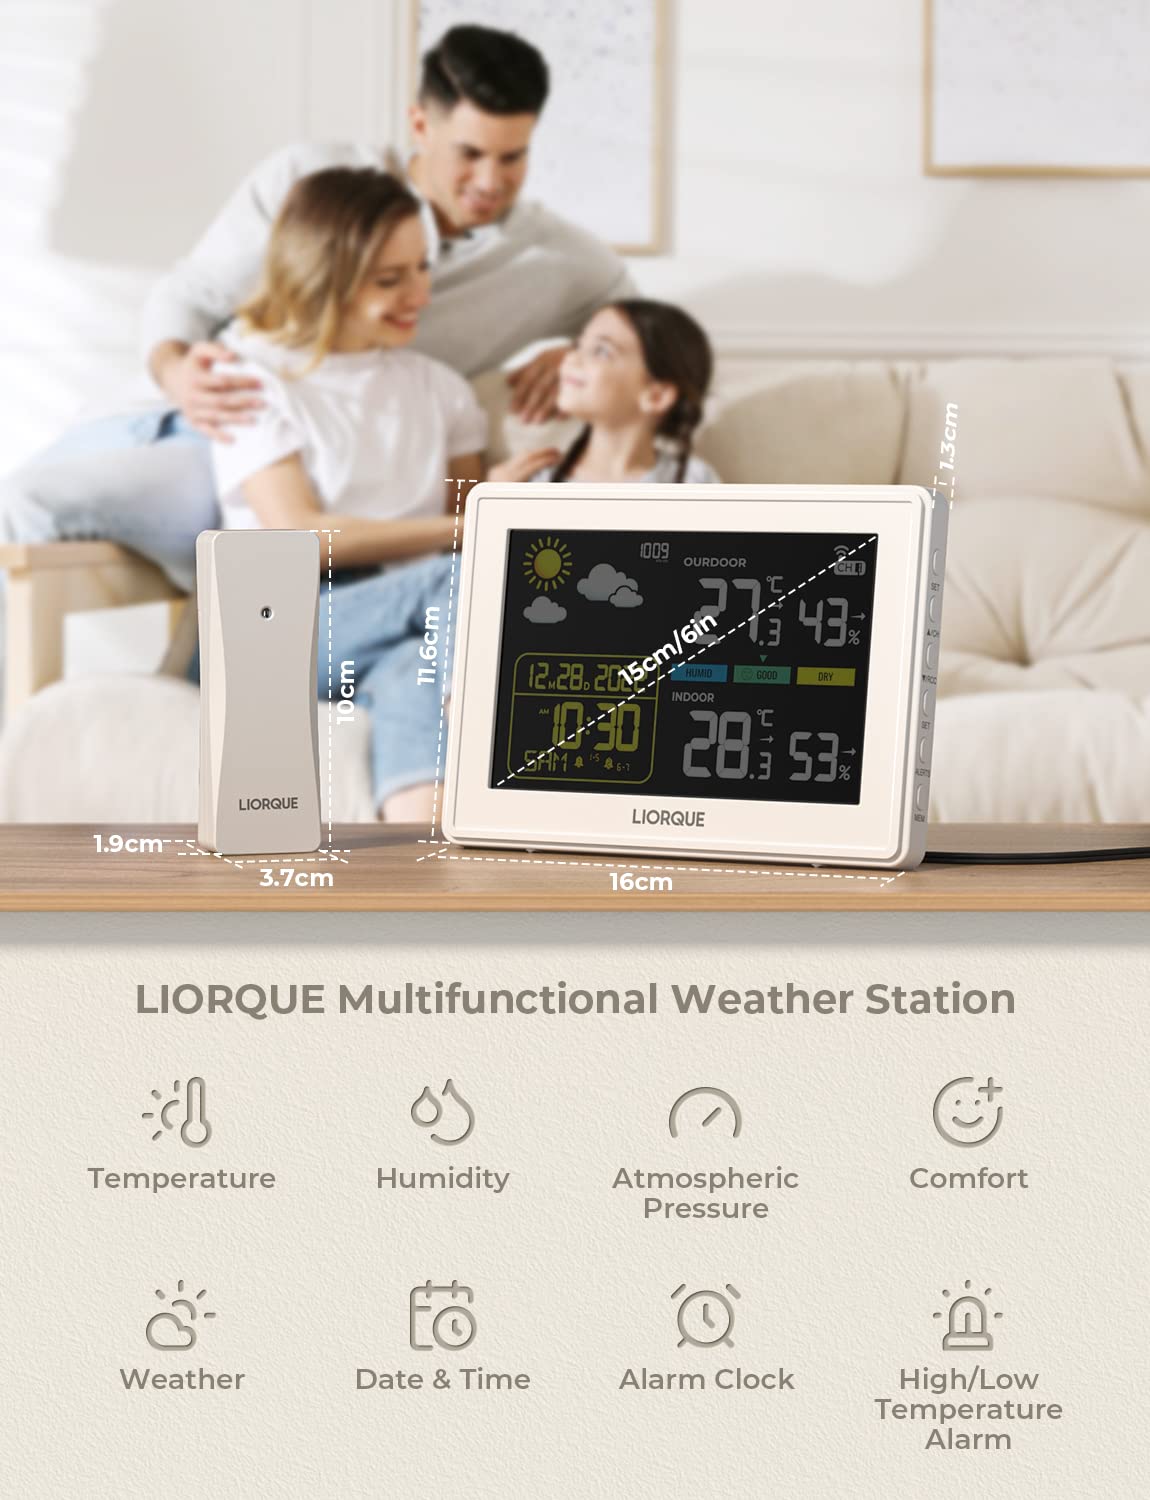
1. Product Overview
The LIORQUE Wireless Weather Station provides comprehensive indoor and outdoor environmental monitoring. It displays temperature, humidity, atmospheric pressure, and offers a 12-hour weather forecast. Equipped with a DCF radio clock, alarm functions, and a large color display, this device is designed for clear readability and ease of use.
Key Features:
- Indoor and Outdoor Temperature & Humidity Display
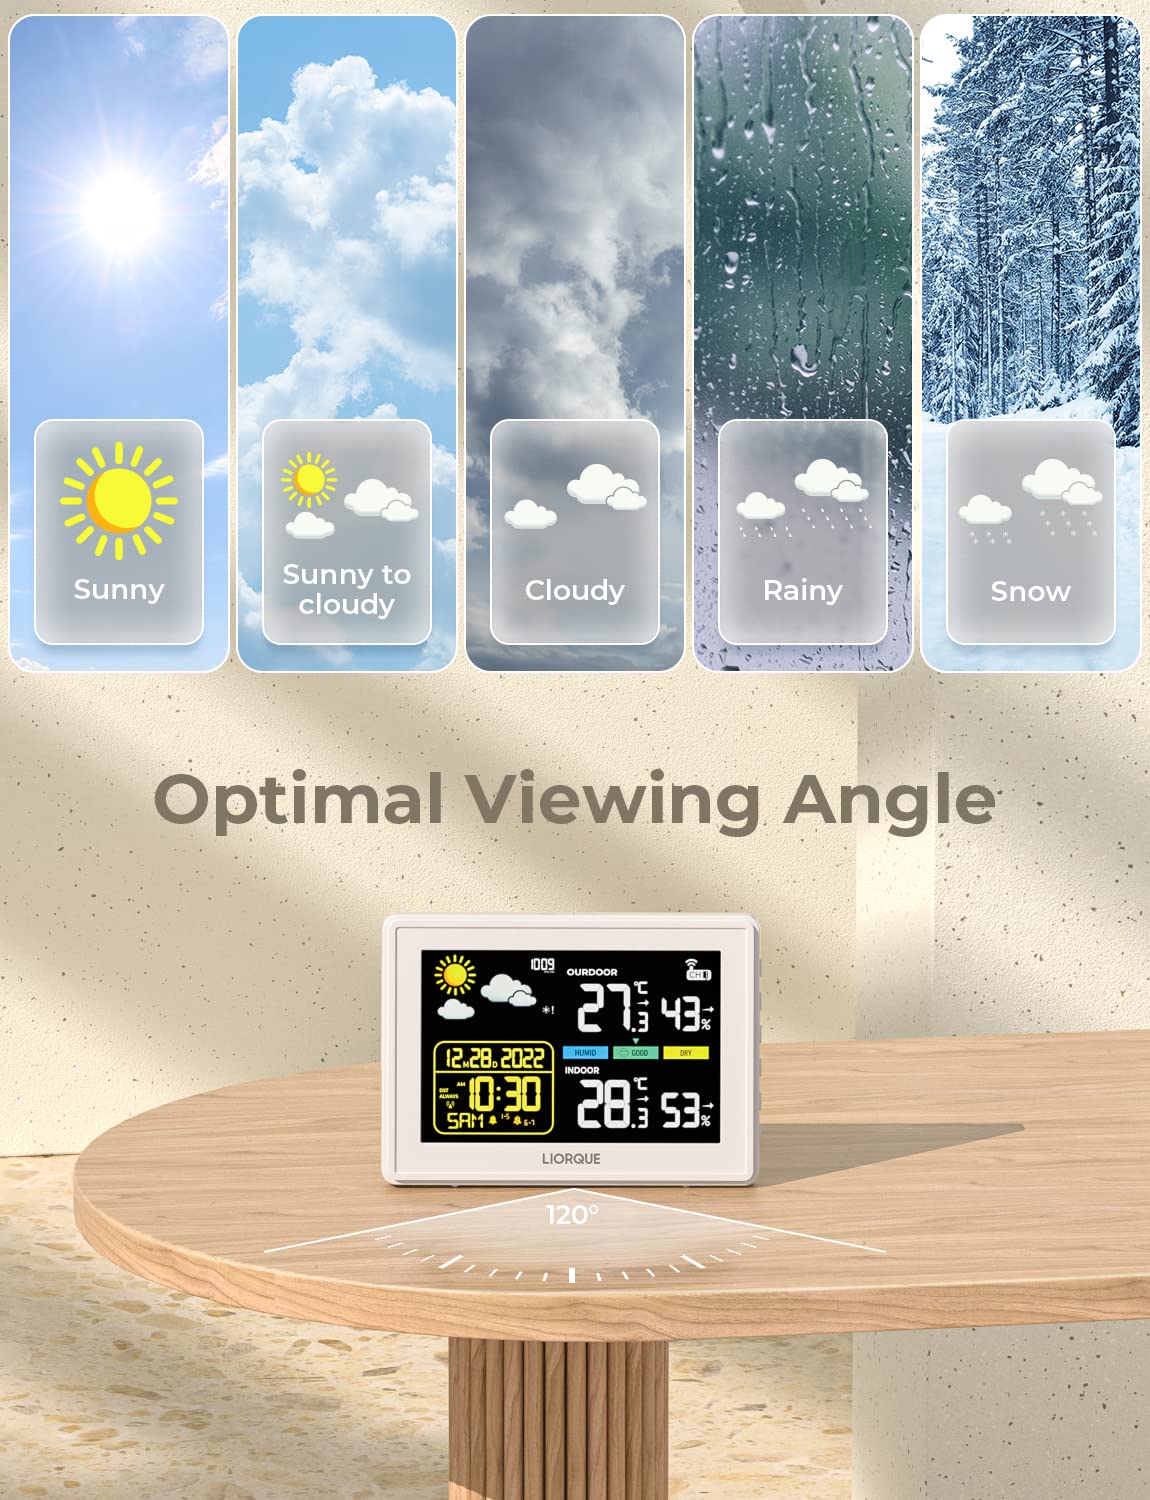
- 12-Hour Weather Forecast (Sunny, Sunny to Cloudy, Cloudy, Rain, Snow)
- DCF Radio Controlled Clock with Automatic Time Synchronization
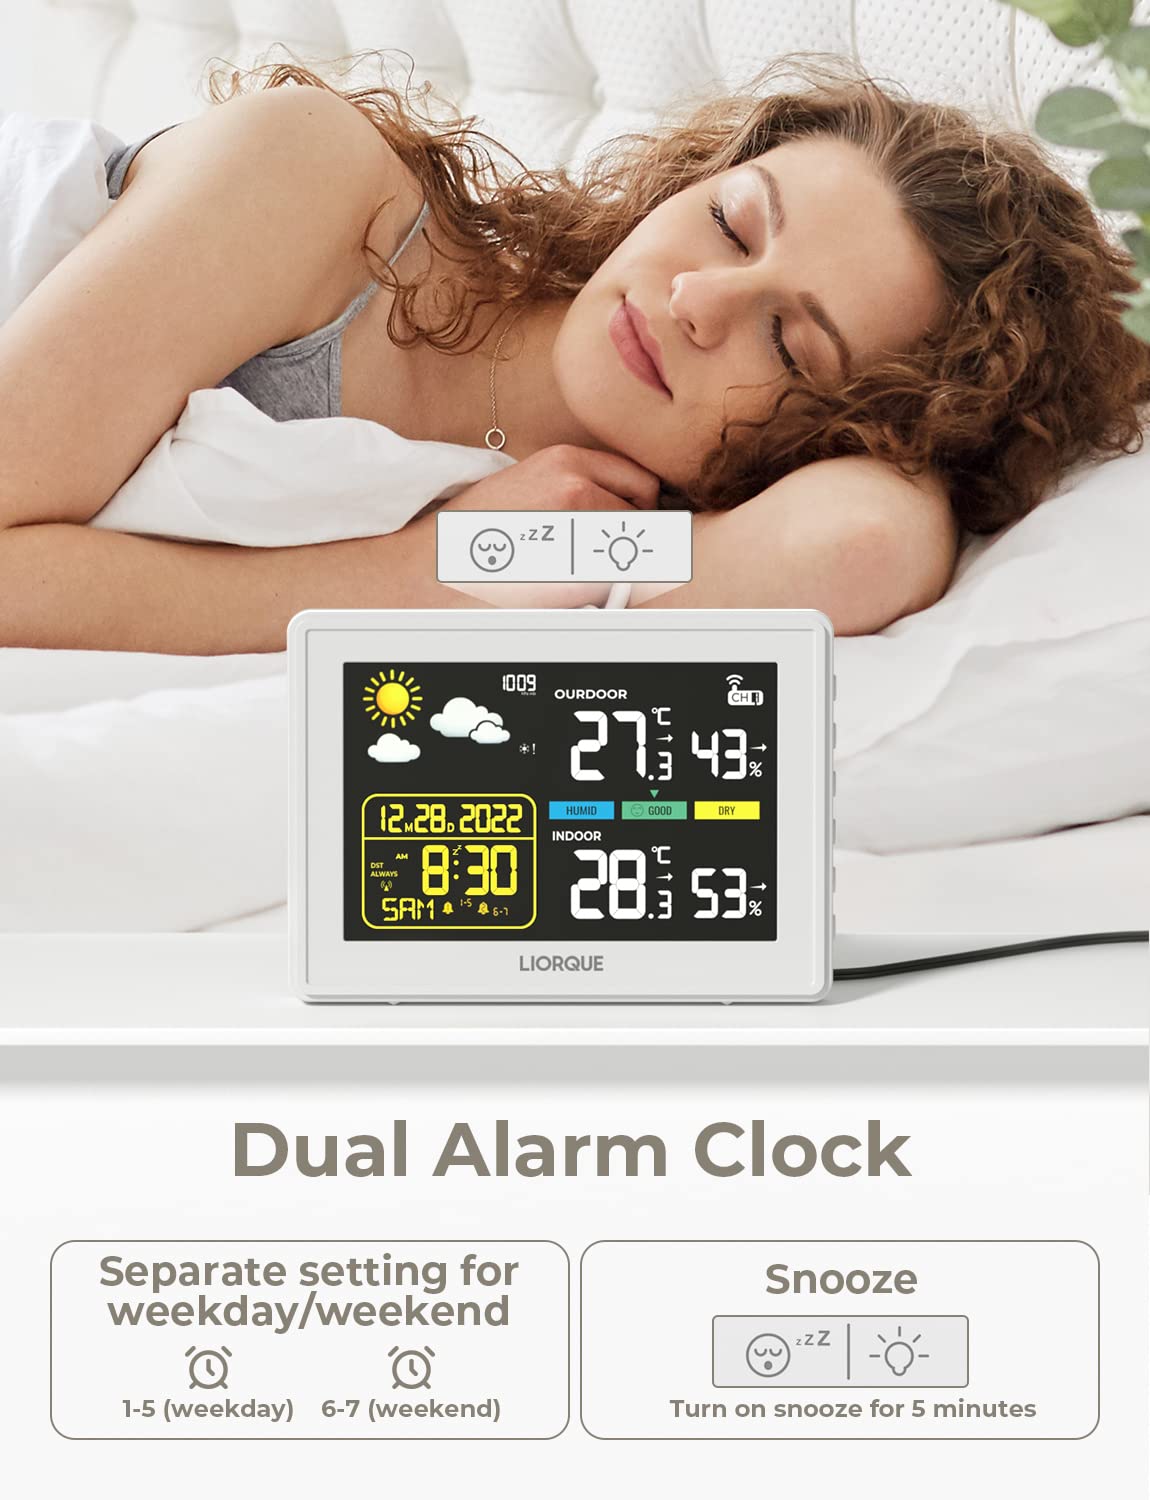
- Dual Alarm Clock with Snooze Function
- Atmospheric Pressure Display (hPa/mb)
- Frost Point Warning and High/Low Temperature Alerts
- Min/Max Temperature and Humidity Records
- Adjustable 5-level Screen Brightness
- Wireless Outdoor Sensor with up to 100m/328ft transmission range

2. Package Contents
Please check the package contents upon unboxing to ensure all items are present:
- 1 x LIORQUE Weather Station (Main Unit)
- 1 x Wireless Outdoor Sensor
- 1 x Power Adapter for Main Unit
- 1 x User Manual
3. Setup Instructions
3.1 Powering the Devices
- Outdoor Sensor: Open the battery compartment on the back of the outdoor sensor. Insert 2 x AA batteries (not included), ensuring correct polarity. Close the compartment.
- Main Unit: Connect the provided power adapter to the DC IN port on the back of the main unit and plug it into a power outlet. The display will light up.
3.2 Sensor Pairing and Initial Synchronization
Once both devices are powered, the main unit will automatically search for and connect to the outdoor sensor. The RCC (Radio Controlled Clock) function will also automatically synchronize the local time. This process may take a few minutes.
- Ensure the outdoor sensor is within the 100m/328ft transmission range in an open space.
- For optimal outdoor temperature readings, mount the sensor on a north-facing wall, protected from direct sunlight and rain.
- The weather station can connect to up to 3 outdoor sensors (only 1 included). Use the 'CH' button to switch between channels if multiple sensors are used.

4. Operating Instructions
4.1 Display Elements

4.2 Button Functions
The main unit features several buttons on the back for configuration and control:

- SET Button: Short press to cycle through display settings. Press and hold for 3 seconds to enter the main settings menu.
- CH / + Button: Short press to switch between outdoor sensor channels (if multiple sensors are connected). In setting mode, short press to increase values.
- RCC / - Button: Press and hold for 3 seconds to manually initiate RCC time synchronization. In setting mode, short press to decrease values.
- ALERTS Button: Short press to view temperature alerts. Press and hold to set high/low temperature alert thresholds.
- MEM Button: Short press to view maximum and minimum recorded temperature and humidity values. Press and hold to clear the recorded max/min values.
- SNOOZE/LIGHT Button (Top): Short press to activate snooze when the alarm sounds (5 minutes duration). Short press to adjust screen brightness (5 levels).
4.3 Specific Functions
- Time & Date: The DCF radio clock automatically sets the time and date. You can choose between 12/24 hour format and select from 7 weekday languages in the settings.
- Alarm Clock: The alarm can be set separately for weekdays (1-5) and weekends (6-7). When the alarm sounds, press the SNOOZE/LIGHT button for a 5-minute snooze.
- Weather Forecast: The station predicts weather trends for the next 12 hours, displaying icons for Sunny, Sunny to Cloudy, Cloudy, Rain, and Snow.
- Frost Point Warning: An icon will flash when the outdoor temperature is between 0°C and 2.9°C. If the temperature drops below 0°C, the icon remains steadily displayed.
- Screen Brightness: Adjust the display brightness through 5 levels using the SNOOZE/LIGHT button to suit your environment and preference.
5. Maintenance
To ensure the longevity and accurate operation of your LIORQUE Weather Station, follow these maintenance guidelines:
- Cleaning: Wipe the main unit and outdoor sensor with a soft, dry cloth. Do not use abrasive cleaners or solvents, as they may damage the surfaces.
- Battery Replacement (Outdoor Sensor): Replace the AA batteries in the outdoor sensor when the low battery indicator appears on the main unit. Ensure to use fresh batteries and dispose of old ones responsibly.
- Placement: Avoid placing the main unit in direct sunlight or near heat sources, as this can affect indoor temperature readings. Ensure the outdoor sensor is protected from extreme weather conditions and direct precipitation.
- Storage: If storing the device for an extended period, remove batteries from the outdoor sensor.
6. Troubleshooting
If you encounter issues with your weather station, please refer to the following common troubleshooting steps:
- No Outdoor Temperature/Humidity Display:
- Check if the outdoor sensor batteries are correctly installed or need replacement.
- Ensure the outdoor sensor is within the transmission range of the main unit. Obstacles like thick walls or electronic interference can reduce range.
- Try re-pairing the sensor: Remove batteries from both units, wait a few minutes, then reinsert batteries into the sensor first, followed by powering on the main unit.
- Incorrect Time Display:
- Ensure the main unit is placed in an area with good reception for the DCF signal (away from electronic devices that might cause interference).
- Manually initiate RCC synchronization by pressing and holding the RCC button.
- Display is Dim or Unresponsive:
- Ensure the power adapter is securely connected to the main unit and the power outlet.
- Adjust the screen brightness using the SNOOZE/LIGHT button.
- Inaccurate Readings:
- Ensure both the main unit and outdoor sensor are not exposed to direct sunlight, heat sources, or extreme drafts, which can skew readings.
- Allow some time for the sensors to stabilize after initial setup or relocation.
7. Specifications
| Feature | Specification |
|---|---|
| Product Dimensions (Main Unit) | 16 x 11.6 x 1.3 cm |
| Sensor Dimensions | 10 x 3.7 x 1.9 cm |
| Weight | 420 grams |
| Screen Size | 15 cm (6 inches) |
| Main Unit Power Source | Power Adapter |
| Outdoor Sensor Power Source | 2 x AA Batteries (not included) |
| Connectivity Technology | Wireless (433 MHz, 868 MHz) |
| Wireless Transmission Range | Up to 100m / 328ft (open space) |
| Temperature Accuracy | ±1 °C |
| Upper Temperature Rating | 40 Degrees Celsius |
| Model Number | B0359WST2H2PR |
| Color | Black |
8. Warranty and Support
Specific warranty information for the LIORQUE Wireless Weather Station is not provided in the product details. For warranty claims, technical support, or further assistance, please refer to the contact information provided with your purchase or visit the official LIORQUE website.


