1. Introduction
This manual provides essential information for the safe and efficient use of your TechniSat DIGITRADIO 143 (V3) HiFi Internet Radio Tuner. Please read these instructions thoroughly before operating the device and retain them for future reference. The DIGITRADIO 143 (V3) is designed to enhance your existing stereo system with a wide range of modern audio reception and streaming capabilities.

Image 1.1: The TechniSat DIGITRADIO 143 (V3) integrated into a home audio setup.
The DIGITRADIO 143 (V3) is a versatile tuner without integrated speakers, allowing you to upgrade your stereo system with DAB+/DAB, FM, Internet radio, and various streaming options, including MP3 file playback. Its standard Hi-Fi component width of 43.5 cm ensures seamless integration with most existing audio systems.

Image 1.2: Highlighting the diverse radio reception capabilities of the device.
2. Safety Information
Always observe the following safety precautions to prevent damage to the device or injury to yourself:
- Do not expose the device to rain or moisture.
- Do not open the device casing; refer all servicing to qualified personnel.
- Ensure proper ventilation to prevent overheating.
- Use only the power adapter supplied with the device.
- Keep the device away from heat sources and direct sunlight.
- Clean the device only with a dry, soft cloth.
3. Package Contents
Verify that all items are present in the package:
- TechniSat DIGITRADIO 143 (V3) HiFi Internet Radio Tuner (Black)
- Wire Antenna
- Remote Control
- Instruction Manual
4. Product Overview
4.1 Front Panel

Image 4.1: Front view of the DIGITRADIO 143 (V3), showing the display, controls, and USB port.
The front panel features a 3.2-inch color TFT display for clear information display, navigation buttons, a USB port for media playback and charging, and rotary controls for tuning and volume.

Image 4.2: Detailed view of the 3.2-inch color display and front USB port.
4.2 Rear Panel Connections
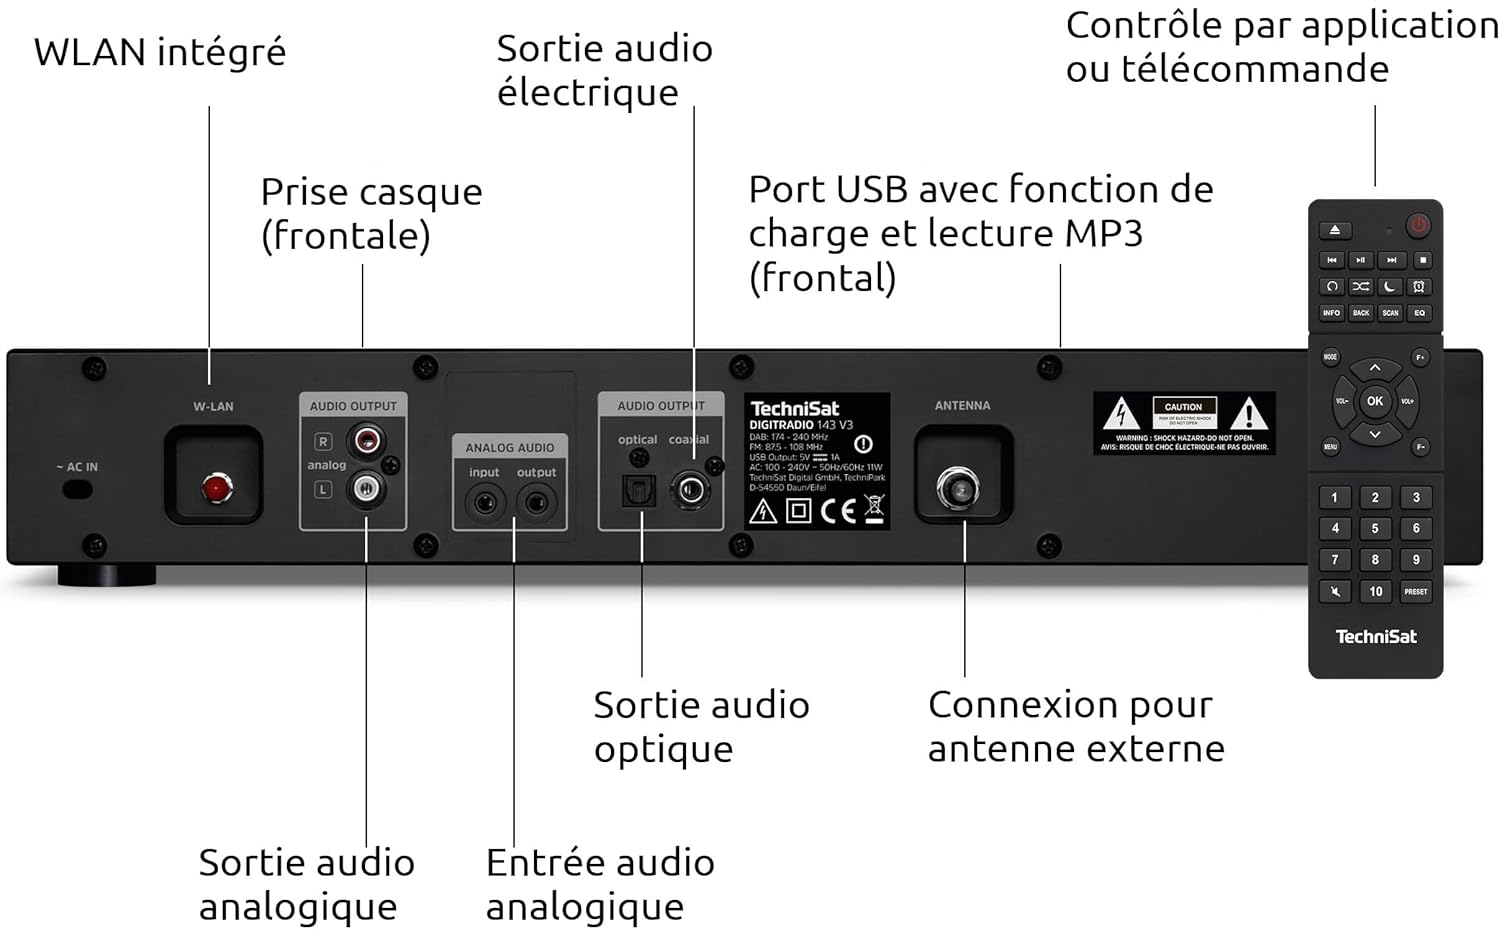
Image 4.3: Rear panel connections including Wi-Fi antenna, audio outputs, and antenna input.
- AC IN: Power connection.
- W-LAN: Integrated Wi-Fi antenna connection.
- AUDIO OUTPUT (Analog L/R): RCA connectors for analog audio output to an amplifier or receiver.
- AUDIO INPUT (Analog L/R): RCA connectors for analog audio input from an external source.
- OPTICAL AUDIO OUTPUT: Digital optical audio output.
- COAXIAL AUDIO OUTPUT: Digital coaxial audio output.
- ANTENNA: F-type connector for external DAB+/FM antenna.
- HEADPHONE: 3.5mm jack for headphone connection (front panel).

Image 4.4: Numbered diagram of the rear panel connections for easy identification.
5. Setup
5.1 Placement and Integration
Place the DIGITRADIO 143 (V3) on a stable, flat surface, ensuring adequate ventilation around the unit. Its 43.5 cm width is designed to fit seamlessly into standard Hi-Fi racks alongside other components.

Image 5.1: The DIGITRADIO 143 (V3) fitting perfectly within a Hi-Fi system stack.
5.2 Connecting to Power and Audio System
- Antenna Connection: Connect the supplied wire antenna to the ANTENNA port on the rear panel. For improved reception, consider connecting an external DAB+/FM antenna.
- Audio Output: Connect the DIGITRADIO 143 (V3) to your amplifier or receiver using one of the following methods:
- Analog: Use RCA cables to connect the AUDIO OUTPUT (Analog L/R) ports to an available analog input on your amplifier.
- Digital: Use an optical or coaxial cable to connect the corresponding digital output on the DIGITRADIO 143 (V3) to a digital input on your amplifier/receiver.
- Power Connection: Plug the power cable into the AC IN port on the rear panel, then connect it to a wall outlet.
5.3 Initial Setup Wizard
Upon first power-on, the device will guide you through an initial setup wizard. Follow the on-screen prompts to configure language, time, date, and network settings (Wi-Fi). Ensure your Wi-Fi network name (SSID) and password are available.
6. Operation
6.1 Radio Modes (DAB+, FM, Internet Radio)
Use the MODE button on the front panel or remote control to switch between DAB+, FM, and Internet Radio modes. In each mode, use the TUNING/OK knob or navigation buttons to scan for stations and select your preferred broadcasts.

Image 6.1: The display showing details of an Internet Radio station.
6.2 Bluetooth Audio Streaming
To stream audio from a Bluetooth-enabled device (e.g., smartphone, tablet):
- Select Bluetooth mode on the DIGITRADIO 143 (V3).
- Enable Bluetooth on your external device and search for available devices.
- Select "DIGITRADIO 143" from the list to pair.
- Once paired, you can play audio from your device through the tuner.

Image 6.2: Wireless music enjoyment via Bluetooth or Spotify Connect.
6.3 Spotify Connect
The DIGITRADIO 143 (V3) supports Spotify Connect for both Free and Premium accounts. To use Spotify Connect:
- Ensure your DIGITRADIO 143 (V3) is connected to the internet.
- Open the Spotify app on your smartphone, tablet, or computer.
- Play a song and tap the "Devices Available" icon.
- Select "DIGITRADIO 143" from the list of devices.
6.4 USB Playback
Insert a USB storage device containing MP3 files into the front USB port. The device will automatically detect the media and allow you to navigate and play your music files.
6.5 App Control
Control your DIGITRADIO 143 (V3) using a compatible smartphone application such as UNDOK or OKTIV. Download the app from your device's app store and follow the in-app instructions to connect to your tuner.

Image 6.3: The device can be conveniently controlled via a smartphone app.
7. Maintenance
To ensure the longevity and optimal performance of your DIGITRADIO 143 (V3):
- Cleaning: Disconnect the power before cleaning. Use a soft, dry, lint-free cloth to wipe the exterior. Do not use liquid cleaners or abrasive materials.
- Ventilation: Ensure that the ventilation openings are not blocked.
- Storage: If storing the device for an extended period, disconnect it from power and store it in a cool, dry place.
8. Troubleshooting
| Problem | Possible Cause | Solution |
|---|---|---|
| No power | Power cable not connected; power outlet faulty. | Check power cable connection; try a different outlet. |
| No radio reception (DAB+/FM) | Antenna not connected or poorly positioned; weak signal. | Ensure antenna is securely connected and properly positioned. Consider an external antenna. |
| No Internet Radio/Streaming | No Wi-Fi connection; incorrect Wi-Fi password; router issue. | Check Wi-Fi settings and password. Restart your Wi-Fi router. Ensure strong Wi-Fi signal. |
| Bluetooth pairing issues | Device not in pairing mode; external device Bluetooth off. | Ensure DIGITRADIO 143 (V3) is in Bluetooth mode. Enable Bluetooth on your external device and search again. |
| Remote control not working | Batteries depleted; obstruction between remote and unit. | Replace remote control batteries (2x AAA). Ensure clear line of sight to the unit's IR receiver. |
9. Specifications
- Brand: TechniSat
- Model: DIGITRADIO 143 (V3)
- Color: Black
- Connectivity: Wi-Fi, Bluetooth
- Tuning Technology: DAB+, FM, Internet Radio
- Special Features: DAB+ radio, FM radio (with RDS and PLL), Internet radio, 3.2" color TFT display, Spotify Connect, Bluetooth audio streaming, app control, USB charge/playback function
- Inputs/Outputs: USB (Type A, 1 port), Analog Audio L/R Input (RCA), Analog Audio L/R Output (RCA), Optical Digital Output, Coaxial Digital Output, 3.5mm Headphone Jack, External Antenna Connection (F-type)
- Product Dimensions (W x H x D): 43.5 x 7.5 x 29 cm
- Power Source: Corded Electric
- Included Components: DIGITRADIO 143, wire antenna, remote control, instruction manual
10. Warranty and Support
This TechniSat DIGITRADIO 143 (V3) comes with a standard 2-year warranty from the date of purchase. This warranty covers manufacturing defects and material faults under normal use. It does not cover damage caused by misuse, accidents, unauthorized modifications, or normal wear and tear.
For technical support, warranty claims, or further assistance, please contact TechniSat customer service through their official website or the retailer where the product was purchased. Please have your proof of purchase and product model number (0000/2947) available when contacting support.


