
Retevis RM20
Retevis RM20 Marine VHF Radio User Manual
Model: RM20 | Brand: Retevis
Introduction
This manual provides detailed instructions for the proper installation, operation, and maintenance of your Retevis RM20 Marine VHF Radio. Please read this manual thoroughly before using the radio to ensure safe and efficient operation.
Package Contents
Upon unboxing, please verify that all items listed below are present and in good condition:
- 1 x Retevis RM20 Marine Transceiver
- 1 x Handheld Microphone
- 1 x Mounting Bracket
- 1 x DC Power Cable
- User Manual (this document)
- 3 x Fixing Screws

Figure 1: Included components in the Retevis RM20 package.
Setup and Installation
Mounting Options
The Retevis RM20 offers both bracket mounting and flush mounting options for versatile installation on your vessel.
Bracket Mounting
Use the provided mounting bracket and screws to secure the radio to a flat surface. Ensure the mounting location allows for proper ventilation and access to controls.
Flush Mounting
For flush mounting, a cutout of approximately 135mm x 50mm x 85mm (5.3in x 2in x 3.3in) is required. Refer to the diagram below for precise dimensions.
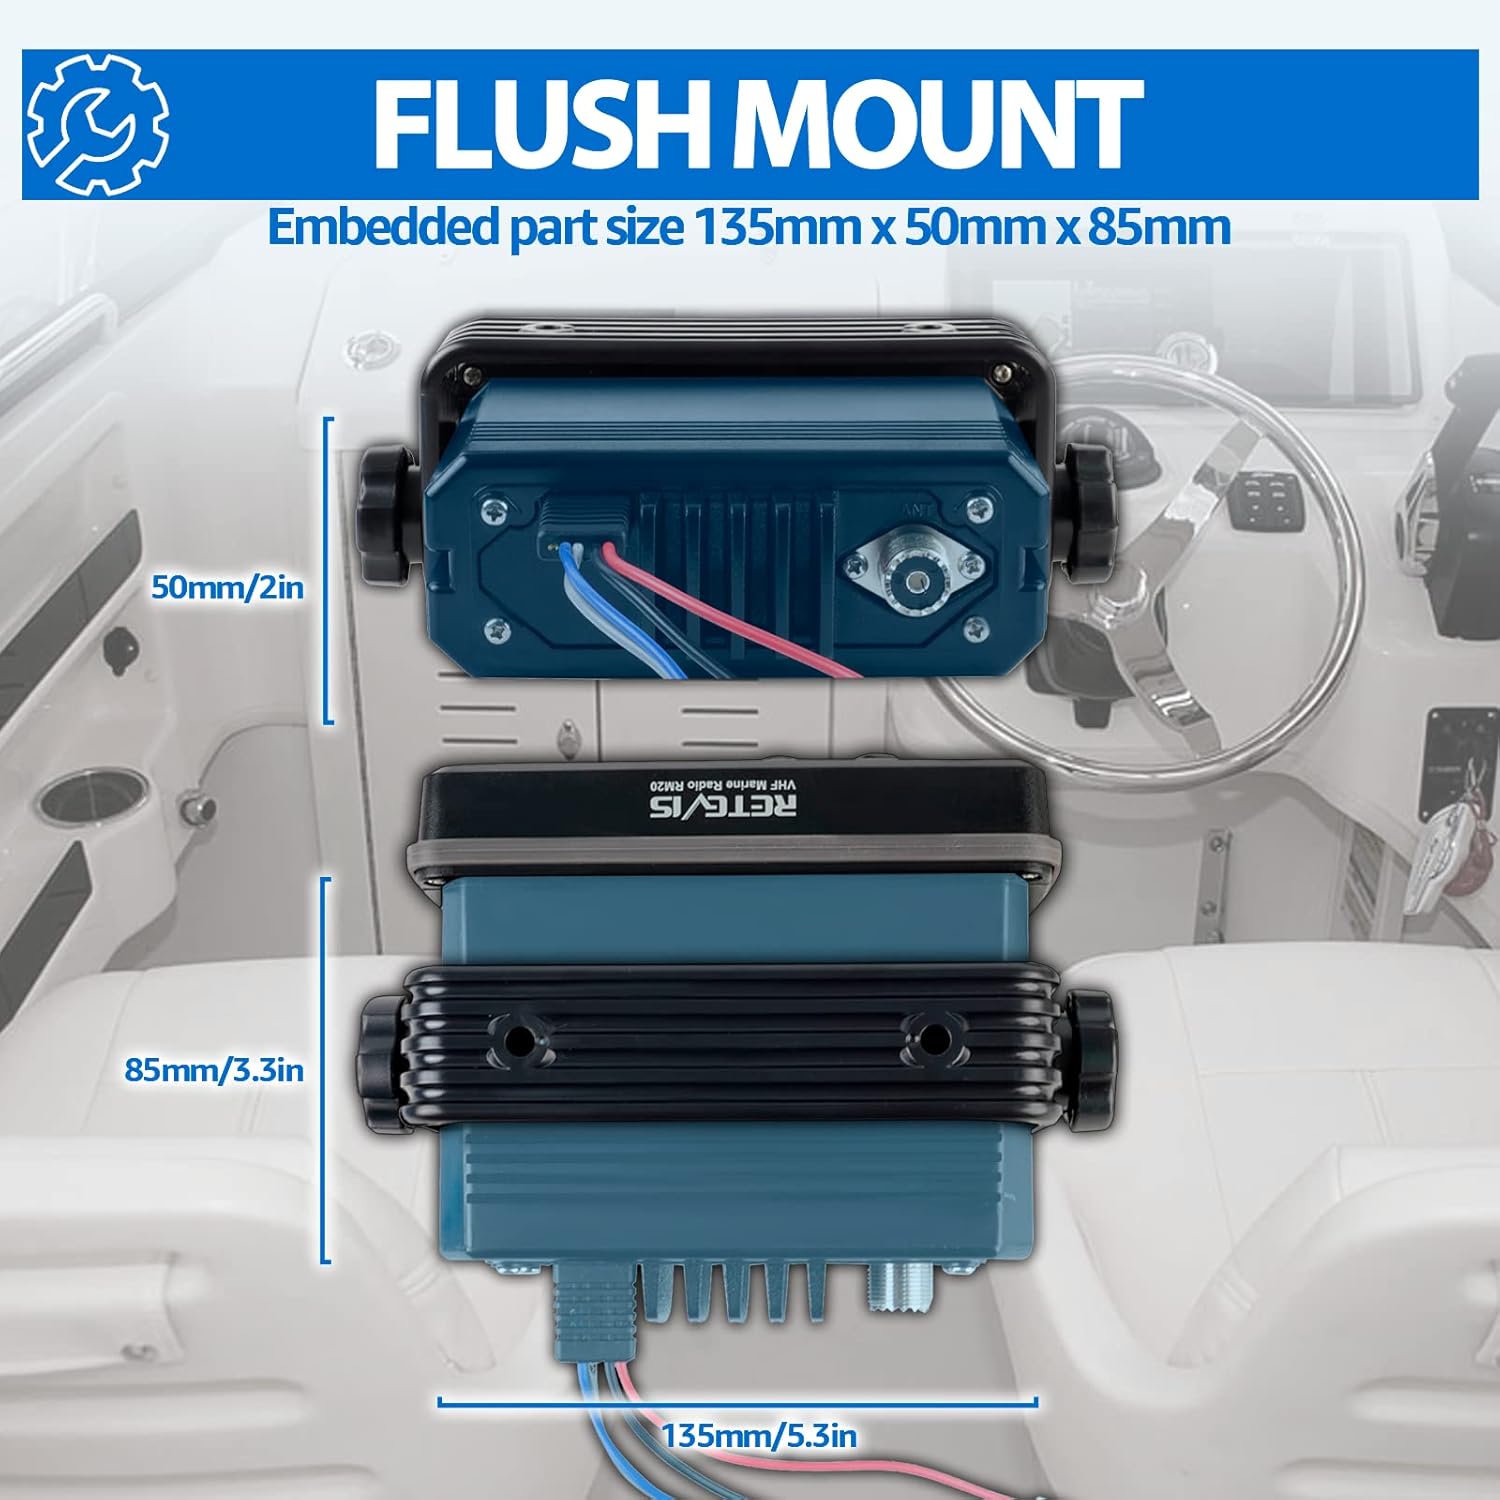
Figure 2: Flush mount dimensions for the RM20 radio.
Power Connection
Connect the supplied DC power cable to the radio and to a 13V DC power source on your boat. Ensure correct polarity to prevent damage.
Antenna Connection
Connect a compatible marine VHF antenna (male 50Ω impedance, 8ft recommended) to the antenna port on the rear of the radio. A secure connection is crucial for optimal performance.

Figure 3: Antenna connection for the RM20.
Operating Instructions
Power On/Off and Volume Control
To power on the radio, rotate the VOL knob clockwise. Continue rotating to adjust the volume. To power off, rotate the VOL knob counter-clockwise until it clicks off.

Figure 4: Front panel of the RM20 radio.
Channel Selection
Use the CH/WX button to switch between channels. The radio supports international channels. Press the 16 button for instant access to Channel 16 (Distress and Calling Channel).
Digital Selective Calling (DSC) and Built-in GPS
The RM20 features built-in GPS for accurate position reporting and DSC functionality. This allows for distress calls and position sharing without external GPS wiring.

Figure 5: Built-in GPS and DSC capabilities.
MMSI Code Programming
The 9-digit MMSI (Maritime Service Identity: DSC self ID) code can be programmed at power ON. This process can only be performed twice. After the code is programmed, it can only be changed by your dealer or distributor.
- Rotate VOL to turn power OFF.
- While pushing and holding DSC, turn power ON to enter MMSI code programming condition.
- After the display appears, release DSC, a cursor starts blinking.
- Edit the specified MMSI code by pushing ▲ or ▼.
- Push 16 or CH/WX to move the cursor forward or backward, respectively.
- Input 9-digit code, then push DSC to set the code.
- Returns to the normal operation.

Figure 6: MMSI code programming steps.
Distress Calling
To initiate a distress call, lift the red cover and press the DISTRESS button. Hold for several seconds until the distress sequence is transmitted. This will send your vessel's position and distress alert to other DSC-equipped vessels and shore stations.

Figure 7: Distress button for emergency situations.
NOAA Weather Channels
The RM20 provides access to 10 NOAA weather channels with alerts. This feature keeps you informed of threatening weather conditions in your vicinity through audible and visual alerts.

Figure 8: NOAA weather alert functionality.
Dual & Tri-Watch Functions
The radio supports Dual Watch and Tri-Watch modes. Dual Watch allows you to alternately listen to the current channel and Channel 16. Tri-Watch allows you to alternately watch the current channel, Channel 16, and a CALL channel.
Video 1: Demonstration of Dual and Tri-Watch functions on the Retevis RM20 radio.
External Speaker Support
The RM20 features a high-power internal speaker with up to 110dB volume. For even louder audio, an external 3.5mm speaker can be connected to the radio.

Figure 9: Connecting an external speaker.
Maintenance
Aqua Quake Draining Function
The radio is equipped with an Aqua Quake draining function. This feature uses vibrations to remove water from the speaker grille, ensuring clear audio even if water enters the speaker area.

Figure 10: Aqua Quake draining function.
Waterproof Rating (IP67)
The Retevis RM20 complies with IP67 waterproof standards. This means the radio can withstand immersion in water up to 1 meter deep for up to 30 minutes. While highly water-resistant, it is recommended to minimize prolonged submersion and ensure all covers and connections are securely fastened.

Figure 11: IP67 Waterproof rating.
Troubleshooting
If you encounter issues with your Retevis RM20 radio, please refer to the following common troubleshooting steps:
- No Power: Ensure the DC power cable is securely connected and the power source (e.g., boat battery) is providing 13V DC. Check for blown fuses in the power line.
- No Audio / Distorted Audio: Check the volume level. If an external speaker is connected, ensure it is functioning correctly. Use the Aqua Quake draining function if the speaker grille is wet.
- Cannot Transmit / Screen Flashes: Verify the antenna connection is secure. Ensure the power supply is stable and sufficient. If the issue persists, contact customer support.
- GPS Not Acquiring Position: Ensure the radio has a clear view of the sky. Allow several minutes for the GPS receiver to acquire satellites.
- MMSI Programming Issues: Remember the MMSI code can only be programmed twice. If you encounter errors, double-check the input sequence. For further assistance, contact Retevis support.
For more complex issues or if troubleshooting steps do not resolve the problem, please contact Retevis customer support.
Specifications
| Feature | Detail |
|---|---|
| Brand | Retevis |
| Model Number | RM20 |
| Item Weight | 2.86 pounds (1296 Grams) |
| Product Dimensions | 6.02 x 5.98 x 2.64 inches |
| Waterproof Rating | IP67 |
| Number of Channels | 88 |
| Frequency Range | 156-174 MHz |
| Voltage | 13 Volts (DC) |
| Special Feature | Support External Speaker, Built-in GPS, DSC, NOAA Weather Alerts |
Warranty and Support
Retevis provides a 2-year warranty for the radio body and a 1-year warranty for accessories. If any issues arise, please contact Retevis customer service on Amazon. They aim to reply within 12 hours.
Beyond the warranty period, maintenance services are still offered, with buyers responsible for associated costs. Retevis strives to process all inquiries in the most hassle-free way possible.
For additional support and resources, visit the official Retevis store on Amazon: Retevis Store
Related documentsRM20


Ask a question about this manual
Ask about setup, troubleshooting, compatibility, parts, safety, or missing instructions. Manuals+ will review the question and use this page’s manual context to help answer it.