
1. Introduction
The ARCCAPTAIN TIG Welder 200A is a versatile and powerful 2-in-1 welding machine, offering both High Frequency TIG and Stick (MMA) welding capabilities. Designed for both 110V and 220V dual voltage operation, it provides up to 200 amps, ensuring precise welds for stainless and mild steel. Featuring an advanced MCU and IGBT Inverter technology digital control system, it delivers flawless welds with minimal spatter. Key functions include Post Gas, Down-slope, and 2T/4T, all easily managed via a large LED digital display. Its lightweight and compact design, coupled with a fan-on-demand cooling system and comprehensive safety features (VRD, over current/voltage/load/heating protection), make it an ideal choice for various welding tasks.

Figure 1: ARCCAPTAIN TIG Welder 200A and included accessories.
2. Safety Precautions
Always prioritize safety when operating welding equipment. Failure to follow safety guidelines can result in serious injury or death.
- Electric Shock: Welding current can cause fatal electric shock. Always wear dry, insulated gloves and clothing. Ensure proper grounding of the welding machine and workpiece. Never touch live electrical parts.
- Fumes and Gases: Welding fumes and gases can be hazardous to your health. Work in a well-ventilated area. Use local exhaust ventilation or a respirator if ventilation is poor.
- Arc Rays: Arc rays can injure eyes and burn skin. Always wear a welding helmet with a proper shade filter. Wear protective clothing (long sleeves, pants, and welding gloves) to protect exposed skin.
- Fire and Explosion: Welding can cause fire or explosion. Keep flammable materials away from the welding area. Have a fire extinguisher readily available. Do not weld on containers that have held flammable materials.
- Burns: Hot metal and sparks can cause burns. Wear protective clothing and gloves. Allow welded materials to cool before handling.
- Noise: Some welding operations can produce noise that may damage hearing. Wear ear protection.

Figure 2: The ARCCAPTAIN TIG200 features multiple safety protections including VRD, over current/voltage/load/heating protection, and IP21S water rating.
3. Components and Accessories
3.1 Included Accessories:
- ARCCAPTAIN 200 Amp TIG Welder
- 13ft TIG Torch
- 10ft Ground Clamp
- 10ft Electrode Holder
- Conversion adapter (for 110V power)
- 8ft Argon Gas Hose (with connector)
- Brush & Hammer
- Tungsten electrode
- Shoulder Strap

Figure 3: All accessories included with your ARCCAPTAIN TIG Welder 200A.
3.2 Welder Components:
Familiarize yourself with the main components of the ARCCAPTAIN TIG200 welder:
- Welding Mode Button: Selects between MMA (Stick) and TIG (2T/4T) modes.
- Preferences Selection: Adjusts parameters like Down-slope and Post Gas.
- Control Mode: Switches between Panel and Remote control (for foot pedal).
- Adjustable Knob: Used to set amperage and other numerical parameters.
- LED Digital Display: Shows current settings and welding parameters.
- Positive Welding Terminal (+): Connects to the electrode holder for Stick welding or the ground clamp for TIG welding.
- Negative Welding Terminal (-): Connects to the ground clamp for Stick welding or the TIG torch for TIG welding.
- Gas Outlet: Connects to the argon gas hose.
- TIG Torch Connector: Connects the TIG torch.
- Air Vents: Ensures proper cooling of the internal components.
- Power Switch: Turns the machine on/off.
- Power Cable: Connects the machine to the power source.
- Cooling Fan: Activates only when needed to reduce noise and save energy.
- Gas Inlet: Connects to the argon regulator and gas cylinder.

Figure 4: Front and rear view of the ARCCAPTAIN TIG Welder 200A with labeled components.
4. Setup
4.1 Power Connection:
- The ARCCAPTAIN TIG200 supports both 110V and 220V input.
- For 220V, connect the main power cable directly to a compatible 220V outlet.
- For 110V, use the provided conversion adapter to connect the main power cable to a 110V outlet.
- Ensure the power source meets the machine's requirements (refer to specifications).
4.2 Gas Connection (TIG Welding):
- Connect the argon gas hose to the Gas Inlet on the rear of the machine and to your argon gas cylinder via the regulator.
- Ensure all connections are secure to prevent gas leaks.
4.3 Connecting Welding Cables:
The connection method depends on the welding mode:
- TIG Mode: Connect the TIG torch to the TIG Torch Connector. Connect the ground clamp cable to the Positive Welding Terminal (+).
- Stick Mode: Connect the electrode holder cable to the Positive Welding Terminal (+). Connect the ground clamp cable to the Negative Welding Terminal (-).

Figure 5: Proper cable connections for Stick and TIG welding modes.
4.4 Foot Pedal Connection (Optional):
- If using an optional foot pedal, connect it to the 5-pin foot pedal interface on the welder.
- Switch the Control Mode to 'Remote' on the display panel to enable foot pedal control.

Figure 6: The welder features a 5-pin foot pedal interface for precise amperage control.
5. Operating Instructions
5.1 Powering On:
- Ensure all connections are secure.
- Flip the Power Switch to the 'ON' position. The LED display will illuminate.
- The cooling fan will run briefly during startup and then activate only when necessary during operation.
5.2 Selecting Welding Mode:
- Press the 'Welding Mode' button to toggle between MMA (Stick) and TIG (2T/4T) modes.

Figure 7: The ARCCAPTAIN TIG200 supports both High Frequency TIG and MMA (Stick) welding.
5.3 Adjusting Parameters:
- Use the 'Adjustable Knob' to set the desired amperage.
- In TIG mode, you can adjust 'Post Gas' time (1-10s) and 'Down-slope' time (0-10s) via the 'Preferences' button.

Figure 8: Post Gas protects the weld and torch, while Down-slope ensures a smooth current decay.
5.4 2T/4T Function (TIG Mode):
- 2T (Two-Touch): Press and hold the torch trigger to start the arc and weld. Release the trigger to stop. Ideal for short welds.
- 4T (Four-Touch): Press and release the trigger to start the arc. The arc will remain active until the trigger is pressed and released again. Suitable for long welds, reducing hand fatigue.
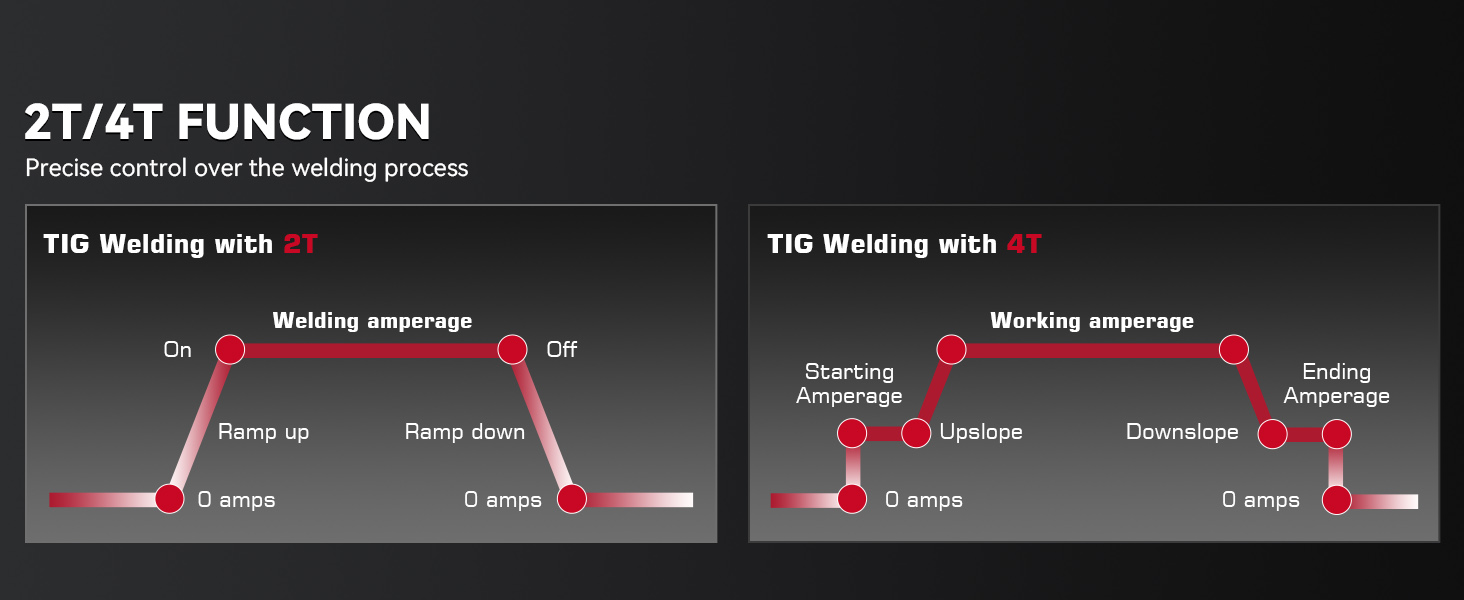
Figure 9: Understanding 2T and 4T functions for precise welding control.
5.5 Welding Different Materials:
The ARCCAPTAIN TIG200 is suitable for various metals including Carbon Steel, Stainless Steel, and Copper. It can handle material thicknesses from 0.02 inches (0.5mm) to 0.4 inches (10mm).

Figure 10: The welder is suitable for Carbon Steel, Stainless Steel, Copper, Sheet Metal, Square Pipe, and Round Tube.

Figure 11: The ARCCAPTAIN TIG200 can weld materials from 0.02 inches (0.5mm) to 0.4 inches (10mm) thick.
5.6 Official Product Video:
Video 1: Official ARCCAPTAIN High Frequency TIG Welder 200A (with MMA) product overview.
6. Maintenance
- Cleaning: Regularly clean the machine's exterior with a soft, dry cloth. Ensure air vents are free from dust and debris to maintain proper airflow.
- Fan Operation: The cooling fan operates on demand. Do not block the air vents.
- Cable Inspection: Periodically inspect welding cables, torch, and ground clamp for any signs of damage, fraying, or loose connections. Replace damaged components immediately.
- Storage: Store the welder in a dry, clean environment away from direct sunlight and extreme temperatures.

Figure 12: The ARCCAPTAIN TIG200 undergoes rigorous testing for durability, including vibration, drop, waterproof, and metal dust tests.
7. Troubleshooting
If you encounter issues with your ARCCAPTAIN TIG Welder 200A, refer to the following common problems and solutions:
- No Power: Check the power cable connection, ensure the power switch is on, and verify the power outlet is functioning. For 110V, ensure the adapter is correctly used.
- No Arc: Ensure proper grounding of the workpiece. Check all cable connections (torch, ground clamp, electrode holder). Verify correct welding mode selection.
- Poor Weld Quality: Adjust amperage settings according to material thickness (refer to setup guide). Ensure proper gas flow (for TIG). Check for clean workpiece and correct electrode/filler rod.
- Overheating: The machine has built-in overheating protection. If it shuts down due to overheating, allow it to cool down. Ensure proper ventilation and clear air vents.
- Fan Not Running: The fan operates on demand. It will only run when the machine requires cooling. This is normal operation.
For more detailed troubleshooting or issues not listed here, please contact ARCCAPTAIN customer support.
8. Specifications
| Feature | Value |
|---|---|
| Brand | ARCCAPTAIN |
| Model Number | ARCCAPTAIN TIG200 |
| Part Number | TIG200 |
| Item Weight | 20.8 pounds |
| Package Dimensions | 18.25 x 15 x 7.25 inches |
| Color | Red |
| Style | TIG200 |
| Pattern | TIG200 |
| Batteries Included? | No |
| Batteries Required? | No |
| Date First Available | July 2, 2022 |

Figure 13: Detailed electrical specifications for the ARCCAPTAIN TIG Welder 200A.

Figure 14: TIG200 Set-Up Guide providing recommended amperage, tungsten, filler metal, and gas settings for steel and stainless steel.
9. Warranty and Support
ARCCAPTAIN offers a 3-year quality service for this product. For any questions, technical assistance, or warranty claims, please contact ARCCAPTAIN customer support through their official channels. Refer to the product packaging or ARCCAPTAIN's official website for the most up-to-date contact information.


