1. Introduction
The ENEGON 4-in-1 Wireless Intervalometer is a versatile remote control device designed for precise camera shutter release. It supports both wireless and wired connections, offering advanced timing functions for various photography techniques, including time-lapse, long exposure, and continuous shooting. This manual provides detailed instructions for setup, operation, and troubleshooting to ensure optimal performance.
2. Product Overview and Components
Familiarize yourself with the components of your ENEGON Intervalometer.

Image 2.1: ENEGON 4-in-1 Wireless Intervalometer Transmitter and Receiver components with numbered labels.
Transmitter (TX) Components:
- Back/Lock button: Used to navigate back in menus or lock settings.
- Timer start/stop: Initiates or halts the timer functions.
- Direction buttons: Used for navigation and adjusting values (Up, Down, Left, Right).
- Set button: Confirms selections and enters menus.
- Shutter release button: Triggers the camera shutter. Press halfway for autofocus, full press for shutter release.
- Display: LCD screen showing current settings and status.
- Indicator light: Shows operational status.
- Power switch: Turns the transmitter on/off.
- 2.5 mm cable socket: For wired connection to the camera.
Receiver (RX) Components:
- Power Switch: Turns the receiver on/off.
- Indicator light: Shows operational status.
- Shutter release button: Manual shutter release on the receiver.
- 2.5 mm cable socket: For wired connection to the camera.
- Hot shoe: Mounts the receiver to the camera's hot shoe.
- Lock ring: Secures the receiver to the hot shoe.
- Battery compartment: Houses the AAA batteries.
3. Setup
3.1 Battery Installation
The ENEGON Intervalometer requires 4 AAA batteries (2 for the Transmitter, 2 for the Receiver).
- Locate the battery compartment on the back of both the Transmitter and Receiver.
- Slide the battery cover open.
- Insert 2 AAA batteries into each unit, ensuring correct polarity (+/-).
- Close the battery covers securely.
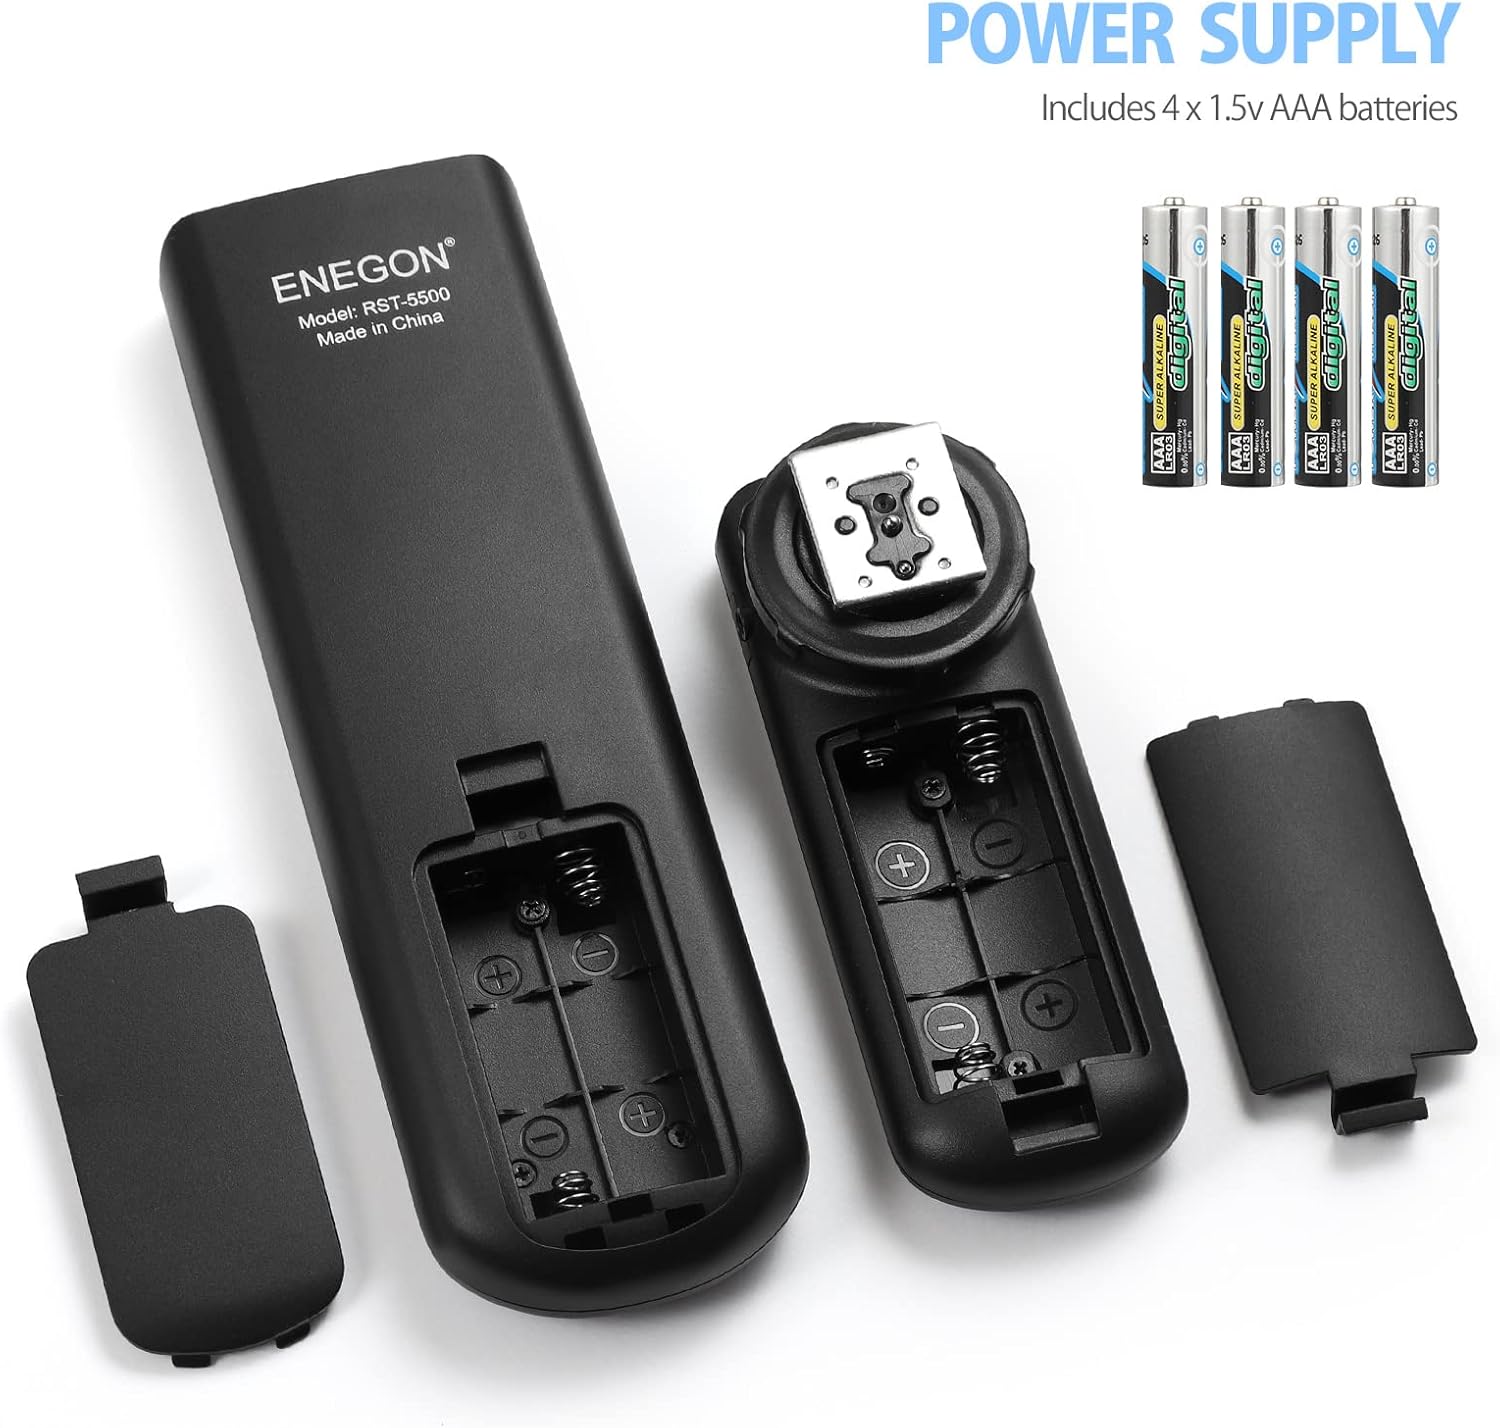
Image 3.1: Battery compartments of the ENEGON intervalometer, showing where to insert 4 AAA batteries.
3.2 Connecting to Your Camera
The intervalometer supports both wired and wireless connections to your camera. The package includes various connection cables (C1, C2 for Canon; S1, S2 for Sony) to ensure compatibility.

Image 3.2: Connection diagram showing various cable types for Canon and Sony cameras.
Wired Connection:
- Select the appropriate connection cable for your camera model.
- Connect one end of the cable to the 2.5 mm cable socket on the Transmitter (or Receiver, if using only the receiver as a wired remote).
- Connect the other end of the cable to your camera's remote control terminal.
- Ensure both the intervalometer unit and your camera are powered on.
Wireless Connection:
- Select the appropriate connection cable for your camera model.
- Connect one end of the cable to the 2.5 mm cable socket on the Receiver.
- Connect the other end of the cable to your camera's remote control terminal.
- Mount the Receiver onto your camera's hot shoe and secure it with the lock ring.
- Ensure both the Transmitter and Receiver are powered on. The Transmitter will communicate with the Receiver wirelessly (up to 300 feet / 100 meters in open areas).
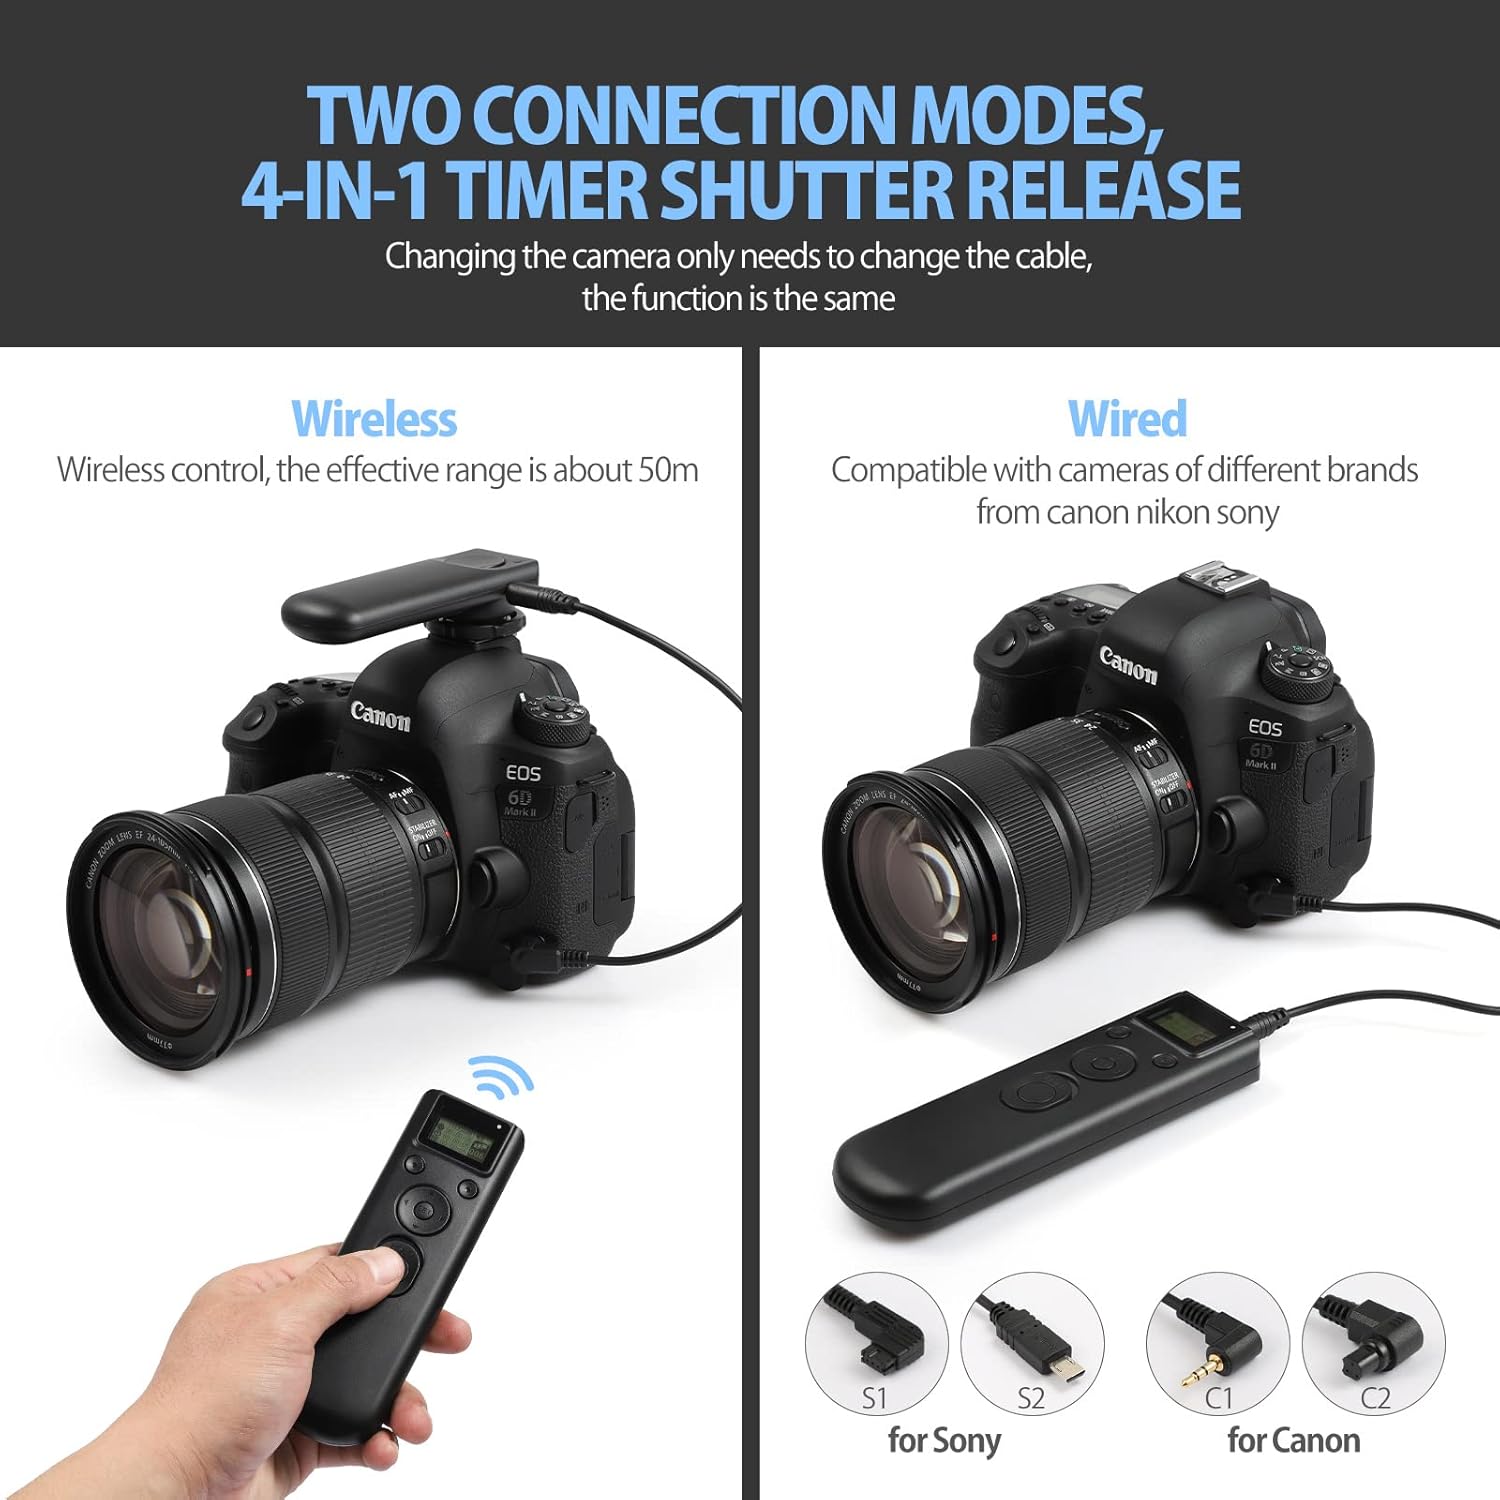
Image 3.3: Illustration of wireless and wired connection modes.
4. Operating Instructions
The ENEGON Intervalometer offers several modes for precise control over your camera's shutter.
4.1 Power On/Off
To power on the Transmitter or Receiver, slide the respective power switch to the 'ON' position. To power off, slide the switch to 'OFF'.
4.2 Basic Shutter Release
In both wired and wireless modes, you can manually trigger the camera shutter:
- Press the Shutter Release button halfway to activate autofocus (if your camera and lens support it).
- Press the Shutter Release button fully to take a picture.

Image 4.1: Using the intervalometer for remote shutter release.
4.3 Timer Functions (Time-Lapse Photography)
The intervalometer allows you to program a sequence of shots with specific delays, exposure times, and intervals. The settings can be adjusted from 1 second to 99 hours, 59 minutes, and 59 seconds. The number of shots can be set from 1 to 399.

Image 4.2: Key settings for time-lapse photography: Delay, Exposure, Interval, and Frames.
To set the timer functions:
- Power on the Transmitter. The LCD display will show the current settings.
- Use the Direction buttons (Up/Down/Left/Right) to navigate between the settings: DELAY (waiting time), EXPOSURE (shutter open time, for Bulb mode), INTERVAL (time between shots), and FRAMES (number of shots).
- Press the Set button to select a setting for adjustment.
- Use the Direction buttons to change the values for hours, minutes, and seconds.
- Press the Set button again to confirm the value and move to the next segment (e.g., from hours to minutes).
- Once all desired settings are configured, press the Timer start/stop button to begin the programmed sequence.
- To stop the sequence prematurely, press the Timer start/stop button again.
Specific Timer Modes:
- Delay Mode: Set a DELAY time before the first shot is taken. EXPOSURE, INTERVAL, and FRAMES can be set to 0 if only a delayed single shot is desired.
- Bulb Mode (Long Exposure): Set your camera to Bulb mode. On the intervalometer, set the EXPOSURE time to the desired duration. DELAY, INTERVAL, and FRAMES can be adjusted as needed.
- Intervalometer Mode (Time-Lapse): Set DELAY to 0 (or a desired start delay). Set EXPOSURE to the desired shutter speed (or 0 if camera controls exposure). Set INTERVAL to the time between the end of one exposure and the start of the next. Set FRAMES to the total number of photos.
- Continuous Shooting: Set DELAY to 0, EXPOSURE to 0, INTERVAL to 0, and FRAMES to the desired number of shots (or 399 for maximum). The camera will shoot continuously until the set number of frames is reached or the Timer start/stop button is pressed.
5. Compatibility
The ENEGON 4-in-1 Wireless Intervalometer is designed for broad compatibility with various camera models from Canon, Nikon, and Sony. It includes four different connection plugs (C1, C2, S1, S2) to match specific camera remote ports.
Refer to your camera's manual to identify the correct remote control terminal and select the corresponding cable from the provided set.
6. Troubleshooting
If you encounter issues with your ENEGON Intervalometer, please refer to the following common solutions:
- Device not powering on: Check if the batteries are correctly installed with the right polarity. Replace batteries if they are depleted.
- Camera not responding to shutter release:
- Ensure both the Transmitter and Receiver (for wireless) or the Transmitter/Receiver (for wired) are powered on.
- Verify that the correct connection cable is securely plugged into both the intervalometer unit and the camera's remote terminal.
- Check your camera settings to ensure it is configured to accept remote shutter input.
- For wireless mode, ensure the Transmitter and Receiver are within range (up to 300 feet / 100 meters in open areas) and there are no significant obstructions.
- Display is dim or blank: Replace the AAA batteries in the Transmitter.
- Timer functions not executing correctly: Double-check all DELAY, EXPOSURE, INTERVAL, and FRAMES settings on the Transmitter. Ensure your camera is in the appropriate mode (e.g., Bulb for long exposures).
- No autofocus with half-press: Some camera models or settings may not support autofocus via remote half-press. Ensure your camera's focus mode is set appropriately, or manually pre-focus.
7. Specifications
| Feature | Specification |
|---|---|
| Model | RST-8500 |
| Wireless Frequency | GFSK 2.4GHz |
| Wireless Transmission Distance | Up to 300 feet (100 meters) in open area |
| Timer Settings Range | 1 second to 99 hours, 59 minutes, 59 seconds |
| Number of Shots | 1 to 399 |
| Power Source | 4 x AAA batteries (2 for Transmitter, 2 for Receiver) |
| Item Weight | 8.8 ounces |
| Package Dimensions | 8.86 x 5 x 1.54 inches |
| Compatible Devices | Cameras (Canon, Nikon, Sony via interchangeable cables) |
8. Maintenance
To ensure the longevity and proper functioning of your ENEGON Intervalometer, follow these maintenance guidelines:
- Cleaning: Use a soft, dry cloth to clean the device. Do not use liquid cleaners or solvents.
- Storage: Store the intervalometer in a cool, dry place away from direct sunlight and extreme temperatures. Remove batteries if the device will not be used for an extended period to prevent leakage.
- Handling: Avoid dropping the device or subjecting it to strong impacts.
- Battery Replacement: Replace batteries promptly when the display becomes dim or the device stops responding.
9. Warranty and Support
For warranty information and customer support, please refer to the documentation included with your purchase or contact the retailer where the product was acquired. ENEGON is committed to providing reliable products and assistance.


