1. Product Overview
The DAKASON 4FT Linkable LED Linear Light is a commercial-grade lighting fixture designed for various indoor applications such as offices, workshops, garages, schools, and markets. It features both direct (down) and indirect (up) lighting components, offering versatile illumination options. The fixture is energy-efficient, color temperature selectable, and dimmable, providing adaptable lighting solutions for different environments.
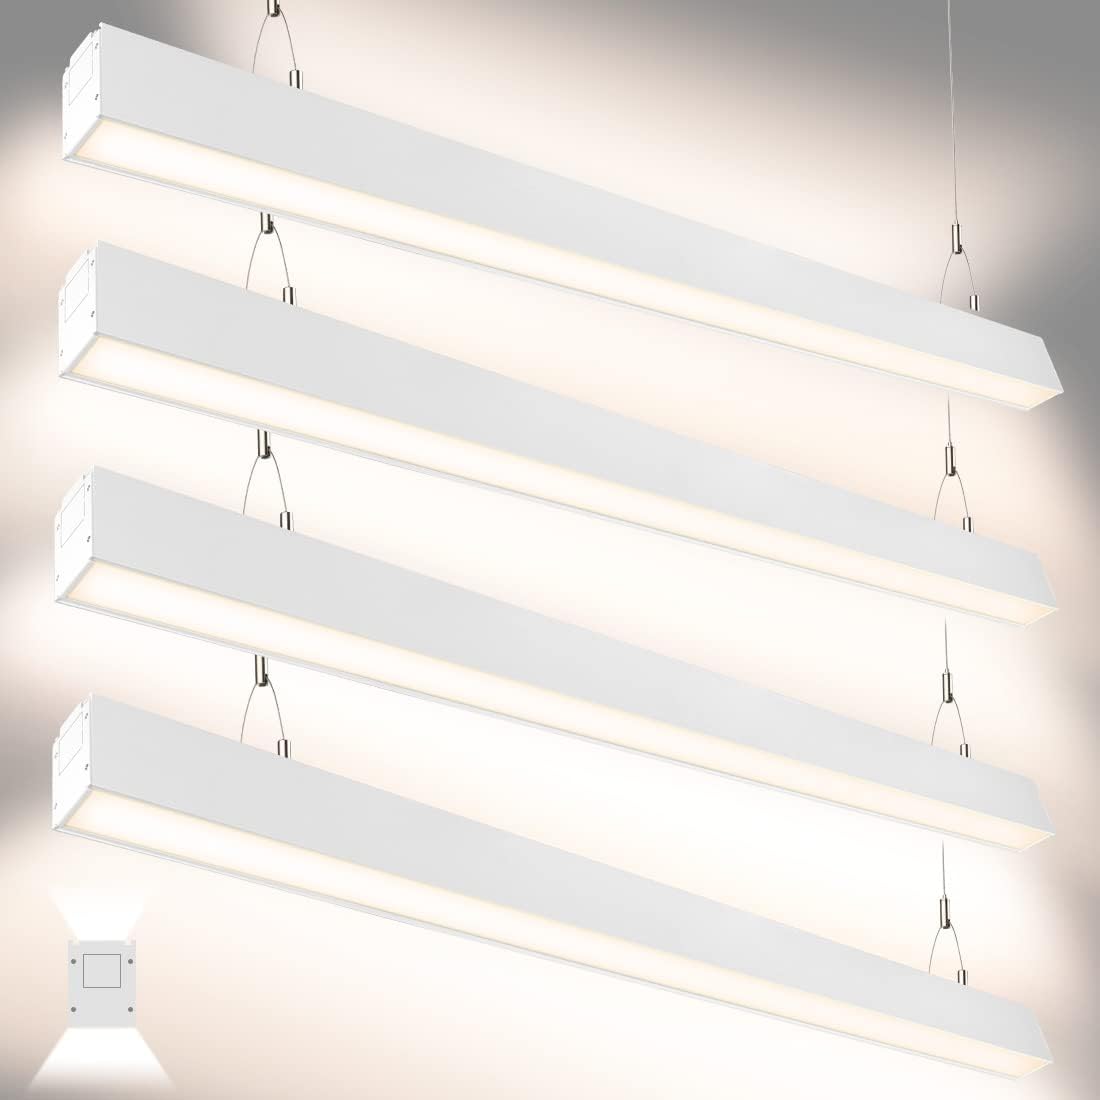
Figure 1.1: Overview of DAKASON 4FT Linkable LED Linear Lights installed.
Key Features:
- Direct and Indirect Lighting: Provides 35W downlight for focused illumination and 15W uplight for ambient lighting, reducing eye fatigue.
- Energy Efficiency: Utilizes high-efficient SMD2835 LEDs, delivering 5000 lumens with only 50W total power consumption, replacing 150W fluorescent tubes.
- Adjustable Color Temperature (CCT): Offers 3000K (Warm White), 4000K (Neutral White), and 5000K (Daylight White) options, selectable via a switch before installation.
- Linkable Design: Allows seamless continuous runs of up to 7 lights, providing uniform architectural lighting.
- 0-10V Dimmable: Compatible with 0-10V dimmers (not included) for smooth brightness control from 0% to 100% without flickering or buzzing.
- Durable Construction: Features a frosted downlight lens for soft, even light distribution and a die-cast aluminum housing for efficient heat dissipation.
- Suspension Mount: Includes all necessary accessories for suspension mounting, with an adjustable hanging height from 5 inches to 6.5 feet.
2. Safety Information
Please read and understand all instructions before installing or operating this fixture. Failure to follow these instructions may result in electric shock, fire, or other hazards that could cause personal injury or property damage.
- WARNING: Risk of electric shock. Disconnect power at the fuse or circuit breaker before installation or servicing.
- WARNING: Risk of fire. Use only with specified voltage and wattage.
- Installation must be performed by a qualified electrician in accordance with all national and local electrical codes.
- Ensure the supply voltage is correct for the fixture (AC100-277V).
- Do not install near heat sources or in areas with excessive moisture.
- Do not look directly into the LED light source when the fixture is powered on.
- Handle the fixture with care to avoid damage to components.
- Keep packaging materials away from children.
3. Package Contents
Verify that all components are present and undamaged before beginning installation. If any parts are missing or damaged, contact DAKASON customer support.
- DAKASON 4FT Linkable LED Linear Light Fixture (Quantity: 4 for 4-pack)
- Suspension Cables (Adjustable, typically 2 per fixture)
- Ceiling Mount Hardware (Screws, anchors, T-bolts, clips)
- Linking Connectors (for continuous runs)
- Instruction Manual

Figure 3.1: Included accessories for installation.
4. Specifications
| Attribute | Specification |
|---|---|
| Model Number | DKS-WL-3LSUD4FT50WBDUV |
| Brand | DAKASON |
| Power Consumption | 50W (35W Downlight + 15W Uplight) |
| Luminous Flux | 5000 Lumens |
| Input Voltage | AC100-277V |
| Color Temperature (CCT) | 3000K / 4000K / 5000K Selectable |
| Dimmability | 0-10V Dimming (dimmer not included) |
| Color Rendering Index (CRI) | 80 |
| Lifespan | 50,000 Hours |
| Material | Die-cast Aluminum Housing, Frosted Lens |
| Dimensions (L x W x H) | 94" x 2.75" x 1.97" (per fixture) |
| Installation Type | Suspension Mount |
| Indoor/Outdoor Usage | Indoor, Water Resistant |
| Special Features | Adjustable CCT, Dimmable, Linkable |

Figure 4.1: Internal components and construction details.
5. Setup and Installation
This fixture is designed for suspension mounting. Ensure the mounting surface can support the weight of the fixture(s) and that all electrical connections are made safely.
5.1 Tools Required (Not Included):
- Drill
- Screwdriver (Phillips and Flathead)
- Wire Strippers
- Measuring Tape
- Pencil
- Safety Glasses
5.2 Installation Steps:
- Power Disconnection: Turn off power at the circuit breaker before starting installation.
- Marking Mounting Points: Determine the desired location for the fixture(s). Use a pencil to mark the ceiling for the suspension cable anchors. For multiple linked fixtures, ensure proper spacing.
- Install Ceiling Anchors: Drill pilot holes at the marked points and insert appropriate ceiling anchors. Secure the ceiling mount hardware.
- Attach Suspension Cables: Attach the suspension cables to the ceiling mount hardware. The cable length is adjustable up to 79 inches (approx. 6.5 ft).

Figure 5.1: Suspension hardware and adjustable cable length.

Figure 5.2: Detail of the adjustable suspension cable mechanism.
- Hang the Fixture: Carefully attach the linear light fixture to the suspension cables. Adjust the cable length to achieve the desired hanging height.
- Electrical Wiring: Connect the fixture's wiring to the main power supply. This fixture is designed for hardwiring. Follow standard electrical codes for connecting Live, Neutral, and Ground wires. If using 0-10V dimming, connect the purple (DIM+) and gray (DIM-) wires to the compatible dimmer.
- Linking Multiple Fixtures (Optional): If installing multiple fixtures in a continuous run, use the provided linking connectors. Ensure power is disconnected before linking. Connect the fixtures mechanically using the linking plates and electrically using the internal wiring connectors.

Figure 5.3: Steps for linking multiple fixtures.
- Restore Power: Once all connections are secure and the fixture(s) are properly mounted, restore power at the circuit breaker.
6. Operating Instructions
6.1 Color Temperature Selection (CCT)
The DAKASON Linear Light allows you to select from three color temperatures: 3000K, 4000K, or 5000K. This selection must be made before installation by accessing the switch located on the fixture.
- Locate the CCT selection switch on the side of the fixture.
- Use a small tool (e.g., screwdriver) to slide the switch to your desired color temperature: 'W' for 3000K, 'CW' for 4000K, or 'C' for 5000K.
- Ensure the switch is firmly set in the chosen position.

Figure 6.1: CCT selection switch and corresponding light outputs.
6.2 Dimming Functionality
This fixture is compatible with 0-10V dimmers (not included). To utilize the dimming feature, ensure your electrical system includes a compatible 0-10V dimmer switch and that the fixture's dimming wires (purple and gray) are correctly connected during installation.
- Once installed with a 0-10V dimmer, use the dimmer switch to adjust the brightness from 0% to 100%.
- The fixture is designed for smooth dimming without flickering or buzzing.
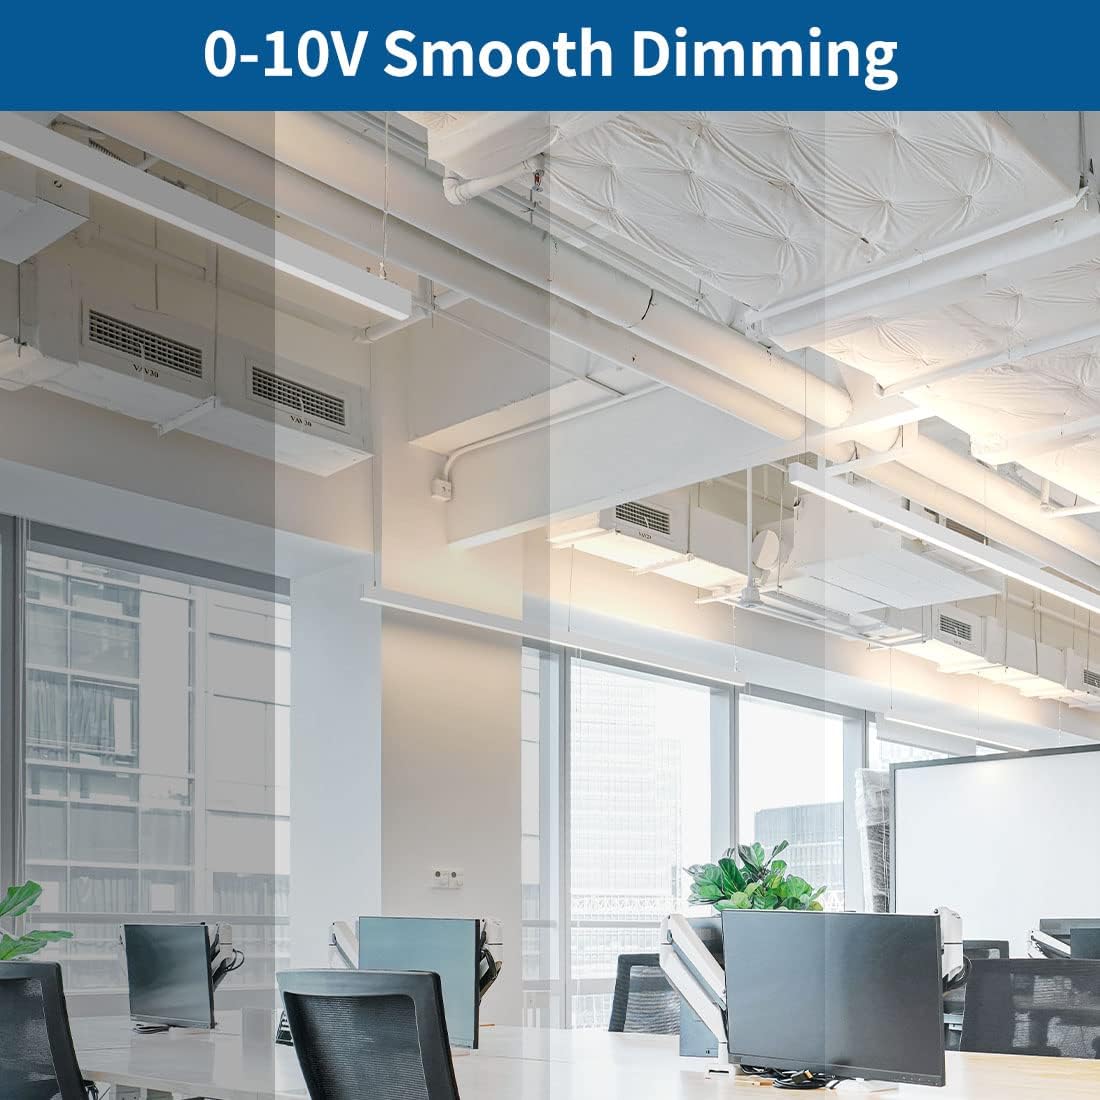
Figure 6.2: DAKASON linear lights operating with 0-10V dimming in an office environment.
6.3 Direct and Indirect Light Output
The fixture provides both downward and upward light distribution. The 35W downlight offers primary illumination, while the 15W uplight contributes to ambient lighting and helps reduce harsh shadows and glare, creating a more comfortable visual environment.
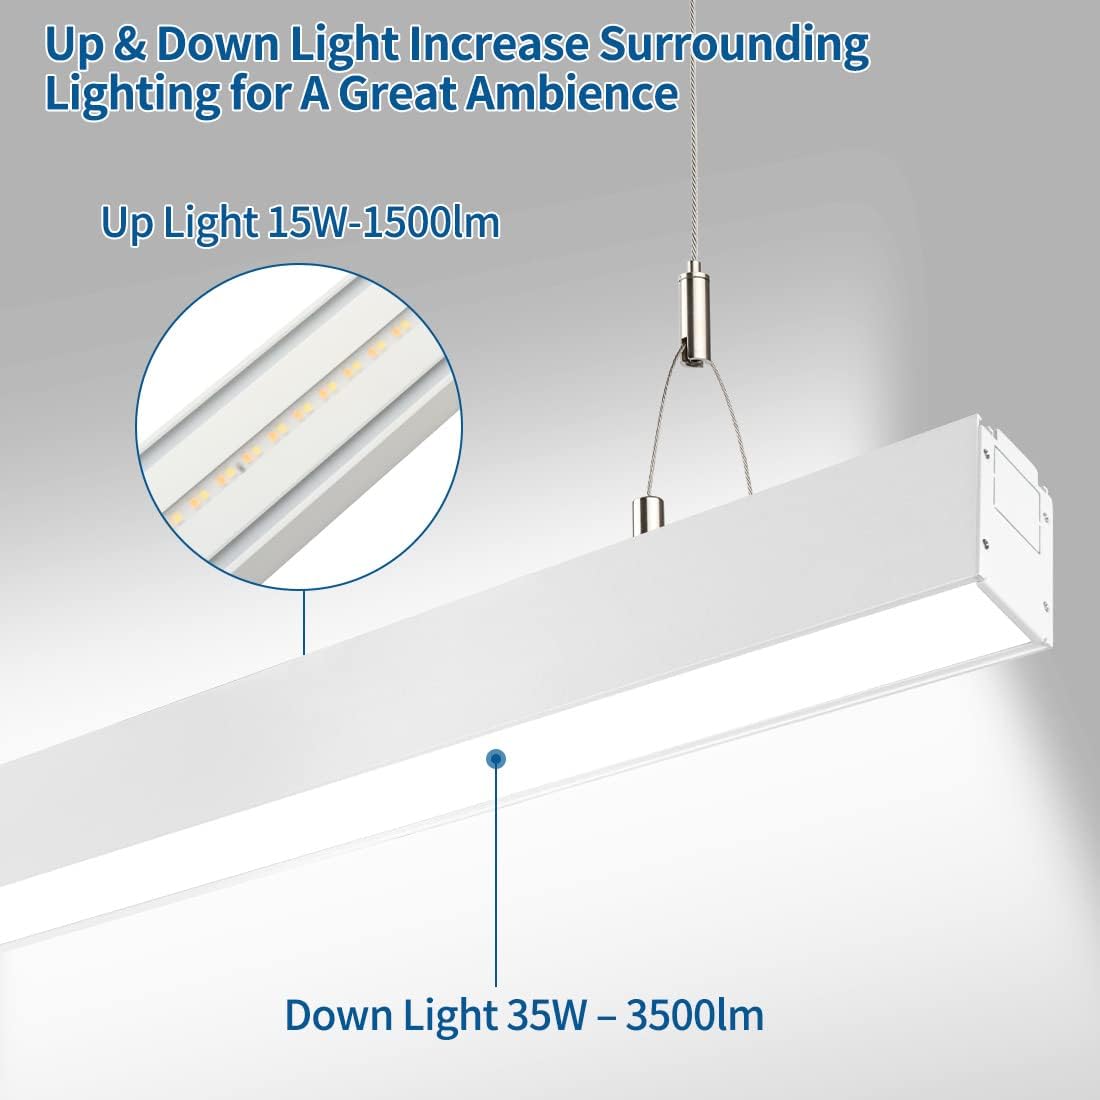
Figure 6.3: Detail of up and down light distribution.
7. Maintenance
The DAKASON LED Linear Light is designed for long-term, low-maintenance operation. Regular cleaning and inspection will help ensure optimal performance and lifespan.
- Cleaning: Disconnect power before cleaning. Use a soft, dry, or slightly damp cloth to wipe the exterior of the fixture. Do not use abrasive cleaners, solvents, or cleaners containing ammonia, as these may damage the finish or electrical components.
- Inspection: Periodically inspect the suspension cables and mounting hardware for any signs of wear, loosening, or damage. Ensure all electrical connections remain secure.
- LEDs: The LED light source is integrated and not user-replaceable. The fixture has a rated lifespan of 50,000 hours.
8. Troubleshooting
If you experience issues with your DAKASON LED Linear Light, refer to the following troubleshooting guide. If the problem persists, contact DAKASON customer support.
| Problem | Possible Cause | Solution |
|---|---|---|
| Light does not turn on | No power supply Loose wiring connection Faulty fixture | Check circuit breaker and wall switch. Verify all wiring connections are secure (ensure power is off). Contact customer support if wiring is correct and power is present. |
| Light flickers or buzzes | Incompatible dimmer switch Loose wiring Power fluctuations | Ensure a 0-10V compatible dimmer is used. Check wiring connections (ensure power is off). Consult an electrician to check power supply stability. |
| Incorrect color temperature | CCT selection switch set incorrectly | Disconnect power. Adjust the CCT selection switch to the desired setting. |
| Dimming not working | No 0-10V dimmer installed Incorrect dimmer wiring Incompatible dimmer | Install a compatible 0-10V dimmer. Verify purple and gray dimming wires are correctly connected (ensure power is off). Ensure the dimmer is a 0-10V type. |
| Multiple linked lights not working uniformly | Loose linking connections Power supply issues to one section | Disconnect power. Check mechanical and electrical linking connections between fixtures. Verify power distribution to all linked fixtures. |
9. Warranty Information
The DAKASON 4FT Linkable LED Linear Light comes with a 5-year limited warranty from the date of purchase. This warranty covers defects in materials and workmanship under normal use and service.
The warranty does not cover:
- Damage caused by improper installation or operation.
- Damage caused by unauthorized repairs or modifications.
- Damage caused by accidents, abuse, misuse, or natural disasters.
- Normal wear and tear.
To make a warranty claim, please retain your proof of purchase and contact DAKASON customer support.
10. Customer Support
For technical assistance, troubleshooting not covered in this manual, or warranty inquiries, please contact DAKASON customer support through the retailer where the product was purchased or visit the official DAKASON website for contact information.
Please have your model number (DKS-WL-3LSUD4FT50WBDUV) and proof of purchase ready when contacting support.


