
1. Product Overview
The DieseRC 433Mhz Universal Wireless Remote Control Switch is designed to provide convenient and reliable remote control for various electrical appliances. This system includes a 12V DC 1-channel RF relay receiver module and a corresponding transmitter, utilizing EV1527 learning code for enhanced security. It offers stable performance with high reception sensitivity, allowing control within a 50-meter range in open areas, even through walls and doors.

Image 1: The DieseRC 433Mhz Universal Wireless Remote Control Switch system, showing the compact receiver module, the remote control, and a protective casing.
2. Safety Information
Please read and understand all safety instructions before installing and operating this device. Failure to follow these instructions may result in electric shock, fire, or serious injury.
- Ensure the power supply is disconnected before performing any wiring or maintenance.
- The receiver operates on 12V DC. Verify your power source matches this requirement.
- Do not expose the device to moisture or extreme temperatures.
- Only use the device within its specified current and voltage ratings (10A relay, 1V-250V input/output).
- Keep the remote control and receiver out of reach of children.
- If the product is damaged, do not attempt to repair it yourself. Contact customer support.
3. Package Contents
The standard package for model 1201+KT03 includes:
- 1 x 433Mhz RF Relay Receiver Module
- 1 x Remote Control Transmitter
- 1 x Protective Casing for Receiver Module
- 2 x CR2016 Batteries (pre-installed in remote)
4. Specifications
| Feature | Specification |
|---|---|
| Product Dimensions | 0.35 x 0.35 x 0.15 inches; 2.08 ounces |
| Item Model Number | 1201+KT03 |
| Batteries | 2 CR2016 batteries (included) |
| Manufacturer | DieseRC |
| Contact Type | Normally Closed (NC) |
| Current Rating | 10 Amps |
| Mounting Type | Wall Mount |
| Operation Mode | Automatic (Momentary, Toggle, Latched, Delay) |
| RF Frequency | 433Mhz |
| Decoding Type | EV1527 Learning Code |
| Receiver Work Voltage | DC 12V |
| Input/Output Voltage | 1V-250V |
5. Setup and Wiring
Proper wiring is crucial for the safe and correct operation of the remote control switch. Refer to the wiring diagrams below for common applications.
5.1 Wiring Diagram

Image 2: Detailed wiring diagram illustrating how to connect the DC 12V power supply to the receiver and how to connect a load (e.g., light bulb, electric lock) to the relay's normally open (NO), common (COM), and normally closed (NC) terminals.
The receiver module has three terminals for connecting the load: Normally Open (NO), Common (COM), and Normally Closed (NC). The choice of connection depends on whether you want the circuit to be open or closed when the relay is inactive.
- +V and -V: Connect your DC 12V power supply to these terminals. Ensure correct polarity.
- NO (Normally Open): This terminal is open when the relay is inactive and closes when the relay is activated.
- COM (Common): This is the common terminal for the relay switch.
- NC (Normally Closed): This terminal is closed when the relay is inactive and opens when the relay is activated.
5.2 Pairing the Remote Control (Latched Mode Example)
The receiver and transmitter need to be paired for communication. The product typically comes pre-set in latched mode, but you can re-pair or change modes as needed. Here's how to pair in Latched Mode:
- Press the learning button on the receiver module 3 times. The indicator light on the receiver will flash.
- Press the "ON" button on your remote control. The receiver's indicator light will flash to confirm successful pairing.
- Press the "OFF" button on your remote control. The receiver's indicator light will flash again to confirm successful pairing.
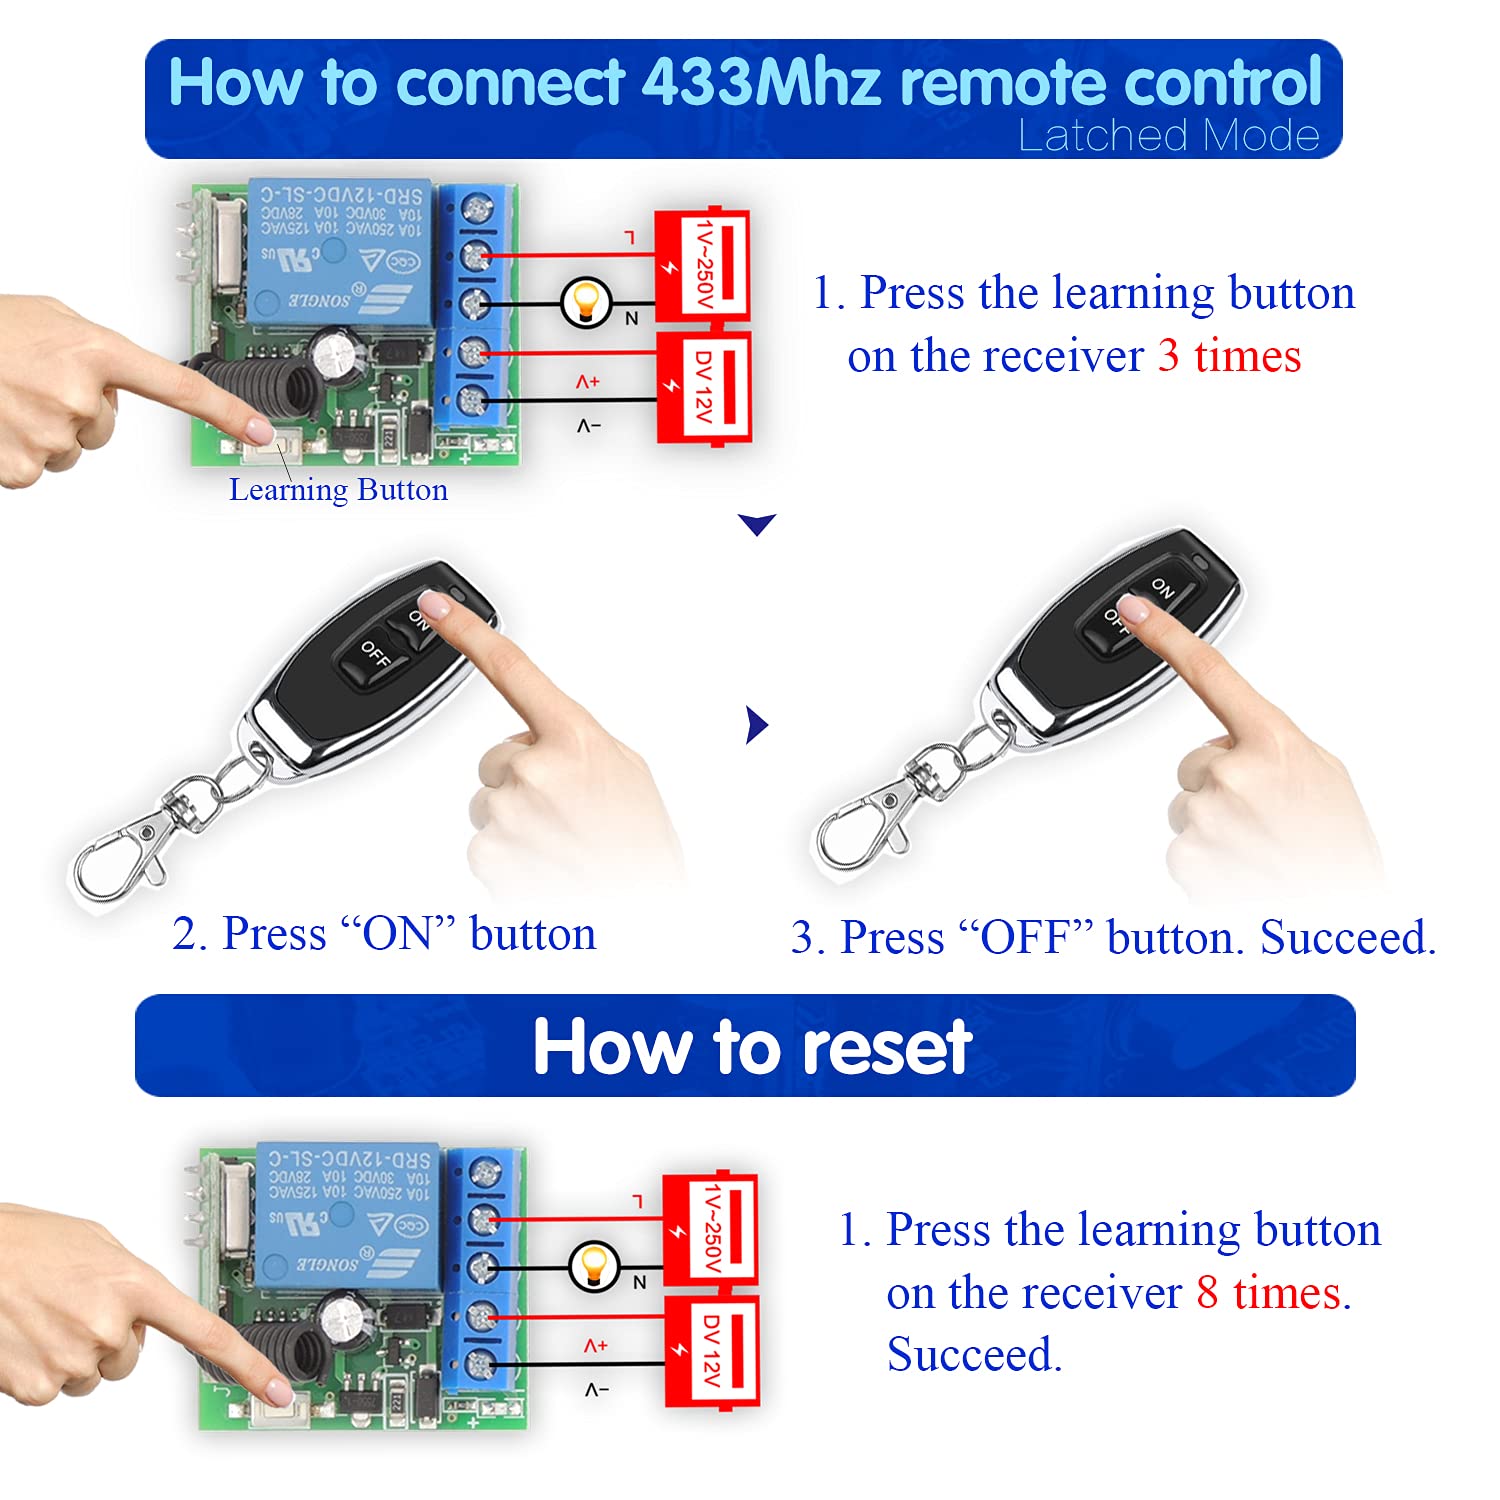
Image 3: Visual guide for pairing the remote control to the receiver in Latched Mode.
5.3 Resetting the Receiver
To clear all paired remote controls from the receiver's memory:
- Press the learning button on the receiver module 8 times.
- The indicator light will flash to confirm that all paired remotes have been cleared. The remote control will no longer work with this receiver until re-paired.

Image 4: Instructions for resetting the receiver, which clears all previously paired remote controls.
6. Operating Modes
The DieseRC remote control switch supports four operating modes, which can be configured by pressing the learning button a specific number of times. The product is typically pre-set to Latched Mode.

Image 5: Visual representation of the four available operating modes and their corresponding button presses.
- Momentary Mode (Press learning button 1 time):
Press and hold the "ON" button on the remote: The relay activates (light turns on). Release the "ON" button: The relay deactivates (light turns off). This mode is suitable for applications requiring a brief activation, like a garage door opener.
- Toggle Mode (Press learning button 2 times):
Press the "ON" button: The relay activates (light turns on). Press the "ON" button again: The relay deactivates (light turns off). This mode acts like a standard on/off switch.
- Latched Mode (Press learning button 3 times):
Press the "ON" button: The relay activates (light turns on). Press the "OFF" button: The relay deactivates (light turns off). This mode requires separate buttons for activation and deactivation.
- Delay Mode (Press learning button 4 times for 5s, 5 times for 10s, 6 times for 15s):
Press the "ON" button: The relay activates (light turns on) and remains active for a set duration (5, 10, or 15 seconds) before automatically deactivating. This is useful for timed operations.
7. Maintenance
- Cleaning: Use a dry, soft cloth to clean the receiver module and remote control. Do not use liquid cleaners or solvents.
- Battery Replacement (Remote Control): The remote control uses CR2016 batteries. If the remote's indicator light dims or the range decreases, replace the batteries. There is a screw port on the back of the transmitter for battery access.
- Antenna Adjustment: The receiver has an antenna that can be stretched to improve signal reception if needed.
8. Troubleshooting
| Problem | Possible Cause | Solution |
|---|---|---|
| Remote control does not work. |
|
|
| Device connected to relay does not turn on/off. |
|
|
| Reduced remote control range. |
|
|
9. Application Examples
The DieseRC 433Mhz Universal Wireless Remote Control Switch is versatile and can be used in a wide range of applications, including homes, farms, factories, offices, laboratories, and supermarkets. It allows for remote operation of various devices.
- Electric Locks and Gates: Control access to electric locks, electromagnetic doors, and gates remotely.
- Lighting Systems: Turn lights on or off from a distance, enhancing convenience in homes or offices.
- Fans and Ventilation Systems: Remotely operate fans or ventilation devices for improved air circulation.
- Water Pumps: Control water pumps for irrigation or other purposes.
- DIY Remote Control Projects: Integrate into custom projects requiring remote switching capabilities.

Image 6: Example of using the remote control switch for a gate with an electric lock, providing convenient remote access.

Image 7: The wireless RF relay module can be widely used for controlling devices such as ventilation systems, lamps, door systems, gates, and electric fans.

Image 8: The remote control offers a 50-meter range, enabling convenient control of home devices like outdoor lighting.
10. Product Demonstration Video
Watch this official product video for a visual demonstration of the DieseRC 433Mhz Universal Wireless Remote Control Switch in action, including setup and various functionalities.
Video 1: A demonstration of the DieseRC relay remote control switch, showing its operation with an electric lock and a light bulb, as well as the pairing and reset processes.
11. Warranty and Support
DieseRC is committed to providing high-quality products and excellent after-sales service. Our products undergo rigorous quality control and are designed for long-lasting and stable use.
- Quality Assurance: The relay is designed for over 100,000 uses, and the high-power terminal can withstand a current of 15A, ensuring good performance even with unstable current.
- Customer Support: For any questions, technical assistance, or issues with your product, please contact our support team. We are dedicated to helping customers with remote control problems and providing perfect after-sales service.
- Service Email: dieseelectronic@163.com