1. Introduction
This manual provides essential information and instructions for the installation and maintenance of your SRJTEK LCD Screen Replacement for the Samsung Galaxy A12. This product is designed to replace damaged or non-functional screens, restoring your device's display and touch functionality. Please read this manual thoroughly before attempting any installation.

This image displays the complete SRJTEK screen replacement kit for the Samsung Galaxy A12. It includes the new LCD screen assembly, a protective screen film, and a set of essential tools such as screwdrivers, pry tools, suction cup, and a SIM ejector pin, all necessary for the replacement process.
2. Compatibility
The SRJTEK A12 LCD screen replacement is specifically designed for the following Samsung Galaxy A12 models:
- SM-A125F/DSN
- SM-A125F/DS
- SM-A125F
- SM-A125M
- SM-A125U
- SM-A125U1
- SM-A125N
To verify your phone's model, navigate to your device's settings and check the 'About phone' section. Ensure your model number matches one of the listed compatible models to prevent incompatibility issues.
3. Package Contents
Your SRJTEK screen replacement package typically includes the following items:
- 1x Samsung Galaxy A12 LCD Screen Replacement Assembly (Black, No Frame)
- 1x Screen Protector
- 1x Set of Repair Tools (including screwdrivers, pry tools, suction cup, SIM ejector pin)

This diagram illustrates the items included in your SRJTEK screen replacement package. It typically contains the LCD screen, a set of repair tools, and a screen protector, ensuring you have the necessary components for the repair.
Please inspect all items upon receipt to ensure they are complete and undamaged. Contact customer support immediately if any items are missing or appear damaged.
4. Installation Guide
Disclaimer: Screen replacement requires technical skill and careful handling. Incorrect installation can cause further damage to your device. If you are not confident in your ability to perform this repair, it is highly recommended to seek professional assistance.
Before you begin, ensure your phone is powered off and disconnected from any power source. We strongly recommend watching a detailed video tutorial specific to Samsung Galaxy A12 screen replacement to familiarize yourself with the process.
Preparation Steps:
- Power Off Device: Completely power off your Samsung Galaxy A12.
- Backup Data: It is advisable to back up your phone's data before starting any repair.
- Gather Tools: Ensure all necessary tools (provided in the kit) are readily available.
- Discharge Battery: If possible, discharge the battery below 25% to reduce the risk of fire if accidentally punctured during repair.
General Installation Steps (Consult a video guide for detailed visuals):
- Remove SIM Tray: Use the SIM ejector tool to remove the SIM card tray.
- Open Back Cover: Carefully pry open the back cover of the phone. This may require heat to loosen adhesive.
- Disconnect Battery: Locate and disconnect the battery flex cable to prevent short circuits.
- Remove Screws and Midframe: Unscrew all screws securing the midframe and carefully remove it.
- Disconnect Old Screen: Locate and disconnect the flex cables connecting the old screen to the motherboard.
- Remove Old Screen: Carefully remove the old screen assembly from the phone frame. This may involve heating the edges to loosen adhesive.
- Clean Frame: Thoroughly clean any old adhesive residue from the phone frame.
- Test New Screen (Pre-installation): Before fully installing, connect the new screen's flex cables to the motherboard. Reconnect the battery and power on the phone to test display, touch, and other functions. Power off and disconnect the battery again after testing.
- Install New Screen: Apply new adhesive (if not pre-applied) to the phone frame and carefully place the new screen assembly. Ensure proper alignment.
- Reconnect Components: Reconnect the screen flex cables, battery, and reassemble the midframe and back cover, securing all screws.
- Final Check: Power on the device and perform a comprehensive test of all functions.
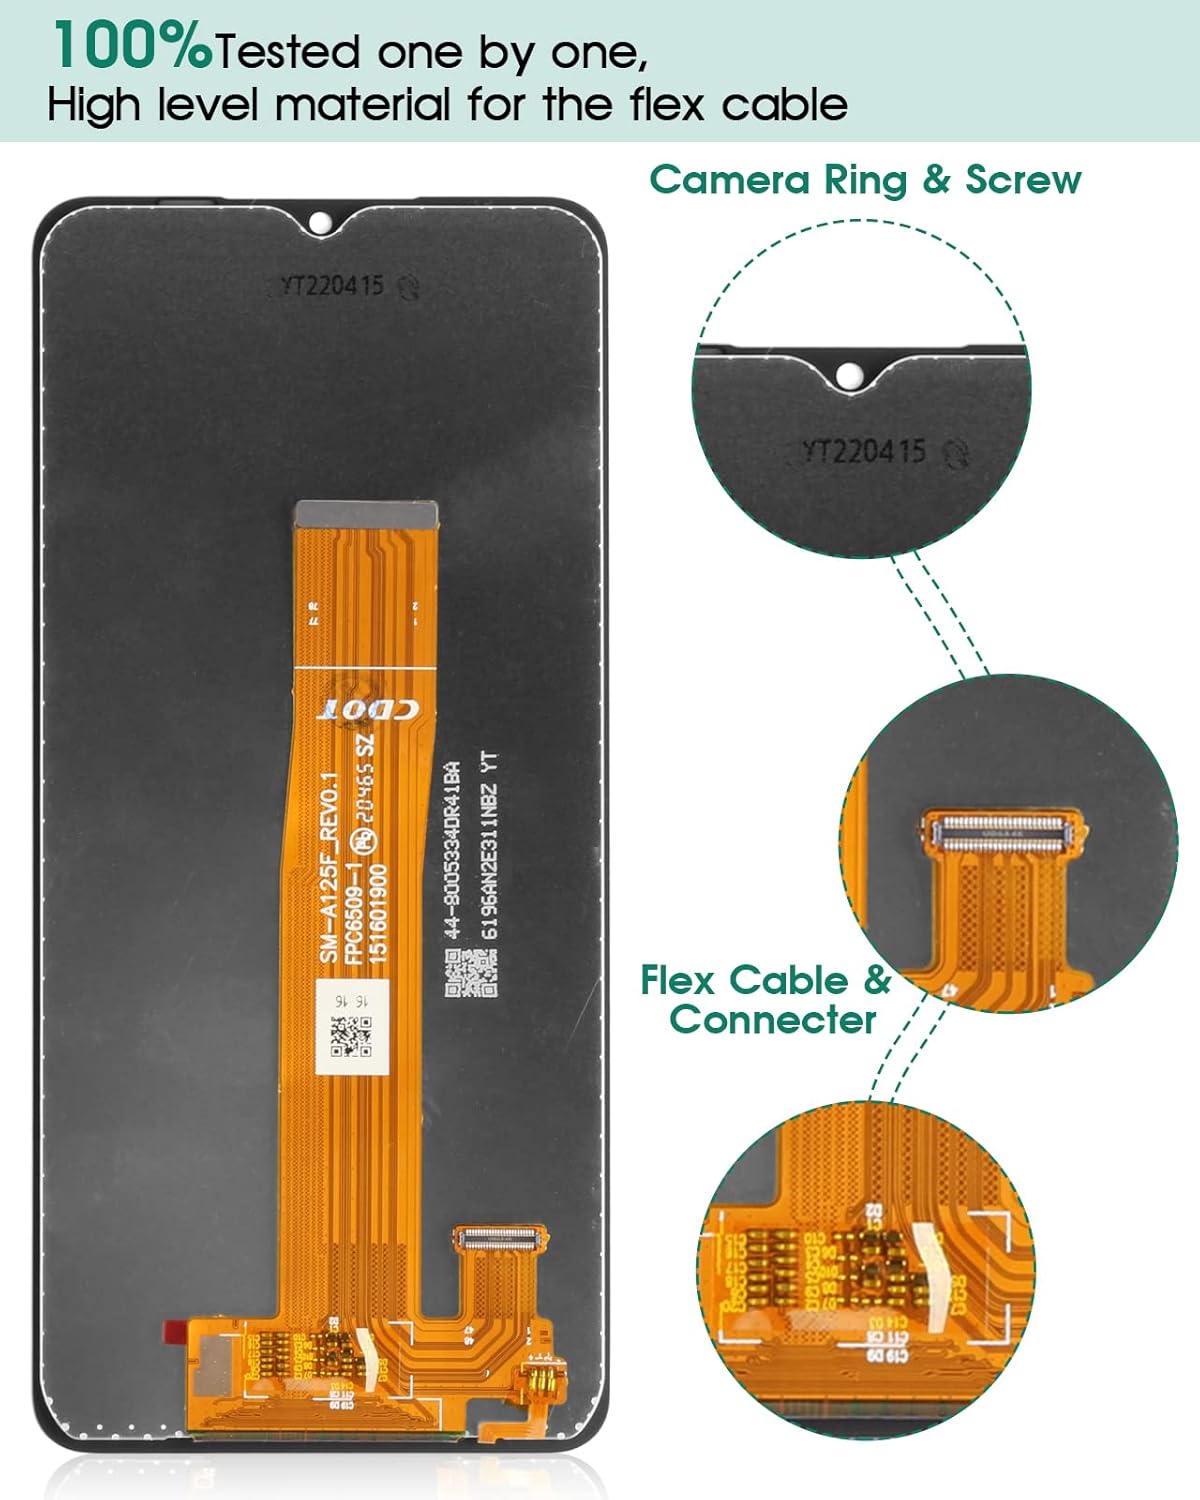
A detailed view of the replacement screen's internal components, highlighting the flex cable and its connector. This shows the precise design and connection points that need to be handled carefully during installation. The image also points out the camera ring and screw placement.
5. Post-Installation Testing
After installing the new screen, it is crucial to perform a thorough test to ensure all functionalities are working correctly. Power on your device and check the following:
- Display Functionality: Check for dead pixels, discoloration, or uneven backlighting.
- Touch Sensitivity: Test touch response across the entire screen. Drag an app icon around the screen to ensure there are no dead spots.
- Multi-Touch: Test multi-touch gestures (e.g., pinch-to-zoom).
- Brightness Adjustment: Ensure screen brightness can be adjusted.
- Proximity Sensor: Test if the screen turns off when you hold the phone to your ear during a call.
- Front Camera: Verify the front camera functions correctly.

An illustration of the screen's touch responsiveness. A finger is shown interacting with the display, emphasizing the smooth and sensitive touch experience provided by the replacement screen, similar to the original.
6. Care and Maintenance
To ensure the longevity and optimal performance of your new screen, follow these care guidelines:
- Use a Screen Protector: Apply the provided screen protector to guard against scratches and minor impacts.
- Avoid Extreme Temperatures: Do not expose your device to very high or very low temperatures.
- Clean Gently: Use a soft, lint-free cloth to clean the screen. Avoid harsh chemicals or abrasive materials.
- Protect from Drops: Use a protective case to minimize damage from accidental drops.
- Avoid Pressure: Do not place heavy objects on your phone or apply excessive pressure to the screen.

This image demonstrates the display quality and viewing angles of the SRJTEK replacement screen. It shows the screen maintaining clarity and color accuracy even when viewed from a 45-degree angle, indicating good visual performance.
7. Troubleshooting
If you encounter any issues after installing your new screen, please refer to the following common problems and solutions:
- Screen Not Turning On / Black Screen:
- Ensure all flex cables are securely connected to the motherboard.
- Check if the battery is properly connected and charged.
- Perform a hard reset on your device (refer to your phone's original manual for instructions).
- Touch Not Responding / Ghost Touch:
- Verify that the touch digitizer flex cable is correctly seated.
- Clean the connector points for any dust or debris.
- Restart your device.
- Display Issues (Lines, Discoloration, Flickering):
- Check the display flex cable for any damage or improper connection.
- Ensure no pressure is being applied to the screen from inside the phone case.
- Restart your device.
- Screen Broken During Installation:
- Handle the screen with extreme care. If breakage occurs due to mishandling, it may not be covered under warranty.
If these steps do not resolve your issue, please contact SRJTEK customer support for further assistance.
8. Specifications
| Feature | Detail |
|---|---|
| Product Type | LCD Screen Replacement with Touch Digitizer |
| Compatibility | Samsung Galaxy A12 (SM-A125F/DSN, SM-A125F/DS, SM-A125F, SM-A125M, SM-A125U, SM-A125U1, SM-A125N) |
| Color | Black |
| Frame | No Frame (Screen only) |
| Package Dimensions | 7.6 x 4.02 x 1.34 inches |
| Item Weight | 4.6 ounces |
| Manufacturer | SRJTEK |
9. Warranty and Support
SRJTEK provides a LIFE-TIME exchange for non-human damages to ensure a risk-free purchase. Each screen undergoes a 100% inspection by a professional QC team before shipping.
If you encounter any problems after receiving the screen, such as breakage or non-functionality, please contact us immediately. We are committed to providing technical support and satisfactory solutions.
How to Contact Support:
- Contact us through the Amazon messaging system.
- Refer to the contact information provided on the outer packaging of your product.
Please provide your order number and a detailed description of the issue when contacting support to facilitate a quicker resolution.


