
1. Introduction
The iDili ET5410A+ is a 400W programmable DC electronic load designed for testing batteries, power supplies, and chargers. It features a 2.8-inch TFT display and offers various operating modes and protection functions for reliable and precise testing in laboratory and industrial environments.
2. Product Features
- Visual interface display system for simple and convenient operation.
- Data storage retention during power failures.
- Input polarity reverse prompt for enhanced safety.
- PS2 interface for external keyboard data value setting.
- Comprehensive safety protections: overcurrent, overvoltage, overpower, and over temperature.
- Flexible setting of overvoltage and overcurrent parameters for effective load protection.
- Intelligent fan speed control to minimize operational noise.
3. Setup
3.1 Unpacking
Carefully remove the ET5410A+ electronic load and all accessories from its packaging. Verify that all components are present: the electronic load unit, power cord, terminal block, and fuses.

Figure 1: ET5410A+ Electronic Load with included accessories.
3.2 Physical Placement
Place the unit on a stable, level surface with adequate ventilation. Ensure the cooling ports are not obstructed.
3.3 Power Connection
Connect the provided power cord to the AC input on the rear panel of the ET5410A+ and then to a suitable power outlet.
3.4 Load Connections
Connect the device under test (DUT) to the positive (red) and negative (black) terminals on the front panel. Ensure correct polarity.
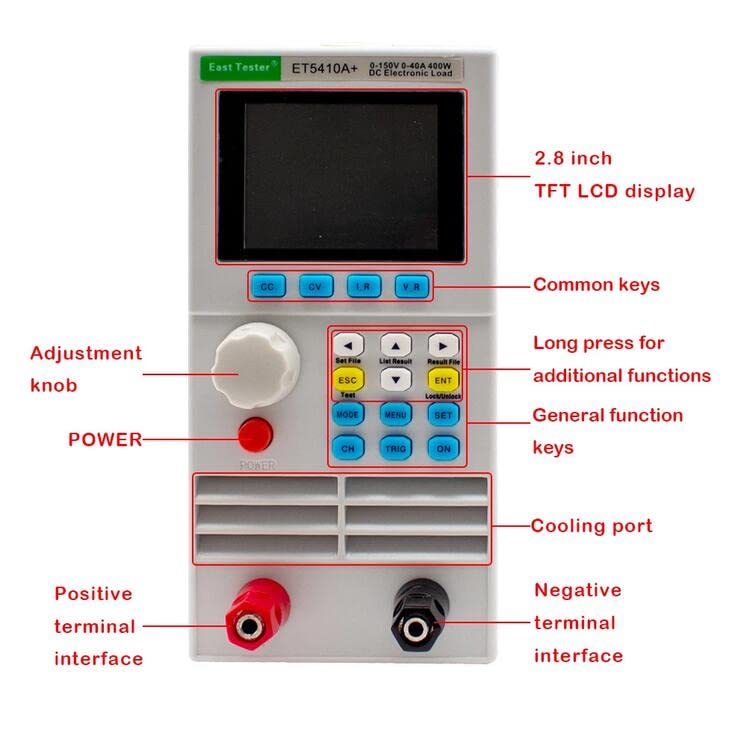
Figure 2: Front panel overview of the ET5410A+ Electronic Load.
3.5 Initial Power-On
Press the POWER button on the front panel to turn on the unit. The 2.8-inch TFT display will illuminate.
4. Operating Instructions
The ET5410A+ offers various operating modes for different testing requirements. Familiarize yourself with the front panel controls:
4.1 Front Panel Controls
- 2.8 inch TFT LCD display: Shows current settings, measurements, and status.
- Adjustment knob: Used to modify parameter values.
- Common keys (CC, CV, IR, VR): Select common operating modes.
- General function keys (MODE, MENU, SET, ON): Access menus, settings, and turn the load on/off.
- Long press for additional functions: Some keys have secondary functions accessible by a long press (e.g., Set File, List Result, Lock/Unlock).
4.2 Selecting Operating Modes
- Press the corresponding mode key (e.g., CC for Constant Current, CV for Constant Voltage, CR for Constant Resistance, CP for Constant Power).
- Use the MODE button to cycle through available modes if dedicated buttons are not present or for advanced modes like Tran Test or Battery Test.
4.3 Setting Parameters
- Once a mode is selected, use the adjustment knob to navigate between parameters on the display.
- Rotate the knob to change the value of the selected parameter.
- Press ENT to confirm the setting.
4.4 Load ON/OFF
- Press the ON button to activate the electronic load.
- Press the ON button again to deactivate the load.
4.5 Safety Features
The unit includes overcurrent, overvoltage, overpower, and over temperature protection. These parameters can be configured via the MENU or SET options to protect the device under test and the electronic load itself.
5. Maintenance
5.1 Cleaning
Regularly clean the exterior of the unit with a soft, dry cloth. Do not use abrasive cleaners or solvents. Ensure no liquids enter the device.
5.2 Ventilation
Keep the cooling ports clear of dust and obstructions to ensure proper airflow. The intelligent fan control system helps maintain optimal operating temperature.
5.3 Fuse Replacement
In case of a power surge or internal fault, the fuse may blow. Refer to the specifications for the correct fuse type and rating. Disconnect the power cord before attempting to replace the fuse.
6. Troubleshooting
6.1 No Power
- Check the power cord connection to both the unit and the wall outlet.
- Verify the power outlet is functional.
- Check the fuse on the rear panel; replace if blown.
6.2 No Load Current/Voltage
- Ensure the load is turned ON.
- Verify connections to the DUT are secure and correct.
- Check if any protection features (OV, OC, OP, OT) have been triggered. Reset if necessary.
6.3 Incorrect Readings
- Ensure proper calibration (if applicable, refer to advanced manual).
- Check for loose connections.
6.4 Fan Noise
The unit features intelligent fan speed control. Increased noise during high load conditions is normal as the fan speeds up to dissipate heat. If noise is excessive or constant at low loads, ensure cooling ports are clear.
7. Specifications
The iDili ET5410A+ offers precise control and measurement capabilities as detailed below:
| Category | Parameter | Value |
|---|---|---|
| Rated Input | Power | 400W |
| Input Voltage | 0-150V | |
| Input Current | 0-40A | |
| CV Mode | Range | 0.1-19.999V, 0.1-150.00V |
| Resolution | 1mV, 10mV | |
| Accuracy | ±(0.05%+0.02%FS) | |
| CC Mode | Range | 0-3.000A, 0-40.00A |
| Resolution | 1mA, 10mA | |
| Accuracy | ±(0.05%+0.05%FS) | |
| CR Mode | Range | 0.05Ω-1 kΩ, 1 kΩ-4.5 kΩ |
| Resolution | 10mΩ, 100mΩ | |
| Accuracy | ±(0.1%+0.5%FS) | |
| CP Mode | Range | 0-400W |
| Resolution | 10mW | |
| Accuracy | ±(0.1%+0.5%FS) | |
| Tran Test | Mode | CC, CV |
| T1&T2 | 50ms-60s | |
| Battery Test | Discharge Mode | CC, CR |
| Maximum Discharge Capacity | 9999Ah | |
| Resolution | 1mA, 10mA, 10mΩ, 100mΩ |
Figure 3: Detailed technical specifications for the ET5410A+.
| Protection Type | Threshold |
|---|---|
| Over Voltage Protection (OV) | >21V OR >155V over voltage protection |
| Over Current Protection (OC) | >3.1A or >42A over current protection |
| Over Power Protection (OP) | 410W |
| Over Temperature Protection (OT) | 85°C |
Figure 4: Protection thresholds for the ET5410A+.
7.1 Physical Dimensions and Weight
- Package Dimensions: 15.75 x 11.81 x 7.87 inches
- Item Weight: 9.46 pounds
- Item Model Number: ET5410A+

Figure 5: Physical dimensions of the ET5410A+ Electronic Load.
8. Warranty and Support
For warranty information and technical support, please refer to the documentation included with your product or contact the manufacturer directly. Keep your purchase receipt for warranty claims.