
Geloo M008
Contents
Geloo Motorcycle Digital Speedometer User Manual
Model: M008
1. Introduction
The Geloo M008 Motorcycle Digital Speedometer is a versatile all-in-one instrument designed for various motorcycle types. It integrates a speedometer, tachometer, odometer, and multiple indicator functions into a single, easy-to-read unit. Its robust design ensures reliable performance across a range of environmental conditions.
Key Features:
- Anti-glare LCD display with blue backlight for clear visibility day and night.
- Digital speed display (0-199 km/h) and RPM needle display (0-12000 RPM).
- Digital odometer (0-99999.9 km) with trip meter functionality.
- Integrated indicator lights: Left/Right turn signals, High Beam, Neutral (N), Position Lights.
- Gear position indicator (1-6) and fuel gauge.
- Alarm functions for low oil level and low voltage.
- Universal compatibility with 1, 2, and 4-cylinder, 2-stroke and 4-stroke 12V motorcycles.

Figure 1.1: Geloo Motorcycle Digital Speedometer main unit and sensor cable.

Figure 1.2: Overview of the speedometer's multi-indicator lights and display functions.
2. Technical Specifications
| Parameter | Value |
|---|---|
| Operating Voltage | 8-18 V DC |
| Rated Voltage | 12 V DC |
| Speed Display Range | 0-199 km/h (Error +10%) |
| RPM Display Range | 0-12000 RPM (Error +5%) |
| Odometer Display Range | 0-99999.9 km |
| Backlight Color | Blue |
| Working Temperature | -20°C to 70°C |
| Storage Temperature | -30°C to 80°C |
| Withstand Voltage | Instantaneous 100V |
| Material | Acrylonitrile Butadiene Styrene (ABS) |
| Dimensions (Package) | 12.3 x 12.2 x 10.9 cm |
| Weight | 370 grams |
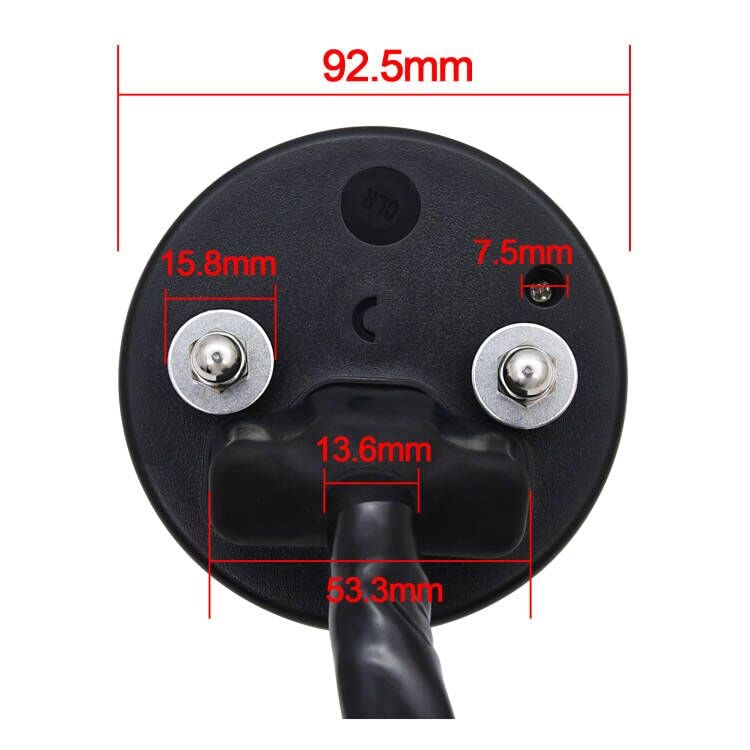
Figure 2.1: Rear dimensions of the speedometer unit.
3. Package Contents
Please verify that all items are present and undamaged upon opening the package:
- 1 x Geloo LCD Digital Motorcycle Odometer (Main Unit)
- 1 x Sensor Cable
- Installation Instructions (This Manual)

Figure 3.1: Package contents including the speedometer unit, wiring, and sensor.
4. Installation Guide
Before beginning installation, ensure your motorcycle's power is off and the battery is disconnected. Professional installation is recommended if you are unfamiliar with motorcycle electrical systems.
4.1 Wiring Diagram
Refer to the following diagram for correct wiring connections. Each wire is color-coded for identification.

Figure 4.1: Wiring Pinout Diagram.
Wiring Color Code:
- Green: Power Ground (-)
- Red: Power (+) (Connect to electric lock line)
- Black: Switch (Ignition)
- Light Blue: Right Turn Signal
- Orange: Left Turn Signal
- Blue: High Beam
- White Brown: Position Light
- Blue White: Fuel Level Sensor
- Yellow Black: Pulsed Coil (RPM Signal)
- Sensor Signal: Connect to the provided speed sensor.
4.2 Mounting the Unit
- Choose a suitable location on your motorcycle's dashboard or handlebars that provides clear visibility and does not obstruct your view or controls.
- Securely mount the speedometer unit using appropriate brackets and fasteners (not included unless specified in package contents). Ensure it is stable and resistant to vibrations.
- Route the wiring harness safely, avoiding hot engine parts, sharp edges, or moving components. Use cable ties to secure the wires.
4.3 Speed Sensor Installation
- Install the speed sensor near a rotating part of the wheel (e.g., brake disc, sprocket) where it can detect pulses.
- Ensure the gap between the sensor and the detection point is within the recommended range for accurate readings.
- Connect the sensor cable to the main unit's designated input.
5. Operation
Once installed and powered on, the speedometer will display various information. The unit features a single button for navigation and settings adjustment, located at the bottom of the instrument.

Figure 5.1: Speedometer Display Layout.
5.1 Display Functions:
- Speed Display: Shows current speed in km/h.
- RPM Pointer: Indicates engine revolutions per minute.
- Mileage (Odometer): Displays total accumulated distance.
- Gear Indicator: Shows the current gear (1-6) or Neutral (N).
- Fuel Consumption: Indicates fuel level.
- Indicator Lights: Separate lights for Left Signal, Right Signal, Headlight (High Beam), Marker Light (Position Light), and N-Neutral Gear.
5.2 Button Operation:
The single button on the instrument controls various display modes and settings.
- Short Press: Toggles between total mileage (ODO) and trip mileage (TRIP).
- Long Press (in TRIP mode): Resets the trip mileage to zero.
- Long Press (in ODO mode): Switches between metric (km) and imperial (miles) units.
6. Settings Adjustment
To enter the settings mode and configure the speedometer for your motorcycle:
- Ensure the speedometer is powered off.
- Press and hold the button, then turn on the ignition to power on the speedometer. This will enter the setting page.
- The total/sub-total mileage position will display "ccc---" (Interface 1). The first "-" will be blinking.
- Adjusting Values: Short press the button to increment the blinking digit. Long press the button to move to the next digit.
- Adjust "---" to "123" to enter the parameter setting mode (Interface 2).
- Cylinder Setting: The gear position display will show the cylinder setting, e.g., "y2" (2 means 2 cylinders, 16.6Hz). Adjust this value to match your motorcycle's cylinder count (1, 2, or 4 cylinders). Default is 1 cylinder.
- Fuel Level Sensor Type: The gear position display will show "1" or "5" (1 means 2-wire oil level sensor, 5 means 3-wire oil level sensor). Adjust this based on your motorcycle's fuel sensor type.
- Speed Sensor Frequency: The cumulative speed position will display "F03.4" (F represents the instrument frequency, used to change speed per hour). Adjust this value if necessary for accurate speed readings, typically based on tire size and sensor pulses.
- Once all settings are adjusted, long press the button to save the settings and exit the configuration mode.

Figure 6.1: Display clarity in various conditions.
7. Troubleshooting
If you encounter issues with your Geloo Digital Speedometer, please refer to the following common problems and solutions:
| Problem | Possible Cause | Solution |
|---|---|---|
| No display/Power off | Loose wiring, no power, blown fuse | Check all wiring connections, ensure 12V power supply, inspect and replace fuse if necessary. |
| Inaccurate speed/RPM | Incorrect sensor installation, wrong cylinder setting, sensor malfunction | Verify sensor gap and position. Check cylinder setting in configuration mode. Test or replace sensor. |
| Indicator lights not working | Incorrect wiring, faulty bulb/LED | Review wiring diagram for correct connections. Check motorcycle's indicator bulbs/LEDs. |
| Display flickering/unstable | Unstable power supply, loose connection, electrical interference | Check battery voltage. Secure all connections. Ensure proper grounding. |
If the problem persists after attempting these solutions, please contact customer support for further assistance.
8. Maintenance
To ensure the longevity and optimal performance of your Geloo Digital Speedometer, follow these maintenance guidelines:
- Cleaning: Wipe the display and unit exterior with a soft, damp cloth. Do not use abrasive cleaners, solvents, or harsh chemicals, as these can damage the LCD screen or casing.
- Connections: Periodically check all electrical connections to ensure they are secure and free from corrosion.
- Environmental Protection: While the unit is designed to be durable, avoid prolonged exposure to extreme weather conditions or direct high-pressure water sprays.
- Storage: If storing the motorcycle for an extended period, ensure the speedometer is clean and dry. Store in a cool, dry place.
9. Warranty and Support
Geloo products are manufactured to high-quality standards. For specific warranty information, please refer to the documentation provided with your purchase or contact your retailer. If you have any questions or require technical assistance, please contact Geloo customer support. Provide your product model (M008) and a detailed description of the issue for prompt service.
Ask a question about this manual
Ask about setup, troubleshooting, compatibility, parts, safety, or missing instructions. Manuals+ will review the question and use this page’s manual context to help answer it.