1. Introduction
This manual provides essential information for the safe and efficient installation, operation, and maintenance of your OmniPV Solar-Powered Roof Fan. Please read this manual thoroughly before installation and retain it for future reference. This fan is designed to improve attic ventilation, reduce heat buildup, and lower humidity in various structures.

Figure 1: OmniPV Solar-Powered Roof Fan with included AC adapter.
2. Safety Information
Observe the following safety precautions to prevent injury or damage to the product:
- Electrical Safety: Ensure all electrical connections are made by a qualified electrician and comply with local electrical codes. Disconnect power before servicing.
- Fall Hazard: Installation on roofs involves working at heights. Use appropriate safety equipment and follow fall protection guidelines.
- Sharp Edges: The fan and flashing may have sharp edges. Wear protective gloves during handling and installation.
- Moving Parts: Keep hands and foreign objects away from the fan blades during operation.
- Structural Integrity: Ensure the roof structure can support the weight of the fan and withstand wind loads.
- Water Intrusion: Proper sealing and flashing are critical to prevent water leaks.
3. Product Overview
The OmniPV Solar-Powered Roof Fan is designed for efficient attic ventilation. It features a 40-watt solar panel, a brushless DC motor, and an integrated thermostat for automatic operation.
Key Features:
- 40-Watt Solar Panel: Maximizes sunlight utilization for effective hot air extraction.
- Energy-Efficient DC Motor: Brushless motor provides up to 1600 CFM airflow with low noise and reduced energy consumption.
- Built-in Thermostat: Automatically activates the fan when the temperature exceeds 77°F (26°C) and deactivates below this threshold.
- Weather-Resistant Construction: Aluminum alloy body with powder coating for UV, oxidation, and corrosion resistance.
- Flexible Installation: Suitable for various roof types and structures.
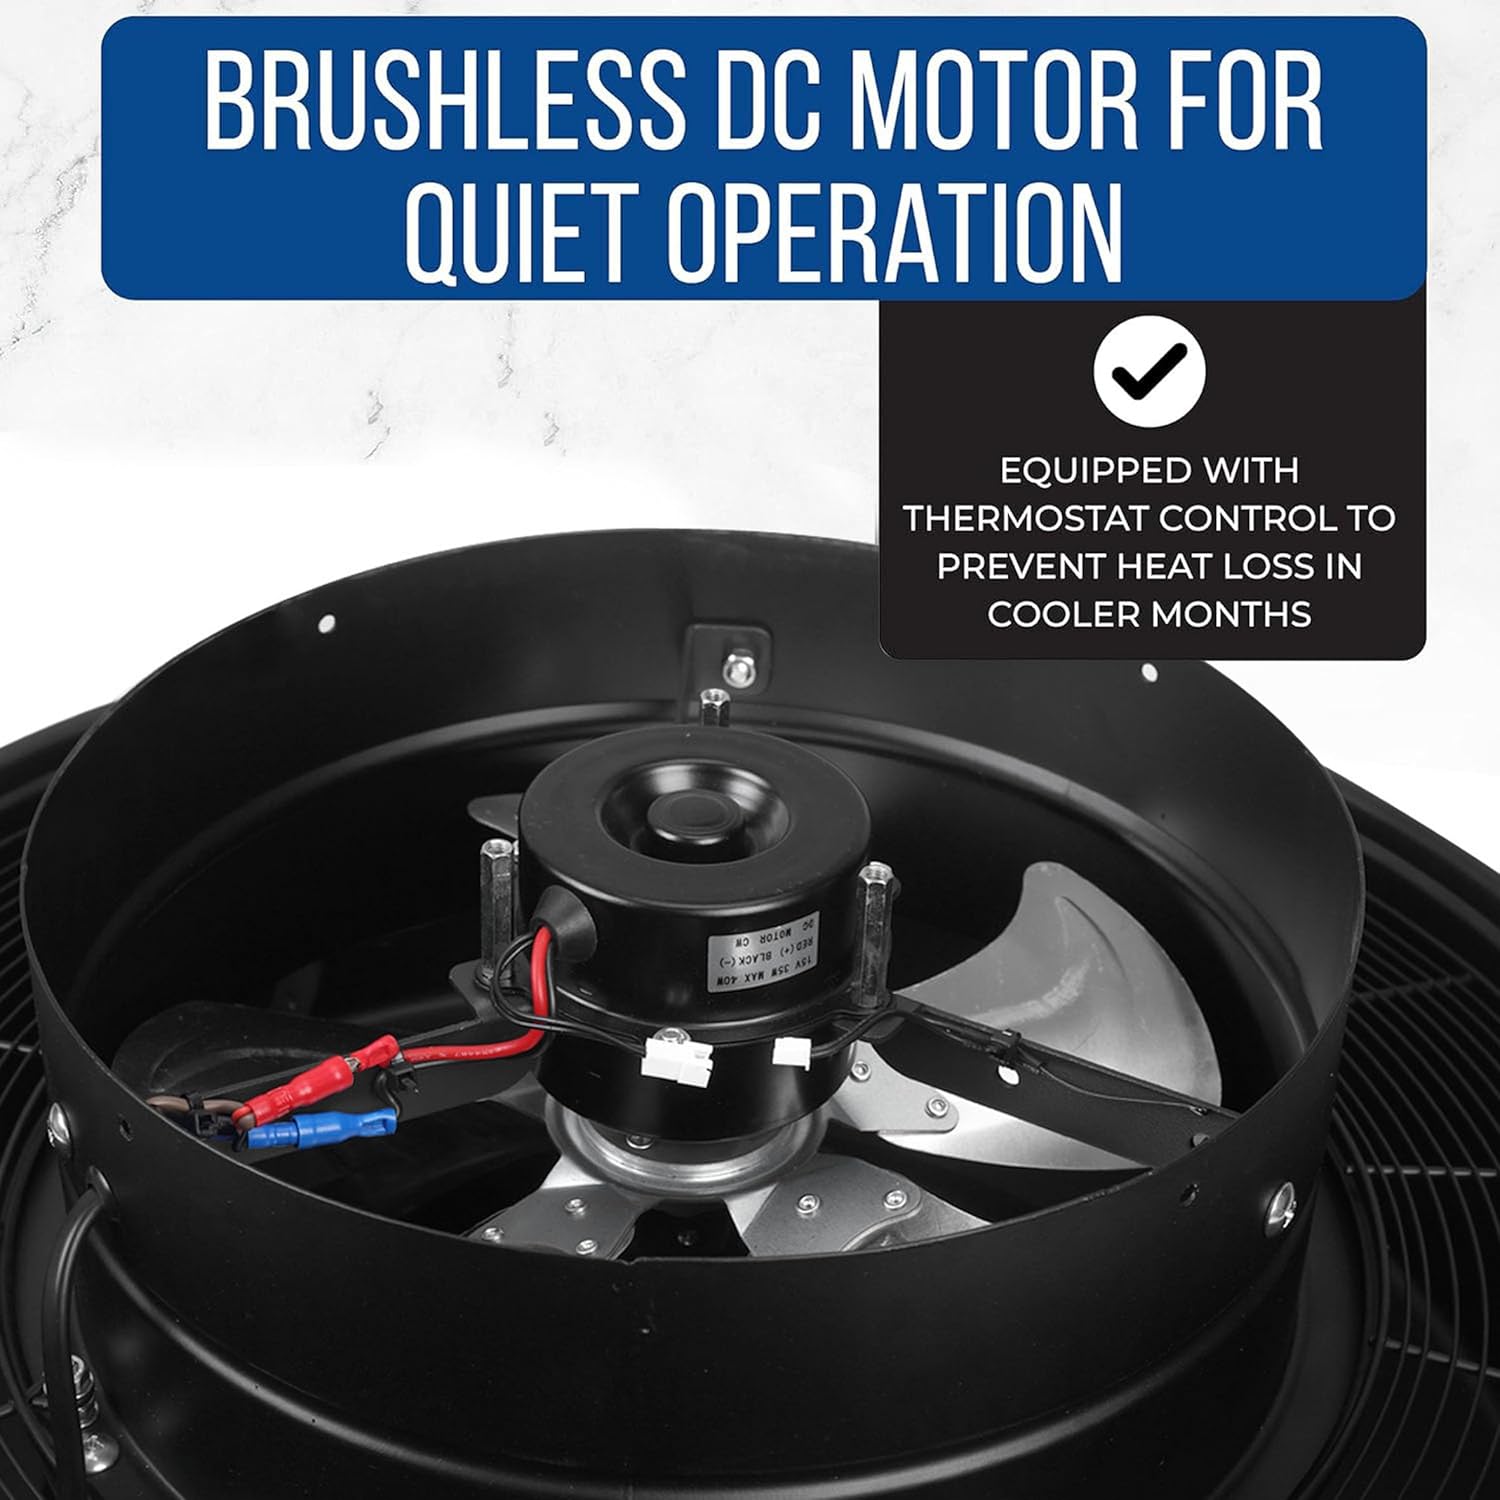
Figure 2: Brushless DC motor for quiet and efficient operation.

Figure 3: High-efficiency monocrystalline silicon solar panel for reliable power generation.
4. Components
The OmniPV Solar-Powered Roof Fan package includes the following items:
- 1 x Fan Body with Flexible Flashing
- 1 x Solar Panel
- 1 x AC Adaptor (for continuous operation or low sunlight conditions)
- 2 x Rafter/Batten Straps
- 4 x Tech Screws
5. Installation
Proper installation is crucial for the fan's performance and longevity. It is recommended to have a qualified professional perform the installation.
5.1 Site Selection
Choose a location on the roof that receives maximum direct sunlight throughout the day. Ensure adequate clearance around the fan for proper airflow and maintenance.

Figure 4: Versatile installation options for various structures.
5.2 Installation Steps (General Guidelines)
- Prepare the Opening: Create a circular opening in the roof according to the fan's dimensions (approximately 12 inches diameter for the fan body). For tile roofs, one roof tile may need to be removed.
- Position the Fan: Place the fan body with its flexible flashing over the opening. Ensure the flashing is properly seated and conforms to the roof surface.
- Secure the Fan: Use the provided tech screws to secure the flashing to the roof deck. Apply a suitable roofing sealant around the edges of the flashing to prevent water intrusion.
- Install Solar Panel: Attach the solar panel to the fan body using the provided brackets. Adjust the angle of the solar panel for optimal sun exposure.
- Connect Wiring: Connect the solar panel wiring to the fan motor. If using the AC adapter for continuous operation, connect it to the designated port on the fan and plug it into a 110V power source.
- Internal Bracing (Optional): Use the rafter/batten straps to secure the fan body to attic rafters for additional stability, if necessary.
Note: Detailed installation instructions may vary based on roof type. Consult a roofing professional for specific guidance.
6. Operation
The OmniPV Solar-Powered Roof Fan operates automatically based on sunlight and temperature conditions.
6.1 Automatic Operation (Solar Power with Thermostat)
When the AC adapter is disconnected, the fan operates solely on solar power. The built-in thermostat controls its activation:
- The fan will turn on when the attic temperature exceeds 77°F (26°C).
- The fan will turn off when the attic temperature falls below 77°F (26°C).
6.2 Continuous Operation (AC Power)
To ensure continuous operation regardless of sunlight or temperature, connect the provided 110V Smart Adapter to the fan and a power outlet. In this mode, the fan will run continuously as long as the AC adapter is connected and powered.

Figure 5: Fan Operation Guide – Solar & AC Power Modes.

Figure 6: Principle of heat extraction and temperature reduction.
7. Maintenance
Regular maintenance ensures optimal performance and extends the lifespan of your solar roof fan.
- Solar Panel Cleaning: Periodically clean the surface of the solar panel with a soft, damp cloth to remove dust, dirt, or debris that may reduce efficiency. Do not use abrasive cleaners.
- Fan Blade Inspection: Annually inspect the fan blades for any obstructions, damage, or excessive dust buildup. Carefully clean if necessary, ensuring power is disconnected.
- Structural Check: Periodically inspect the fan's mounting and flashing for any signs of wear, damage, or potential leaks. Reapply sealant if needed.
- Wiring Inspection: Check all wiring connections for tightness and signs of wear or damage.
8. Troubleshooting
If you encounter issues with your OmniPV Solar-Powered Roof Fan, refer to the following table:
| Problem | Possible Cause | Solution |
|---|---|---|
| Fan not running (solar mode) | Insufficient sunlight; Temperature below 77°F (26°C); Dirty solar panel; Loose wiring. | Ensure direct sunlight; Check ambient temperature; Clean solar panel; Inspect wiring connections. |
| Fan not running (AC mode) | AC adapter not plugged in; Power outage; Faulty adapter. | Verify AC adapter connection and power supply; Test adapter if possible. |
| Excessive noise during operation | Obstruction in fan blades; Loose mounting; Damaged motor. | Disconnect power and check for obstructions; Tighten mounting screws; Contact support if motor is damaged. |
| Water leakage around fan | Improper flashing installation; Damaged sealant. | Inspect flashing and sealant; Reapply roofing sealant as needed. Consult a professional. |
9. Specifications
| Feature | Specification |
|---|---|
| Brand | OmniPV |
| Model Name | OmniPV Solar-Powered Roof Fan |
| Item Model Number | cd348357-a391-4620-b7ee-ef487b5eefb5 |
| Power Source | Solar Powered, 110V AC Adaptor |
| Wattage | 40 Watts |
| Air Flow Capacity | 1600 Cubic Feet Per Minute (CFM) |
| Product Dimensions | 22.2"D x 22.2"W x 10.2"H |
| Item Weight | 17.2 Pounds |
| Blade Length | 11.8 Inches |
| Number of Blades | 5 |
| Color | Black |
| Finish Type | Powder Coated |
| Special Feature | Water Resistant, Built-in Thermostat |
| UPC | 714651998899 |
10. Warranty and Support
For warranty information and customer support, please refer to the documentation included with your purchase or visit the official OmniPV website. OmniPV offers customer support and product coverage. Contact information can typically be found on the product packaging or the manufacturer's website.


