
ENJOYWOOD XK4 Pocket Hole Jig System Instruction Manual
Model: XK4
1. Introduction
The ENJOYWOOD XK4 Pocket Hole Jig System is designed to simplify woodworking joinery, allowing for strong and precise pocket hole connections. This manual provides essential information for safe and effective use of your new tool.
2. Safety Information
- Always wear appropriate personal protective equipment, including safety glasses, during operation.
- Ensure the workpiece is securely clamped before drilling to prevent movement and potential injury.
- Keep hands and fingers clear of the drill bit and moving parts.
- Disconnect power tools from the power source before making any adjustments or changing accessories.
- Use the dust port system to maintain a clear workspace and reduce airborne dust.
- Store the jig and accessories in a dry, secure place out of reach of children.
3. Package Contents
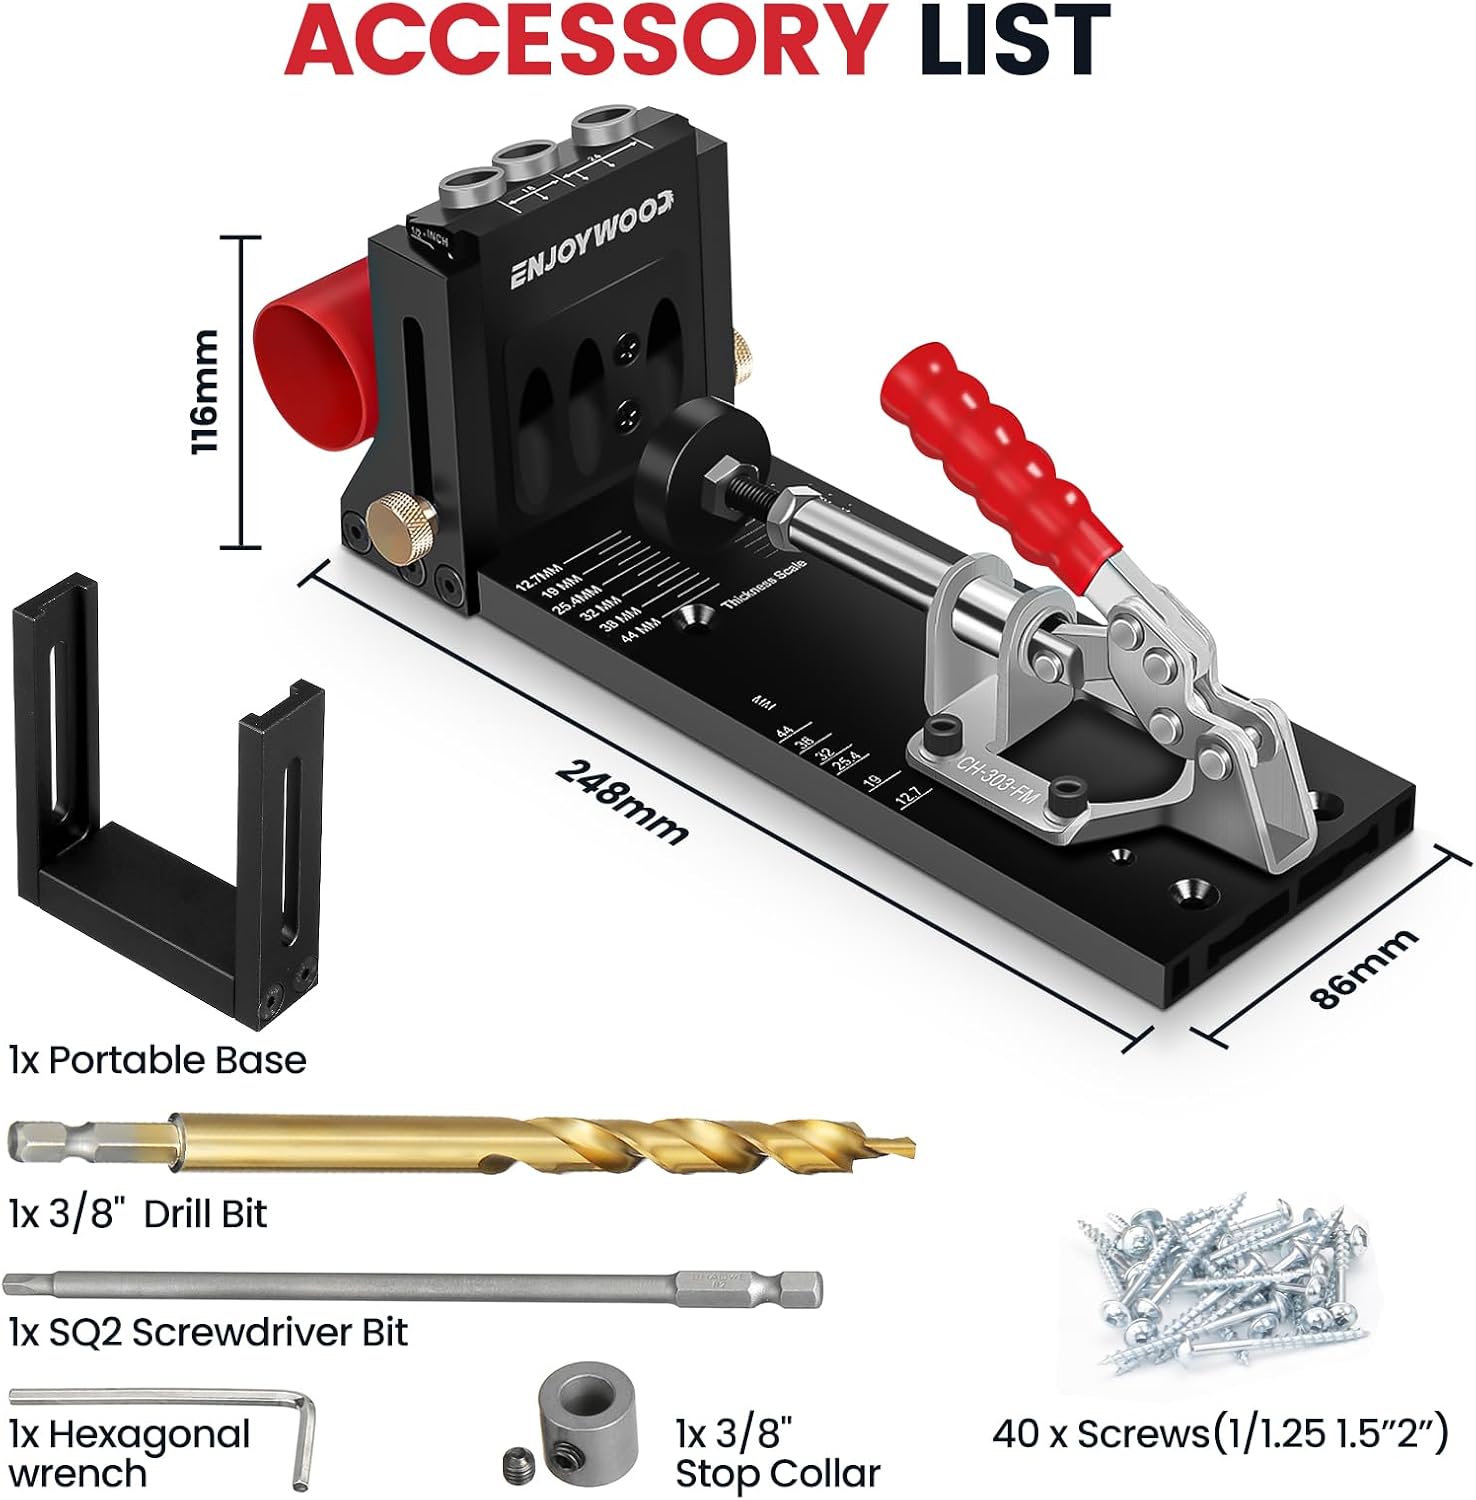
Verify that all items are present in your package:
- 1pc Pocket Hole Jig
- 1pc Portable Base
- 1pc 9.5mm (3/8") Drill Bit
- 1pc SQ2 Screwdriver Bit
- 1pc Stop Collar
- 40 x Screws (1/1.25 1.5" 2")
- 1x Hexagonal wrench
4. Setup and Adjustable Features
The ENJOYWOOD XK4 Pocket Hole Jig offers several adjustable features for versatile use:
4.1. Adjustable Depth for Material Thickness
The jig allows for depth adjustment to accommodate material thicknesses from 1/2" to 1 3/4".
- Measure Workpiece Thickness: Use a measuring tool to determine the exact thickness of your wood.
- Adjust Jig: Loosen the brass knob on the side of the jig. Slide the drill guide assembly up or down to align the indicator with the desired thickness marking (e.g., 1/2", 3/4", 1").
- Secure Adjustment: Tighten the brass knob firmly to lock the drill guide in place.

4.2. Setting Drill Bit Depth with Stop Collar
To ensure consistent pocket hole depth, set the stop collar on the drill bit:
- Insert Drill Bit: Place the 9.5mm (3/8") drill bit into one of the jig's drill guide holes.
- Position Stop Collar: Slide the stop collar onto the drill bit until it rests against the top of the drill guide.
- Tighten Stop Collar: Use the provided hexagonal wrench to firmly tighten the set screw on the stop collar. This prevents the drill bit from plunging too deep.

4.3. Quick Fixture Clamp
The integrated quick fixture clamp secures your workpiece to the jig for stable drilling.
- Adjust Clamp: Rotate the black knob on the clamp mechanism to adjust the clamping pressure and accommodate different workpiece widths.
- Engage Clamp: Place your workpiece against the jig's fence and press the red handle down to engage the clamp. Ensure the workpiece is held firmly.

4.4. Two Ways to Use: Benchtop and Portable
The jig can be used as a benchtop unit or as a portable tool with its removable drill guide.
- Benchtop Use: Mount the jig securely to a workbench using screws through the designated holes in the base. This provides maximum stability for repetitive tasks.
- Portable Use: Detach the main drill guide assembly from the base. Attach the portable base to the drill guide. This configuration is ideal for working on larger panels or in situations where bringing the workpiece to the benchtop jig is impractical.

5. Operating Instructions
Follow these steps for creating pocket holes:
- Prepare Workpiece: Ensure your workpiece is clean and free of debris.
- Set Up Jig: Adjust the jig for your material thickness and set the drill bit depth as described in Section 4.
- Secure Workpiece: Place the workpiece against the jig's fence and engage the quick fixture clamp. Ensure it is held firmly and level.
- Connect Dust Collection: Attach a dust collection hose to the jig's dust port to manage sawdust.
- Drill Pocket Holes: Insert the drill bit into a drill guide hole. Start the drill and slowly plunge the bit into the wood until the stop collar makes contact with the guide. Withdraw the drill bit. Repeat for additional holes.
- Assemble Joint: Once holes are drilled, use the provided SQ2 screwdriver bit and pocket hole screws to join your workpieces.


5.1. Official Product Video: Pocket Hole Jig Usage
Video 5.1: This video demonstrates the setup and operation of the 3-hole pocket hole jig kit, including measuring, adjusting, drilling, and assembly steps.
6. Screw Length and Jig Setting Guide
Use the following guide to select the appropriate screw length and jig slider setting based on your material thickness:

| Material Thickness | Screw Length | Slider Setting |
|---|---|---|
| 13MM (1/2") | 25MM (1") | 13MM (1/2") |
| 16MM (5/8") | 25MM (1") | 16MM (5/8") |
| 19MM (3/4") | 32MM (1-1/4") | 19MM (3/4") |
| 22MM (7/8") | 38MM (1-1/2") | 22MM (7/8") |
| 25MM (1") | 38MM (1-1/2") | 25MM (1") |
| 29MM (1-1/8") | 38MM (1-1/2") | 29MM (1-1/8") |
| 32MM (1-1/4") | 51MM (2") | 32MM (1-1/4") |
| 35MM (1-3/8") | 51MM (2") | 35MM (1-3/8") |
| 38MM (1-1/2") | 64MM (2-1/2") | 38MM (1-1/2") |
7. Maintenance
- Cleaning: After each use, clear sawdust and debris from the jig, especially around the drill guides and clamping mechanism. A brush or compressed air can be used.
- Lubrication: Periodically apply a light lubricant to the moving parts of the clamp and adjustment mechanisms to ensure smooth operation.
- Check Fasteners: Regularly inspect all screws and fasteners on the jig. Tighten any that have become loose to maintain accuracy and safety. Pay particular attention to the set screws holding the drill guides.
- Drill Bit Care: Keep drill bits sharp for optimal performance. Replace dull or damaged bits promptly.
8. Troubleshooting
- Inconsistent Hole Depth: Ensure the drill bit stop collar is securely tightened. Check that the jig's thickness adjustment knob is also firmly secured.
- Workpiece Slipping: Verify that the quick fixture clamp is properly adjusted for the material thickness and fully engaged. The workpiece should not move during drilling.
- Drill Guides Turning: If drill guide sleeves turn with the bit, check and tighten their respective set screws.
- Rough or Burred Holes: This can indicate a dull drill bit. Replace or sharpen the drill bit. Ensure proper drilling speed and pressure.
- Excessive Sawdust: Confirm that the dust collection hose is properly attached to the dust port and that your vacuum system is functioning effectively.
9. Specifications
- Brand: ENJOYWOOD
- Model: XK4
- Material: Aluminum
- Color: Black
- Item Weight: 16 ounces
- Item Dimensions: 12.6 x 5.51 x 5.51 inches
- Adjustable Wood Thickness: 1/2" to 1 3/4"
- Drill Bit Size: 9.5mm (3/8")
10. Warranty
This product does not include a manufacturer's warranty as per the provided information.
11. Support
For further assistance or inquiries regarding your ENJOYWOOD XK4 Pocket Hole Jig System, please refer to the manufacturer's official website or contact their customer support channels.
12. Applications
The ENJOYWOOD XK4 Pocket Hole Jig System is suitable for a wide range of woodworking and DIY carpentry projects, including:
- Building cabinets and shelving units
- Assembling furniture (tables, chairs, beds)
- Constructing frames and boxes
- Repairing wooden items
- General home improvement projects
