1. Introduction
This manual provides essential information for the proper installation, operation, and maintenance of the Generic Potter PAD 200-DUCT - 200 Duct Detector. This device is designed to detect smoke in heating, ventilation, and air conditioning (HVAC) ducts, providing an early warning of potential fire hazards. Adherence to these instructions is crucial for the detector's optimal performance and your safety.
The PAD 200-DUCT is a UL 7th Edition compliant duct detector, ensuring it meets rigorous safety and performance standards.
2. Safety Information
WARNING: Installation and servicing of this device must be performed by qualified personnel only. Disconnect all power before installing or servicing the unit. Failure to do so may result in electric shock, property damage, or death.
- Always follow local codes and ordinances for fire alarm system installation.
- Ensure the power source is compatible with the detector's requirements (9 Volts DC).
- Do not paint the detector or obstruct its sensing ports.
- Test the detector regularly as described in the maintenance section.
- This device is not intended to be a substitute for proper fire prevention practices.
3. Package Contents
Verify that all components are present and undamaged upon opening the package. If any items are missing or damaged, contact your supplier immediately.
- Generic Potter PAD 200-DUCT - 200 Duct Detector Unit
- Detector Head (pre-installed or separate)
- Mounting Hardware (screws, anchors)
- Instruction Manual (this document)
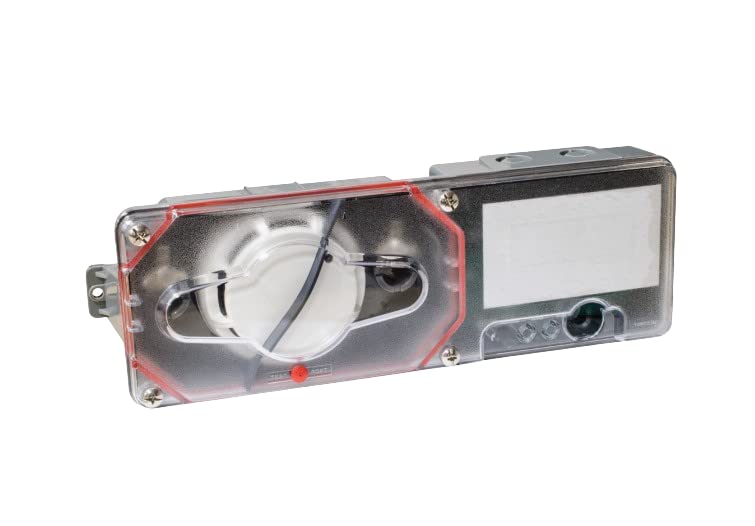
Figure 1: Generic Potter PAD 200-DUCT Duct Detector main unit. This image shows the primary detector housing with its cover.
4. Setup and Installation
The PAD 200-DUCT is designed for ceiling mount installation within HVAC duct systems. Proper air sampling tube installation is critical for effective smoke detection.
4.1 Site Selection
- Select a location in the duct where airflow is consistent and turbulence is minimal.
- Ensure easy access for maintenance and testing.
- Avoid locations immediately downstream from humidifiers, filters, or sharp bends in the ductwork.
4.2 Mounting the Detector
- Turn off all power to the HVAC system and the detector's power supply.
- Drill appropriate holes in the ductwork for the detector housing and air sampling tubes according to the provided template (if applicable).
- Secure the detector housing to the duct using the supplied mounting hardware. Ensure a tight seal to prevent air leakage.
- Install the air sampling tubes. The inlet tube should extend across the duct to sample the entire airflow, and the exhaust tube should be shorter.
4.3 Wiring
The detector operates on 9 Volts DC (Battery Powered). Refer to the wiring diagram on the unit or in supplementary documentation for specific connections. Ensure correct polarity and secure all connections.
- Connect the power supply wires to the designated terminals.
- Connect alarm and supervisory contacts to the fire alarm control panel as required by local codes.
5. Operating Instructions
Once installed and powered, the PAD 200-DUCT detector continuously monitors the air within the HVAC duct for the presence of smoke particles.
5.1 Normal Operation
Under normal conditions, the detector's status indicator (usually an LED) will flash periodically, indicating that the unit is powered and functioning correctly. The detector is in a standby state, ready to detect smoke.
5.2 Alarm Condition
When smoke is detected in the duct, the detector will enter an alarm state. This will trigger an audible alarm from the unit itself and activate its alarm contacts, signaling the fire alarm control panel. The status indicator will typically illuminate steadily or flash rapidly to indicate an alarm.
5.3 Resetting the Detector
After an alarm condition has been addressed and the smoke cleared, the detector can be reset. This is typically done via the fire alarm control panel or a local reset button on the detector itself (if present). Refer to your fire alarm system documentation for specific reset procedures.
6. Maintenance
Regular maintenance ensures the continued reliability and performance of your duct detector.
6.1 Testing
- Monthly: Perform a functional test using the test button on the detector. This should trigger an alarm.
- Annually: Conduct a full system test with simulated smoke to ensure the detector responds correctly and communicates with the fire alarm control panel. This should be performed by a qualified technician.
6.2 Cleaning
- Annually (or as needed): Carefully remove the detector head and clean the sensing chamber using a soft brush or compressed air to remove dust and debris.
- Clean the exterior of the detector housing with a damp cloth. Do not use harsh chemicals or abrasives.
- Inspect air sampling tubes for blockages or damage.
6.3 Battery Replacement
The detector is battery-powered (9 Volts DC). Replace the battery annually or immediately if a low battery signal is indicated by the detector or the fire alarm control panel. Use only recommended battery types.
- Disconnect power to the detector.
- Open the detector housing.
- Carefully remove the old battery and dispose of it according to local regulations.
- Insert a new 9V DC battery, ensuring correct polarity.
- Close the housing and restore power. Test the detector.
7. Troubleshooting
| Problem | Possible Cause | Solution |
|---|---|---|
| Detector not powering on | No power supply; incorrect wiring; dead battery. | Check power connections; verify battery is installed correctly and charged; inspect wiring. |
| False alarms | Dust/debris in sensing chamber; excessive humidity; strong air currents; chemical fumes. | Clean sensing chamber; relocate detector if environmental factors are persistent; ensure proper air sampling tube installation. |
| No alarm during test | Faulty detector; dead battery; wiring issue; test button malfunction. | Replace battery; check wiring; if problem persists, replace detector head or entire unit. |
| Low battery signal | Battery needs replacement. | Replace the 9V DC battery immediately. |
If troubleshooting steps do not resolve the issue, contact qualified service personnel.
8. Specifications
| Feature | Detail |
|---|---|
| Model Number | PAD 200-DUCT (PPAD200DUCT) |
| Brand | Generic |
| Power Source | Battery Powered (9 Volts DC) |
| Alarm Type | Audible |
| Mounting Type | Ceiling Mount (for HVAC ducts) |
| Compliance | UL 7th Edition |
| Item Package Quantity | 1 |
| UPC | 742779313379 |
9. Warranty and Support
This Generic Potter PAD 200-DUCT detector comes with a 12-month warranty from the date of purchase, covering defects in materials and workmanship. Additionally, a 30-day return policy is available if you are not satisfied with the product.
For technical support, warranty claims, or further assistance, please contact your authorized dealer or the manufacturer's customer service. Ensure you have your product model number (PAD 200-DUCT) and purchase details available when contacting support.


