Introduction
This manual provides detailed instructions for the GOLOZA Projection Alarm Clock, designed with a modern curved display and advanced features for your convenience. Please read this manual carefully before use to ensure proper operation and to maximize the lifespan of your device.

Figure 1: GOLOZA Projection Alarm Clock Overview
Included Components
The GOLOZA Projection Alarm Clock package includes the following items:
- Alarm Clock Unit
- User Manual
- Micro USB Cable
- AC Adapter (AC100-240V, 50/60Hz)
Setup Guide
Power Connection:
Connect the provided Micro USB Cable to the alarm clock's power input port. Plug the AC Adapter into a standard electrical outlet (AC100-240V, 50/60Hz). The clock will power on and the display will illuminate.

Figure 2: Power Adapter and Cable
Backup Battery (CR2032):
The clock has a built-in CR2032 button cell battery. This battery automatically saves your time and alarm settings in case of a power outage. The display will not show time and the alarm will not sound during an outage, but settings will be retained when power returns. No user action is required for this feature.

Figure 3: Built-in Backup Battery
Initial Time Setting:
Refer to the "Operating Instructions" section for detailed steps on setting the time and alarm. The large control buttons on top of the clock are clearly marked for easy adjustment.
Operating Instructions
1. Time Display and Brightness
The clock features a large LED curved screen (3.4 x 1.7 inches for digits) for easy readability. It offers 3 adjustable brightness levels for the main display, allowing you to set it to a comfortable level for day or night use. The brightness of the face display and the projection display can be adjusted separately.

Figure 4: Large LED Curved Screen

Figure 5: 3 Levels of Display Brightness
The clock supports both 12-hour and 24-hour time formats. If the 12-hour format is selected, a "PM" icon will appear when the time reaches the afternoon.

Figure 6: 12/24-Hour Time Display
2. Projection Feature
The integrated projector allows you to project the time onto a wall or ceiling. The projector arm swivels 180 degrees for optimal positioning, providing a clear and sharp image at a distance of 1.64-11.4 feet (0.5-3 meters). The projected numerals are sharp and do not require focus adjustment.

Figure 7: High-Definition Projection
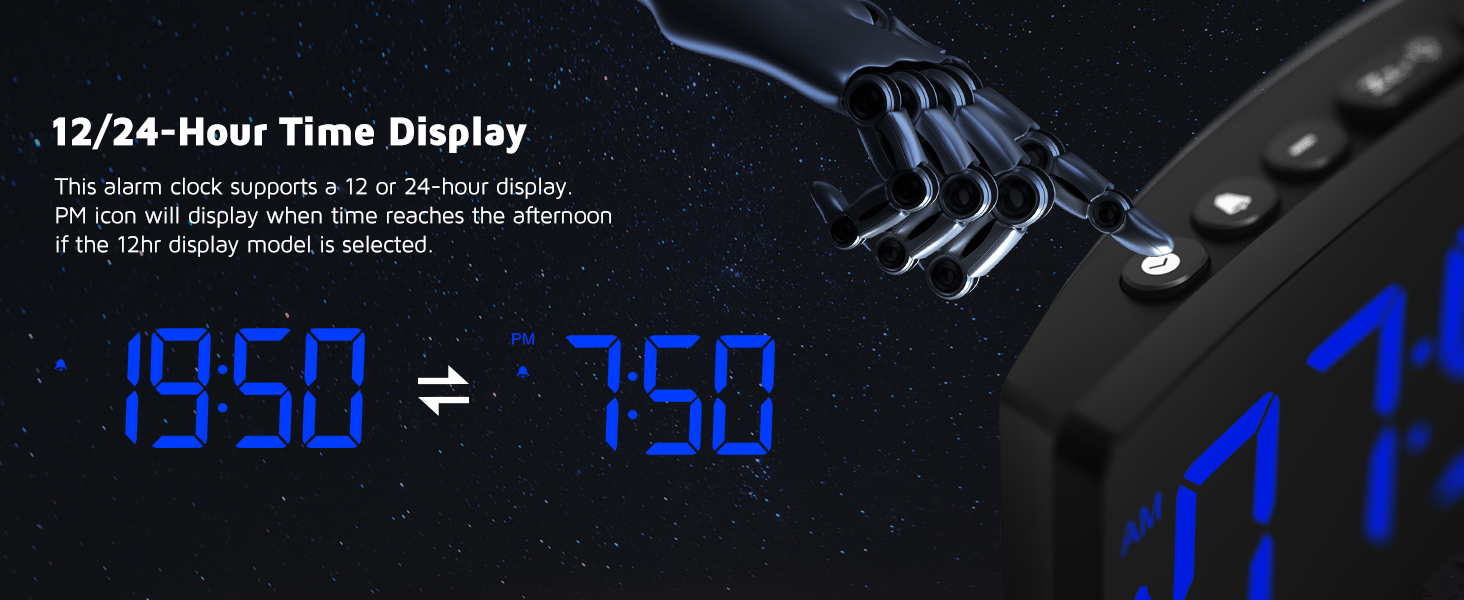
Figure 8: Customizable Clear Projection
Projection Operation:
- In time mode, short press the projection button to turn on the projection.
- Rotate the projector arm to adjust it to the desired angle.
- Short press the projection button again to adjust the projection brightness (Low-Medium-High-OFF).
- If the projected numbers appear upside down, long press the projection button to flip the numbers.

Figure 9: Projection 4-Step Operation
3. Alarm and Snooze Function
The alarm features a progressive buzzer volume (up to 75dB), which gradually increases in loudness and speed. This is beneficial for heavy sleepers, preventing sudden loud sounds.
To activate the snooze function, press the large SNOOZE button located on the top of the clock when the alarm sounds. This will provide an additional 9 minutes of sleep before the alarm sounds again.

Figure 10: 9 Minutes Snooze Function
4. USB Charging Port
The alarm clock includes a 5V/1A USB output interface. This allows you to charge your smartphone or other mobile devices directly from the clock, freeing up an additional power outlet.

Figure 11: USB Charging Port
Maintenance and Care
- Do not expose the unit to extreme temperatures, direct sunlight, dust, or high humidity.
- Always use the original AC adapter provided with the clock.
- Before cleaning, disconnect the power. Clean the clock with a soft cloth moistened only with mild soap and water.
- Do not disassemble the clock or attempt to touch any internal components.
- When placing the clock on furniture, use a cloth or other protective material underneath to prevent scratches.
Troubleshooting
| Problem | Possible Cause | Solution |
|---|---|---|
| Clock display is off / Alarm does not sound during power outage. | Main power supply is interrupted. | This is normal. The built-in CR2032 battery only retains settings, it does not power the display or alarm. Reconnect to main power for full functionality. |
| Projected image is blurry or unclear. | Incorrect projection distance or surface. | Ensure the clock is placed within the optimal projection distance of 1.64-11.4 feet (0.5-3 meters) from the projection surface. The projector does not require manual focus adjustment. |
| Projected numbers are upside down. | Projection image orientation needs adjustment. | Long press the projection button to flip the projected numbers. |
| USB charging is slow or not working. | Device requires more than 5V/1A; cable issue; device not properly connected. | Ensure your device is compatible with 5V/1A charging. Try a different USB cable. Ensure the cable is securely connected to both the clock and your device. |
If you encounter issues not listed here or if the problem persists, please refer to the "Warranty and Support" section for assistance.
Specifications
| Feature | Detail |
|---|---|
| Brand | GOLOZA |
| Model | B0B45XH44P |
| Display Type | Digital LED (Curved Screen) |
| Display Color | Blue Digit + Blue Projection |
| Power Source | AC Adapter (AC100-240V, 50/60Hz) |
| USB Output | 5V/1A |
| Backup Battery | CR2032 (for settings memory only) |
| Projection Distance | 1.64-11.4 ft (0.5-3 m) |
| Snooze Duration | 9 minutes |
| Alarm Volume | Progressive, up to 75dB |
Warranty and Support
GOLOZA provides comprehensive support for its products:
- Warranty: 24 Months Warranty
- Support: Lifetime Support
For any questions or assistance, please contact GOLOZA support through your Amazon account:
- Go to "Account"
- Navigate to "Orders"
- Select "Order Detail" for your GOLOZA Projection Alarm Clock purchase
- Click on "Sold by: GOLOZA"
- Select "Ask a question"

Figure 12: GOLOZA Support Information

