Introduction
This user manual provides detailed instructions for the installation, operation, and maintenance of your EUKI Wireless Outdoor 2K Solar Security Camera System. Designed for outdoor surveillance, this camera features 2K resolution, 360° Pan-Tilt-Zoom (PTZ) capabilities, a built-in spotlight and siren, color night vision, PIR motion detection, and two-way audio communication. Its solar panel ensures continuous power, making it a wire-free solution for your security needs. Please read this manual thoroughly before use to ensure proper setup and optimal performance.
Package Contents
- EUKI Wireless Outdoor Security Camera
- Solar Panel with 10-ft (3-meter) Cable
- Mounting Bracket
- Mounting Screws and Wall Anchors
- USB Charging Cable
- User Manual (this document)
- Quick Start Guide
Product Overview
Familiarize yourself with the components of your EUKI security camera system.

Figure 1: The EUKI Wireless Outdoor 2K Solar Security Camera system, showing the camera unit, solar panel, and a smartphone displaying the live feed. This image illustrates the complete setup and remote viewing capability.
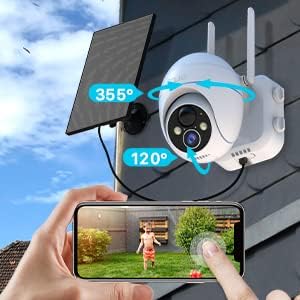
Figure 2: Illustration of the camera's flexible Pan-Tilt capabilities, indicating 355° horizontal rotation and 120° vertical rotation. A hand on a smartphone screen demonstrates how to control the camera's movement remotely.

Figure 3: The solar panel connected to the camera, highlighting the 3-meter (approximately 10-ft) cable length for flexible installation. This setup ensures optimal solar charging for continuous operation.
Setup Guide
1. Initial Charging
Before initial use, fully charge the camera's built-in battery using the provided USB cable and a 5V/2A power adapter (not included). A full charge typically takes 8-10 hours. The indicator light will turn solid blue when fully charged.
2. App Installation
Download and install the "CloudEdge" app from the App Store (iOS) or Google Play Store (Android). Register an account and log in.
3. Camera Pairing and Wi-Fi Connection
- Open the CloudEdge app and tap the "+" icon to add a device.
- Select "Battery Camera" or "Solar Camera" from the device list.
- Follow the on-screen instructions to power on the camera. Ensure the camera's indicator light is flashing blue, indicating it's ready for pairing.
- Connect your smartphone to a 2.4GHz Wi-Fi network. The camera does not support 5GHz Wi-Fi.
- Enter your Wi-Fi network password in the app.
- The app will generate a QR code. Position your phone approximately 6-8 inches (15-20 cm) in front of the camera lens until you hear a prompt sound, indicating successful scanning.
- Once connected, the camera's indicator light will turn solid blue. You can then name your camera and begin live viewing.
4. Mounting the Camera and Solar Panel
Choose a suitable location for mounting the camera and solar panel. Ensure the camera has a clear view of the area you wish to monitor and the solar panel receives direct sunlight for most of the day.
- Use the provided mounting bracket, screws, and wall anchors to securely attach the camera to a wall or eave.
- Mount the solar panel in an unshaded area, ideally facing south (in the Northern Hemisphere) or north (in the Southern Hemisphere) to maximize sun exposure.
- Connect the solar panel cable to the camera's charging port.

Figure 4: An example of the solar panel installation, showing the panel mounted on a roof and connected to the camera via a 10-ft long cable. This setup ensures optimal solar charging for continuous operation.
Operating Instructions
1. Live View and PTZ Control
Open the CloudEdge app and select your camera to access the live view. Use the on-screen joystick or swipe gestures to control the camera's Pan (355° horizontal) and Tilt (120° vertical) movements. You can also use the digital zoom feature to get a closer look.
2. Two-Way Audio
Tap the microphone icon in the live view to enable two-way audio. You can speak through your phone, and your voice will be projected through the camera's speaker. Similarly, you can hear audio from the camera's surroundings.

Figure 5: Depiction of the real-time two-way audio feature, showing a child playing in a yard and a speech bubble indicating communication from the camera. This highlights the ability to interact with people near the camera.
3. Motion Detection and Alerts
The camera utilizes Passive Infrared (PIR) motion detection to identify human-like movement, reducing false alarms. When motion is detected, the camera will:
- Send instant alert notifications to your smartphone (within 0.2-2 seconds).
- Begin recording video footage.
- Activate the built-in spotlight and siren (if enabled in settings).
You can customize motion detection settings in the app, including sensitivity levels (1-10), alarm plans, and alarm intervals.

Figure 6: An illustration of the intelligent PIR motion detection system, showing a person walking past the camera and a smartphone notification for "CloudEdge Notification". This demonstrates the camera's ability to detect motion and send instant alerts.
4. Night Vision
The camera features 4 IR lights and a 1/3 CMOS color sensor, providing clear 2K/3MP images and videos even in low light conditions. It automatically switches to color night vision mode, with a monitoring distance of up to 50ft (15m).

Figure 7: A visual representation of the camera's night vision capabilities, showing a clear image of a garage at night. The text indicates "Clearer and Longer Night Vision Distance: 65 Feet", highlighting its effectiveness in low-light environments.
5. Recording and Storage
The camera supports local storage via a Micro SD card (up to 128GB, not included) and optional cloud storage. Recorded events can be accessed and played back through the CloudEdge app.
- To install an SD card, power off the camera, locate the SD card slot (usually under a rubber cover), and insert the card until it clicks.
- Format the SD card via the app settings for optimal performance.
6. Group Sharing
You can easily share camera access with family members or friends through the CloudEdge app by scanning a QR code. This allows multiple users to view the live feed and receive alerts.
Maintenance
- Cleaning: Regularly wipe the camera lens and solar panel with a soft, damp cloth to ensure clear vision and efficient solar charging. Avoid abrasive cleaners.
- Battery Management: While the solar panel provides continuous charging, in periods of prolonged cloudy weather or low sunlight, the camera's battery may deplete. If the battery level is critically low, you may need to manually charge the camera using the USB cable.
- Firmware Updates: Periodically check the CloudEdge app for available firmware updates. Keeping the firmware updated ensures optimal performance, new features, and security enhancements.
- SD Card Management: If using an SD card for storage, regularly review and back up important footage. The camera will typically overwrite the oldest footage when the card is full.
Troubleshooting
| Problem | Possible Cause / Solution |
|---|---|
| Camera won't connect to Wi-Fi. |
|
| Battery drains quickly. |
|
| False motion alerts. |
|
| No night vision or poor night vision. |
|
| Cannot hear two-way audio or audio is unclear. |
|
| Alarm/Siren not activating. |
|
Specifications
| Feature | Detail |
|---|---|
| Brand | EUKI |
| Model Number | 1 |
| Connectivity Technology | Wireless (Wi-Fi 2.4GHz only) |
| Power Source | Battery Powered, Solar |
| Video Capture Resolution | 2K (3MP Max Webcam Image Resolution) |
| Pan/Tilt/Zoom | 355° Horizontal, 120° Vertical, 4X Digital Zoom |
| Night Vision Range | Up to 50 Feet (15m) / 65 Feet (20m) (Color Night Vision) |
| Motion Detection | PIR Motion Detection (Human-like recognition) |
| Audio | 2-Way Talk |
| Storage Options | Micro SD Card (up to 128GB, not included), Cloud Storage |
| Weatherproof Rating | IP66 |
| Operating Temperature | −25°C to 60°C (−13°F to 140°F) |
| Dimensions (L x W x H) | 6.3 x 10.24 x 11.81 inches |
| Item Weight | 2.57 pounds |
| Compatible Devices | Smartphone (via CloudEdge App) |
Warranty and Support
For warranty information, technical support, or further assistance, please refer to the official EUKI website or contact their customer service directly. Contact details are typically available on the product packaging or the manufacturer's website.
No official product videos from the seller were available for embedding in this manual.


