1. Safety Instructions
Please read all instructions carefully before using the Melchioni Family CUBIK Automatic Ice Maker. Retain this manual for future reference.
- Electrical Safety: Ensure the appliance is connected to a grounded power outlet with the correct voltage (AC 220-240V ~ 50Hz). Do not operate with a damaged cord or plug.
- Placement: Place the ice maker on a stable, level surface away from direct sunlight, heat sources, and corrosive gases. Ensure adequate ventilation around the unit.
- Water Usage: Use only potable water. Do not fill the water reservoir with any other liquids.
- Cleaning: Always unplug the appliance before cleaning. Do not immerse the unit in water. Clean removable parts with warm, soapy water.
- Children: This appliance is not intended for use by persons (including children) with reduced physical, sensory or mental capabilities, or lack of experience and knowledge, unless they have been given supervision or instruction concerning use of the appliance by a person responsible for their safety.
- Maintenance: Do not attempt to repair or modify the appliance yourself. Contact qualified service personnel for any repairs.
2. Product Overview
The Melchioni Family CUBIK Automatic Ice Maker is designed for convenient ice production. Familiarize yourself with its components:
- Main Unit: The primary housing containing the compressor and water reservoir.
- Transparent Lid: Allows observation of the ice-making process without opening.
- Ice Basket: Removable basket for collecting produced ice cubes.
- Ice Scoop: For safely removing ice from the basket.
- Control Panel: Features indicator lights and a power button for operation.

Figure 2.1: Top-down view of the Melchioni Family CUBIK Ice Maker with its transparent lid open, revealing the internal ice-making components and the removable ice basket.

Figure 2.2: The Melchioni Family CUBIK Ice Maker shown with its ice basket and scoop placed next to it, illustrating the accessories included for ice handling.
3. Setup
3.1 Unpacking
- Carefully remove the ice maker from its packaging.
- Remove all packing materials, including any tape or protective films.
- Inspect the appliance for any damage. If damaged, do not operate and contact customer support.
3.2 Initial Cleaning
Before first use, clean the internal components:
- Remove the ice basket and ice scoop.
- Wash the ice basket, ice scoop, and the transparent lid with warm water and a mild detergent. Rinse thoroughly and dry.
- Wipe the interior of the water reservoir and the ice collection area with a soft cloth dampened with warm water and a small amount of vinegar or mild detergent. Rinse by wiping with a clean, damp cloth.
- Ensure all parts are completely dry before reassembling.
3.3 Placement and Power Connection
- Place the ice maker on a flat, stable, and heat-resistant surface.
- Ensure there is at least 10 cm (4 inches) of space around the unit for proper ventilation.
- Plug the power cord into a grounded electrical outlet (AC 220-240V ~ 50Hz).
4. Operation
4.1 Control Panel
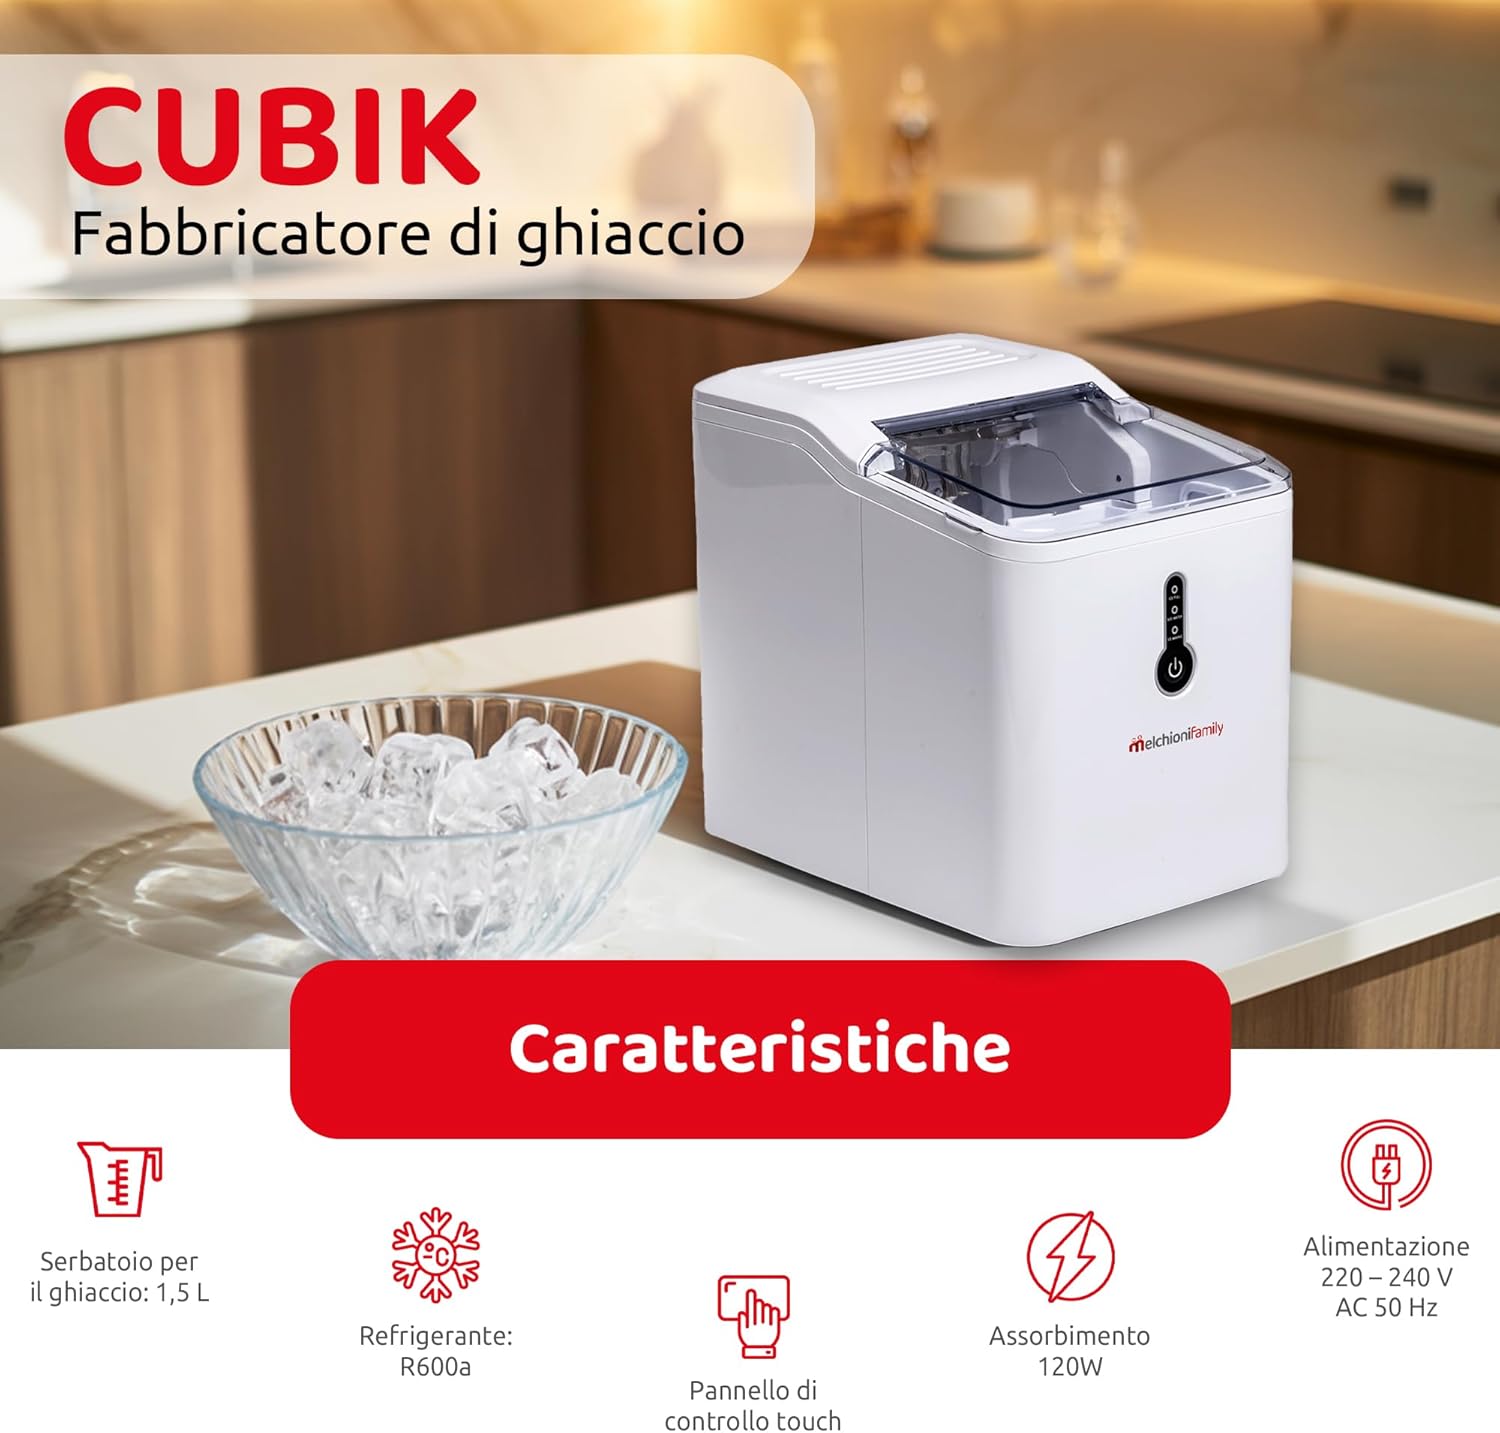
Figure 4.1: Front view of the Melchioni Family CUBIK Ice Maker, highlighting the intuitive control panel with indicator lights and the power button.
The control panel features a power button and indicator lights:
- Power Button: Press to turn the unit ON or OFF.
- ICE FULL Indicator: Illuminates when the ice basket is full, signaling the unit to pause ice production.
- ADD WATER Indicator: Illuminates when the water reservoir needs refilling.
4.2 Making Ice
- Fill Water Reservoir: Open the transparent lid and pour potable water into the water reservoir up to the MAX fill line. Do not overfill.
- Power On: Press the Power Button to start the ice-making cycle. The unit will begin to operate.
- Ice Production: The ice maker will automatically produce bullet-shaped ice cubes. The first batch of ice may take approximately 6-13 minutes, with subsequent batches being faster.
- Ice Collection: As ice is produced, it will drop into the removable ice basket.
- Ice Full Detection: When the ice basket is full, the ICE FULL indicator will light up, and the unit will automatically pause production. Remove ice to resume.
- Low Water Detection: If the water level in the reservoir is too low, the ADD WATER indicator will light up, and the unit will pause. Refill the reservoir to resume operation.
- Removing Ice: Use the provided ice scoop to remove ice cubes from the basket.

Figure 4.2: A close-up view of the internal ice basket area, showing the design for collecting bullet-shaped ice cubes.
5. Maintenance and Cleaning
Regular cleaning ensures optimal performance and extends the lifespan of your ice maker.
5.1 Daily Cleaning
- Turn off the appliance and unplug it from the power outlet.
- Remove the ice basket and empty any remaining ice.
- Drain any remaining water from the reservoir.
- Wipe the interior and exterior surfaces with a soft, damp cloth.
- Dry all parts thoroughly before closing the lid.
5.2 Deep Cleaning (Weekly/Bi-weekly)
- Unplug the unit.
- Remove the ice basket, transparent lid, and mixing blade (if easily removable). Wash these parts with warm, soapy water, rinse, and dry.
- For the main unit, prepare a cleaning solution of water and a small amount of white vinegar or a food-grade descaling agent.
- Pour the solution into the water reservoir and let it sit for 10-15 minutes.
- Drain the solution completely.
- Rinse the interior thoroughly by filling the reservoir with clean water and draining it several times.
- Wipe all surfaces dry with a clean cloth.
5.3 Storage
If storing the ice maker for an extended period, ensure it is thoroughly cleaned and dried. Store it in a cool, dry place, away from direct sunlight and out of reach of children.
6. Troubleshooting
Refer to the table below for common issues and their solutions:
| Problem | Possible Cause | Solution |
|---|---|---|
| ADD WATER indicator is on. | Water reservoir is empty or water level is too low. | Refill the water reservoir with potable water up to the MAX line. |
| ICE FULL indicator is on. | Ice basket is full. | Remove ice cubes from the basket. The unit will resume operation automatically. |
| Ice maker is on but not making ice. |
|
|
| Ice cubes are too small or clumpy. |
|
|
| Unusual noise during operation. |
|
|
7. Specifications
Technical details for the Melchioni Family CUBIK Automatic Ice Maker:
| Feature | Specification |
|---|---|
| Brand | Melchioni |
| Model Name | CUBIK |
| Model Number | 118700201 |
| Dimensions (L x W x H) | 23 x 31 x 29 cm (9.06 x 12.2 x 11.4 inches) |
| Weight | 8 kg (17.6 lbs) |
| Water Reservoir Capacity | 1.5 Liters |
| Ice Basket Capacity | 1.5 Liters |
| Power | 120 Watts |
| Voltage | AC 220-240V ~ 50Hz |
| Refrigerant | R600a |
| Noise Level | 60 dB(A) |
| Material | Plastic |
| Ice Production Capacity | Up to 12 kg (26.5 lbs) in 24 hours |

Figure 7.1: The Melchioni Family CUBIK Ice Maker with its key dimensions (length, width, height) clearly marked for reference.

Figure 7.2: An illustrative graphic detailing key features such as ice basket capacity, refrigerant type, control panel, power consumption, and electrical requirements.
8. Warranty & Support
For warranty information, please refer to the warranty card included with your product or contact your retailer. For technical support or service inquiries, please contact Melchioni Family customer service through their official website or the contact details provided in your purchase documentation.
Keep your proof of purchase for any warranty claims.