1. Safety Information
Please read all instructions carefully before assembly and use. Retain this manual for future reference.
- This product has a maximum weight capacity of 136 kilograms (299.8 pounds). Do not exceed this limit.
- Improper use or assembly may lead to instability or injury. Always follow the assembly instructions provided.
- Ensure all screws and bolts are securely tightened before use. Periodically check and re-tighten as necessary.
- Keep children away from the chair during assembly. Small parts may pose a choking hazard.
- Use the chair on a flat, stable surface.
2. Product Overview
The Primy Ergonomic Office Chair is designed for comfort and functionality in various settings, including home offices, conference rooms, and studies. It features adjustable lumbar support, height adjustment, a breathable mesh back, and flip-up armrests for space-saving convenience.

Image 2.1: Front-side view of the Primy Ergonomic Office Chair in white.

Image 2.2: The Primy office chair positioned in a modern office environment.
3. Components List
Before beginning assembly, ensure all components are present and undamaged. If any parts are missing or damaged, please contact customer support.

Image 3.1: Exploded view of chair components and hardware for assembly.
The package includes:
- Backrest
- Seat Cushion with Armrests
- Gas Lift Cylinder
- Base (5-star)
- Casters (5 pieces)
- Mechanism Plate
- Hardware (screws, washers, Allen wrench)
4. Assembly Instructions
Assembly is designed to be straightforward and typically requires no additional tools beyond what is provided. Follow these steps:
- Attach Casters to Base: Insert each of the five casters into the holes at the end of each leg of the 5-star base. Push firmly until they click into place.
- Insert Gas Lift: Place the gas lift cylinder into the center hole of the assembled 5-star base.
- Attach Mechanism Plate to Seat: Align the mechanism plate with the pre-drilled holes on the underside of the seat cushion. Secure it with the provided screws. Ensure the lever is on the right side when facing the front of the seat.
- Attach Backrest to Seat: Align the backrest with the mounting points on the seat cushion. Secure it using the provided screws.
- Connect Seat to Gas Lift: Carefully place the assembled seat and backrest onto the gas lift cylinder, ensuring the center hole of the mechanism plate aligns with the top of the gas lift. Press down firmly to secure.
Image 4.1: Visual guide for chair assembly, showing six main steps.
5. Operating Instructions
5.1. Height Adjustment
To adjust the chair's height, locate the lever on the right side beneath the seat. While seated, pull the lever up to lower the chair. To raise the chair, stand up slightly to relieve weight from the seat, then pull the lever up. Release the lever at the desired height.

Image 5.1: Visual guide for adjusting the chair's height using the lever.
5.2. Lumbar Support Adjustment
The chair features an adjustable lumbar support designed to conform to your spine. The lumbar support can be adjusted vertically by approximately 2 inches (5 cm) to provide optimal lower back comfort. Gently push or pull the lumbar support mechanism on the backrest to find your preferred position.

Image 5.2: Illustration of the 2-inch (5 cm) adjustable lumbar support.
5.3. Tilt Function
The chair's backrest can tilt back up to 120 degrees, allowing for a comfortable recline. To engage the tilt, pull the same lever used for height adjustment outwards. Push the lever inwards to lock the backrest in an upright position.
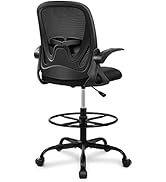
Image 5.3: Visual representation of the chair's 120-degree tilt capability.
5.4. Armrest Adjustment (Flip-up)
The armrests can be flipped up by 90 degrees, allowing the chair to be pushed closer to a desk or stored compactly. Simply lift the armrests upwards until they lock into the vertical position. To lower them, gently pull them down.

Image 5.4: Illustration of the 90-degree flip-up armrests for space-saving.
5.5. Swivel Function
The chair offers 360-degree swivel mobility, facilitating easy movement and interaction within your workspace.

Image 5.5: Overview of chair adjustments, including 360-degree rotation.
6. Maintenance
6.1. Cleaning
To clean the chair, simply wipe it with a clean, damp cloth. Avoid using harsh chemicals or abrasive cleaners, as these may damage the mesh fabric or plastic components.
6.2. General Care
- Periodically check all screws and bolts to ensure they remain tight. Re-tighten if necessary to maintain stability.
- Avoid exposing the chair to direct sunlight for extended periods, as this may cause fading or material degradation.
- Ensure casters are free of debris to maintain smooth rolling.
7. Troubleshooting
- Issue: Chair height slowly drops.
Solution: This can sometimes occur with gas lift mechanisms over time. Re-adjust the height as needed. If the issue persists or the chair does not hold height at all, the gas lift may need replacement. Contact customer support for assistance. - Issue: Chair is wobbly or unstable.
Solution: Check all assembly screws and bolts, especially those connecting the seat to the mechanism plate and the backrest. Ensure they are securely tightened. Verify that the gas lift is properly seated in the base. - Issue: Casters do not roll smoothly.
Solution: Inspect casters for any trapped hair, dust, or debris. Clean them thoroughly. Ensure the chair is used on an appropriate surface (e.g., hard floor as recommended).
8. Specifications
| Feature | Detail |
|---|---|
| Brand | Primy |
| Model Number | PR934-Parent |
| Color | White |
| Product Dimensions (D x W x H) | 25.2"D x 25.2"W x 39.8"H |
| Back Style | Ergonomic backrest |
| Special Feature | Adjustable height, Adjustable lumbar support, Flip-up armrests |
| Maximum Weight Recommendation | 136 Kilograms (299.8 lbs) |
| Material Type | Mesh (back), Foam (seat) |
| Furniture Base Movement | Swivel |
| Tilting | Yes (up to 120 degrees) |
| Included Components | Casters |
| Product Care Instructions | Wipe Clean |
9. Warranty and Support
The Primy Ergonomic Office Chair comes with a one-year warranty from the date of purchase, covering manufacturing defects. This warranty does not cover damage caused by misuse, accidents, or unauthorized modifications.
For any questions, concerns, or warranty claims, please contact Primy customer support:

Image 9.1: Contact details for Primy customer service.
- Email: cs@primyhome.com
- Phone: +1 (775) 320-9681
You can also reach us through your Amazon account by navigating to 'Your Orders' and selecting 'Contact Seller' for your purchase.


