1. Introduction
This manual provides essential information for the safe and effective use of your Helavo All Terrain Walker Rollator. Please read these instructions thoroughly before assembly and operation. Retain this manual for future reference.
The Helavo All Terrain Walker Rollator is designed to provide mobility assistance with enhanced comfort and stability across various terrains. It features 12-inch pneumatic tires for superior shock absorption, an adjustable handle height, a comfortable seat, and a foldable design for portability.

Image 1.1: The Helavo All Terrain Walker Rollator, showcasing its robust design and pneumatic tires.
2. Safety Guidelines
Your safety is paramount. Adhere to the following guidelines to prevent injury and ensure proper operation:
- Weight Capacity: Do not exceed the maximum weight capacity of the rollator. Refer to the 'Specifications' section for details.
- Brakes: Always engage the parking brakes before sitting on the seat or when the rollator is stationary. Regularly check brake functionality.
- Tire Pressure: Maintain recommended tire pressure for optimal performance and stability. Under-inflated tires can affect maneuverability and safety.
- Uneven Surfaces: While designed for all-terrain use, exercise caution on extremely uneven, slippery, or steep surfaces.
- Assembly: Ensure all parts are securely fastened and locked into place before each use.
- Adjustments: Adjust handle height to a comfortable and safe position before use. Ensure adjustment mechanisms are locked.
- Supervision: Individuals with cognitive impairments or severe balance issues should use the rollator under supervision.
Legal Disclaimer: Statements regarding medical devices have not been evaluated by the FDA and are not intended to diagnose, treat, cure, or prevent any disease or health condition. Consult a healthcare professional for medical advice.
3. Assembly & Setup
The Helavo All Terrain Walker Rollator comes partially assembled. Follow these steps to complete the setup:
- Unfolding the Rollator: Carefully remove the rollator from its packaging. Stand it upright and gently pull the handlebars apart until the frame locks into its open position. Ensure all locking mechanisms are engaged.
- Attaching Wheels (if necessary): If wheels are not pre-attached, insert the wheel axles into the designated slots on the frame and secure them according to the included quick-release or bolt instructions. Ensure wheels rotate freely.
- Adjusting Handle Height: Locate the height adjustment pins or levers on the handlebar uprights. Press or release them and slide the handlebars to your desired height. Ensure both handles are at the same height and the pins/levers are securely locked in place. The ergonomic handlebars adjust from 31.9 inches to 37.0 inches, suitable for users approximately 4.9 ft to 6.3 ft tall.
- Inflating Pneumatic Tires: Check the pneumatic tires for proper inflation. Use a standard bicycle pump to inflate the tires to the recommended pressure, typically indicated on the tire sidewall. Proper inflation ensures optimal shock absorption and maneuverability.
- Attaching Accessories: Attach the cup holder and storage bag to the designated points on the rollator frame. Ensure they are securely fastened.

Image 3.1: Detail of the adjustable handle, showing the mechanism for setting the desired height.
4. Operating Instructions
4.1 Walking with the Rollator
- Position yourself between the handlebars, gripping them firmly.
- Push the rollator slightly ahead of you, maintaining a stable posture.
- Walk at a comfortable pace, allowing the rollator to support your balance.
4.2 Using the Brakes
The rollator is equipped with loop hand brakes for speed control and parking.
- To Slow Down or Stop: Squeeze both brake levers towards the handlebars. The harder you squeeze, the more braking force is applied.
- To Engage Parking Brakes: Push the brake levers downwards until they lock into place. This will prevent the rollator from moving. Always engage parking brakes before sitting or when stationary.
- To Release Parking Brakes: Pull the brake levers upwards until they disengage.

Image 4.1: Ergonomic hand brake lever for controlling speed and engaging parking brakes.
4.3 Using the Seat
The built-in seat provides a convenient resting spot during walks.
- Ensure the rollator is on a flat, stable surface.
- Engage both parking brakes securely.
- Turn around and slowly lower yourself onto the seat. Use the handlebars for support if needed.
- The backrest provides additional comfort.

Image 4.2: User demonstrating the comfortable seat and backrest feature of the rollator.
4.4 Folding the Rollator
The rollator features a compact, travel-friendly foldable design.
- Ensure the storage bag is empty and removed if it obstructs folding.
- Locate the folding mechanism, typically a strap or lever on the seat or frame.
- Pull the strap upwards or activate the lever to release the locking mechanism.
- Gently push the sides of the rollator together until it folds compactly.
- Once folded, it measures approximately 29.9" x 10.6" x 31.9", making it easy to store and transport.

Image 4.3: The rollator in its folded configuration, demonstrating its portability.
4.5 Using Accessories
The rollator includes a clip-on cup holder and a large transport bag.
- Cup Holder: Securely attach the cup holder to the frame. It is designed to transport beverages without spilling.
- Transport Bag: Use the large bag for carrying personal items. Ensure items are evenly distributed and do not exceed the bag's weight limit.

Image 4.4: The rollator equipped with its practical storage bag and cup holder.
5. Care & Maintenance
Regular maintenance ensures the longevity and safe operation of your rollator.
- Cleaning: Wipe down the frame and seat with a damp cloth and mild detergent. Avoid abrasive cleaners.
- Tire Pressure: Check pneumatic tire pressure weekly and inflate as needed. Refer to the tire sidewall for recommended PSI.
- Brakes: Periodically inspect brake cables and levers for wear or damage. Ensure brakes engage and disengage smoothly. If adjustment is needed, consult a qualified technician.
- Fasteners: Regularly check all screws, bolts, and locking mechanisms to ensure they are tight and secure.
- Storage: Store the rollator in a dry place, away from extreme temperatures and direct sunlight.
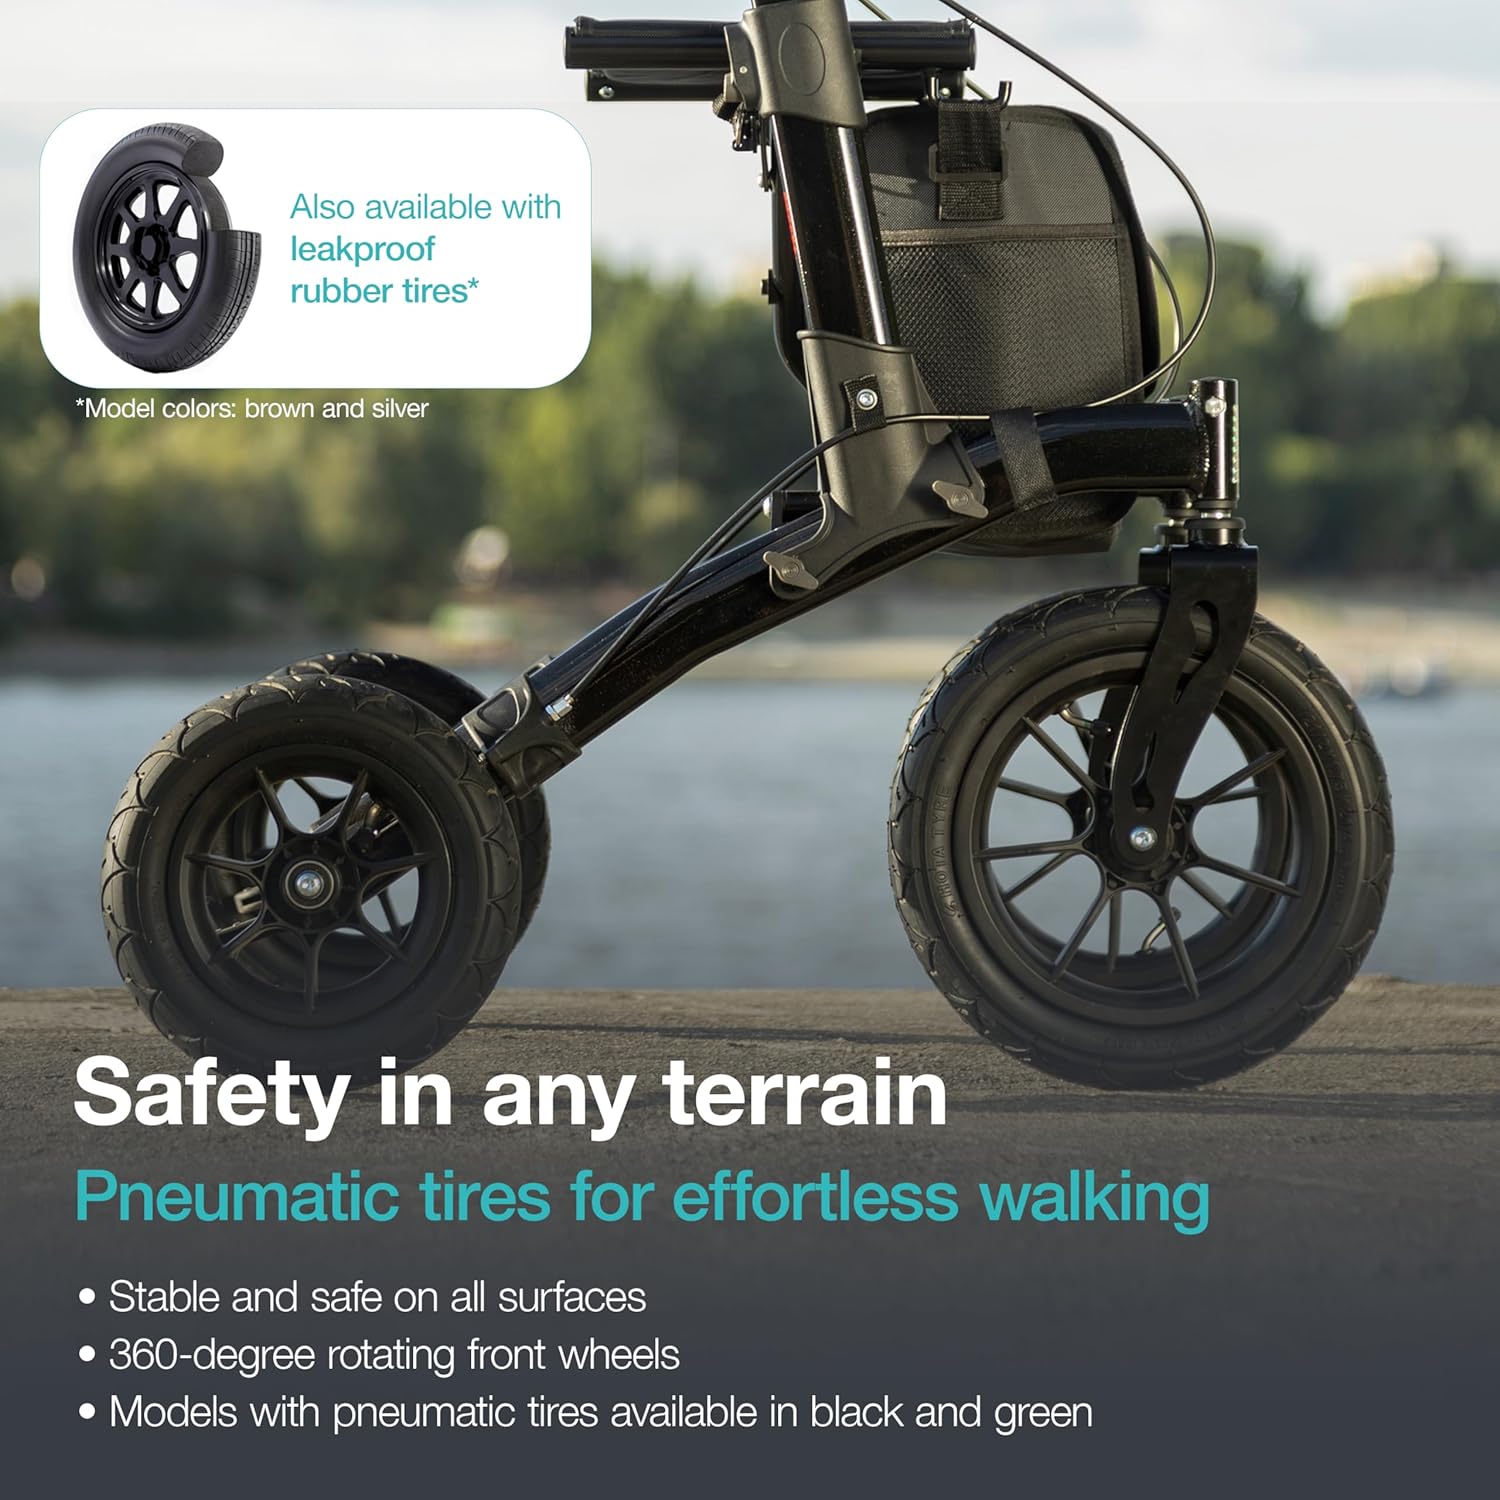
Image 5.1: Detail of the pneumatic tire, emphasizing its importance for comfort and stability.
6. Troubleshooting
If you encounter issues with your rollator, refer to the following common problems and solutions:
| Problem | Possible Cause | Solution |
|---|---|---|
| Rollator feels unstable or wobbly | Loose fasteners; uneven handle height; under-inflated tires. | Check and tighten all screws and bolts. Ensure handles are at equal height and locked. Inflate tires to recommended PSI. |
| Brakes are not engaging or are too loose/tight | Brake cable adjustment needed; worn brake pads. | Consult a qualified technician for brake adjustment or replacement. Do not attempt to adjust if unsure. |
| Difficulty folding the rollator | Obstruction; folding mechanism not fully released. | Ensure the storage bag is empty and not obstructing. Verify the folding strap/lever is fully pulled/released. |
| Tires frequently lose air | Puncture in tire or valve issue. | Inspect tires for punctures. If a puncture is found, the inner tube may need repair or replacement. Consult a bicycle repair shop or qualified technician. |
7. Specifications
- Model Number: H1040
- Material: Aluminum
- Product Dimensions (Unfolded): 29.92"D x 25.98"W x 37.01"H
- Product Dimensions (Folded): Approximately 29.9"D x 10.6"W x 31.9"H
- Item Weight: 9.5 Kilograms (20.94 Pounds)
- Front Wheel Size: 12 inches (Pneumatic)
- Rear Wheel Size: 10 inches (Pneumatic)
- Adjustable Handle Height: 31.9" to 37.0"
- Recommended User Height: 4.9 ft to 6.3 ft
- Color: Black
8. Warranty & Support
For warranty information, please refer to the documentation included with your purchase or visit the official Helavo website. If you require assistance, have questions, or need to report an issue, please contact Helavo customer support.
Contact Information:
- Website: Visit the Helavo Store on Amazon
- Email/Phone: Refer to the Helavo website or product packaging for the most current contact details.
Note: No official product videos were available in the provided data for embedding in this manual.


