
DGNOG R4 PRO
DGNOG R4 PRO Audio Mixer User Manual
Professional 4-Channel Sound Mixer with Dual Wireless Microphones
1. Introduction
This manual provides comprehensive instructions for the setup, operation, and maintenance of your DGNOG R4 PRO 4-Channel Audio Mixer. Designed for versatility, this mixer is suitable for various audio applications including home karaoke, parties, DJ sets, recording, live singing, broadcasting, and studio streaming. Please read this manual thoroughly before use to ensure optimal performance and longevity of your device.
2. Product Features
- Integrated Wireless Microphone System: The R4 Pro features a built-in wireless receiving module. Simply activate 'MIC ON' on the mixer panel for automatic microphone connection. Offers a receiving distance of approximately 180 feet. Microphone volume, echo, equalization, and gain are controllable via Channel 2.
- UHF Wireless Microphones: Each microphone provides 10 groups of frequency selection. UHF frequencies are CHA 576.1-590.1Mhz and CHB 560.1-574.1Mhz. Microphones are powered by 2 AA batteries (not included) and offer 4-6 hours of operation on a full charge.
- USB Audio Interface & Bluetooth Connectivity: The mixer's USB audio interface supports PC/phone recording and music playback. A USB to phone adapter may be required for phone connection. Bluetooth 3.0 enables cordless music transfer with a range of up to 35 feet. Bluetooth name: BT-NSMIX.
- Versatile Mic and Stereo Line Inputs: Supports XLR and unbalanced 1/4" plugs with a +48V Phantom button for condenser microphones. Includes a 3.5mm 5V Mic Jack, highly accurate LED Peak Level Indicators, and ultra-musical 3-band EQ on channels 1 and 2. A PAD button (-20dB) on Channel 1 accommodates high-sensitivity signals, such as from guitars or electronic musical instruments.
- Broad Application: Connects to a TV for home karaoke, suitable for parties, DJ performances, recording sessions, live singing, broadcasting, and studio streaming.
3. Package Contents
Verify that all items are present in your package:
- Audio Mixer x 1
- Wireless Microphone x 2
- USB Power Cable x 1
- USB to USB Cable x 1
- 5V 2A Power Plug x 1
- 2 RCA to 3.5mm Cable x 1
- Mic Protection Ring x 2
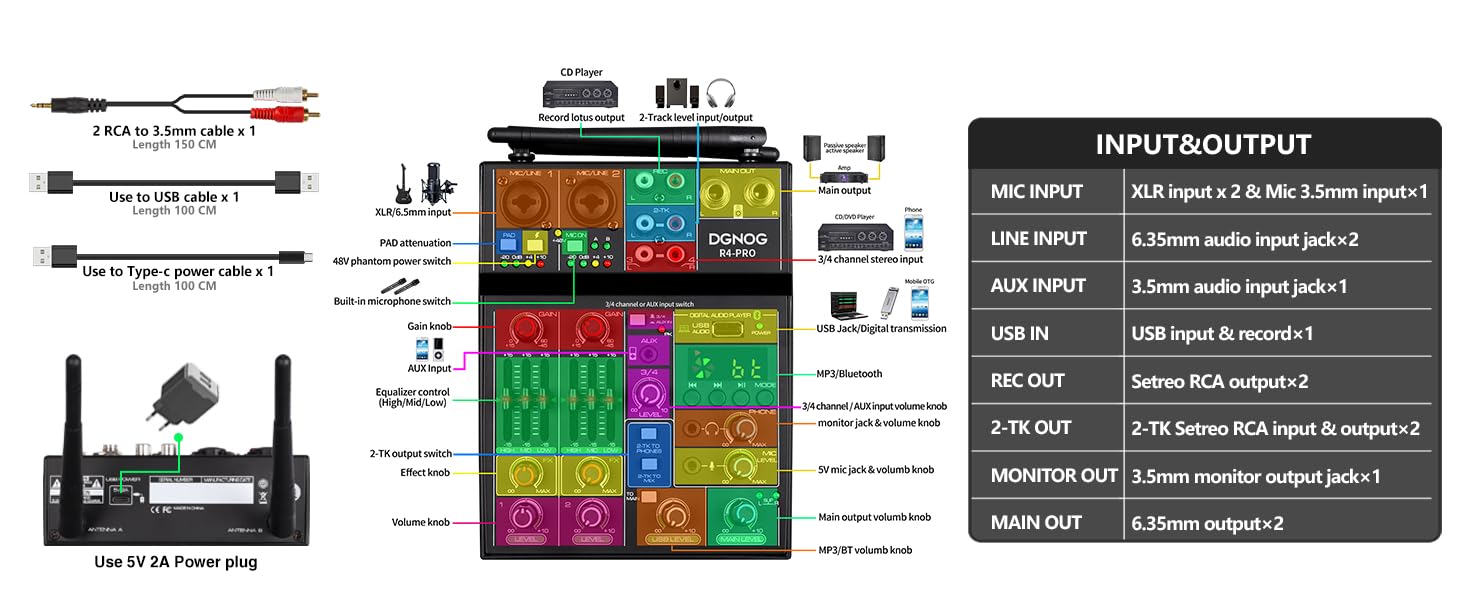
Image: Detailed view of the DGNOG R4 PRO mixer's input/output ports and a complete list of included accessories.
4. Product Overview

Image: The DGNOG R4 PRO 4-channel audio mixer shown alongside its two accompanying wireless microphones.

Image: A detailed diagram labeling all controls and ports on the DGNOG R4 PRO mixer, including inputs, outputs, and various knobs and buttons.

Image: Close-up view of the metal handheld wireless microphones, highlighting their durable construction and ergonomic design.
5. Setup
5.1 Power Connection
Connect the provided USB power cable to the 5V 2A power plug and then to the mixer's USB power input. Ensure a stable power supply for optimal performance. The mixer requires a 5V 2A power source.
5.2 Antenna Setup
Extend the two antennas on the rear of the mixer for optimal wireless signal reception for the microphones.
5.3 Microphone Setup
- Unscrew the bottom cap of each wireless microphone.
- Insert two AA batteries (not included) into each microphone, observing polarity.
- Replace the bottom cap.
- Slide the included anti-roll rings onto the microphones to prevent them from rolling on flat surfaces.
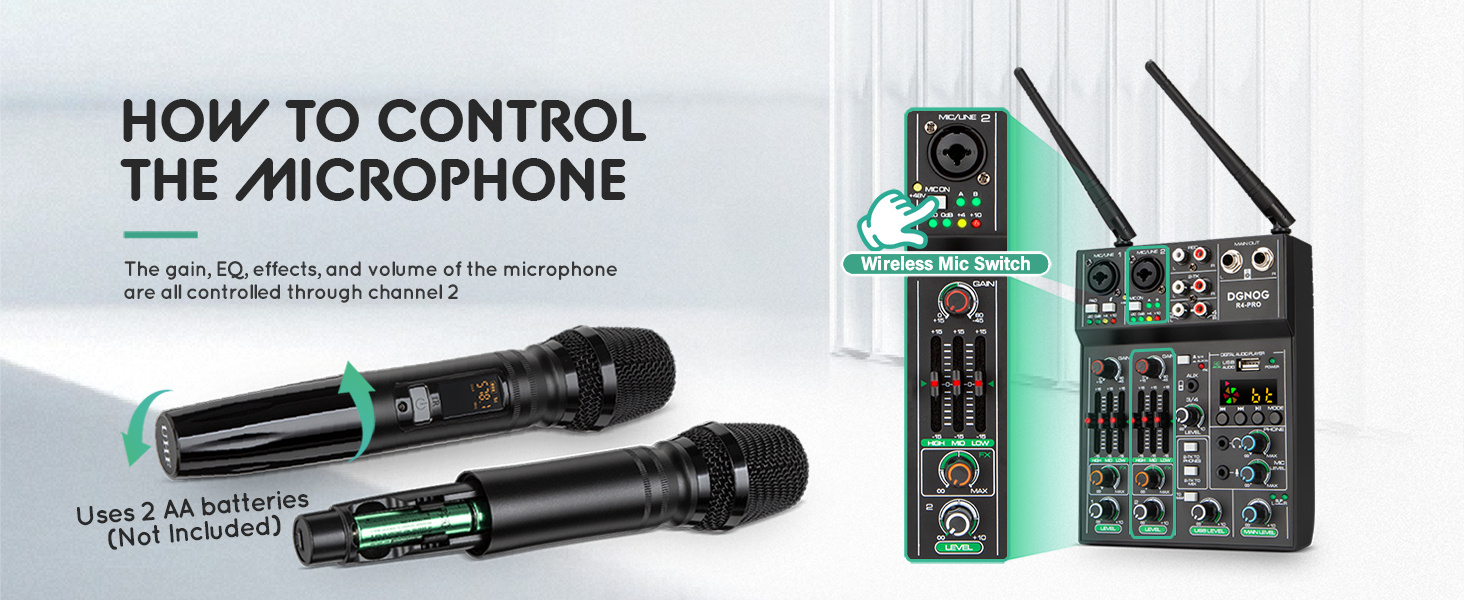
Image: Instructions on how to insert batteries into the wireless microphones and how Channel 2 controls microphone settings.
6. Operating Instructions
6.1 Initial Power On
Before powering on, ensure all 'GAIN' and 'LEVEL' knobs on corresponding channels are set to 0dB. This prevents sudden loud noises and protects your audio equipment and hearing.
6.2 Wireless Microphone Usage
Turn on the mixer. On the mixer panel, locate the 'MIC ON' button and press it. The microphones will automatically connect to the mixer. Each microphone has 10 groups of frequency selection. To change the frequency, press the 'CH' button on the microphone. The wireless range is up to 180 feet.

Image: Illustration of the powerful wireless range of the microphones, extending up to 200 feet (60 meters).

Image: Diagram showing the 15 adjustable frequency points for each microphone (Mic A and Mic B) and how to change them.
6.3 Bluetooth Connection
To connect a device via Bluetooth:
- Ensure the mixer is powered on.
- On your mobile device, enable Bluetooth and search for devices.
- Select 'BT-NSMIX' from the list of available devices to pair.
- Once connected, you can play audio from your device through the mixer. Adjust the 'USB LEVEL' knob to control the Bluetooth audio volume.

Image: Visual guide for connecting a mobile phone to the mixer via Bluetooth, showing the 'BT-NSMIX' name and volume control.
6.4 USB Audio Interface
The mixer can be used for PC/phone recording or music playback via its USB interface. Connect your computer or phone (with a suitable adapter) to the USB port. The mixer will appear as an audio device on your computer.

Image: Instructions for connecting the mixer to a computer for recording, showing the 'MICROPHONE USB2.0 Device' selection in sound settings.
6.5 Mic and Stereo Line Input
The mixer supports XLR and unbalanced 1/4" plugs for microphones and line-level instruments. Channel 1 and 2 feature +48V Phantom power for condenser microphones (activated by the +48V button). The PAD button on Channel 1 reduces input signal by 20dB, useful for high-sensitivity instruments like guitars or electronic musical instruments to prevent distortion.

Image: Explanation of the PAD button for signal attenuation and the 48V phantom power switch for condenser microphones.
6.6 Equalization (EQ) Controls
Channels 1 and 2 feature a 3-band EQ (High, Mid, Low) to shape the tone of your audio. Adjust these sliders to achieve your desired sound. The LED Peak Level Indicators help monitor signal levels to prevent clipping.
6.7 Headphone Monitoring
Connect headphones to the 3.5mm 'PHONE' jack for monitoring your mix. Adjust the 'PHONE' level knob to control headphone volume. The '2-TK TO PHONES' button routes the 2-TK input directly to headphones.
6.8 Output Connections
The mixer provides 'MAIN OUT' (1/4" jacks) for connecting to speakers or amplifiers, and 'REC' (RCA jacks) for recording devices. The '2-TK' input allows for external audio sources like CD players or other playback devices.
6.9 Karaoke Party Setup Examples
The R4 PRO mixer can be integrated into various audio setups for karaoke. Below are common connection methods:
Method One: Speaker Output
Connect the mixer's 'MAIN OUT' to your speaker's 6.35mm or RCA input. If your speaker has a 3.5mm AUX input, use the provided RCA to 3.5mm cable. Ensure your speaker is compatible with analog audio input.
Method Two: Digital Audio Output (TV/Home Theater)
For TVs or home theater systems with optical or SPDIF digital audio output, a Digital to Analog Audio Converter (not included) is required to connect to the mixer. Connect the TV's digital output to the converter, and then the converter's analog output to the mixer's '2-TK' input. The mixer's 'MAIN OUT' can then connect to your home theater system.

Image: Two diagrams illustrating different ways to connect the DGNOG R4 PRO mixer for a karaoke party, including direct speaker connection and connection via a digital-to-analog converter for TVs.
Video: A demonstration of the DGNOG R4 PRO 4-Channel Audio Mixer, showcasing its features, wireless microphones, and various connectivity options for different audio setups.
7. Maintenance
To ensure the longevity and optimal performance of your DGNOG R4 PRO Audio Mixer, follow these maintenance guidelines:
- Cleaning: Use a soft, dry cloth to clean the mixer and microphones. Avoid using liquid cleaners or aerosols, as they may damage the components.
- Storage: Store the device in a cool, dry place away from direct sunlight and extreme temperatures.
- Handling: Handle the mixer and microphones with care. Avoid dropping them or subjecting them to strong impacts.
- Battery Care: Remove batteries from the wireless microphones if they will not be used for an extended period to prevent leakage and damage.
8. Troubleshooting
If you encounter issues with your DGNOG R4 PRO mixer, refer to the following common problems and solutions:
| Problem | Possible Cause | Solution |
|---|---|---|
| No power/Mixer not turning on | Insufficient power supply (less than 5V 2A); loose power connection. | Ensure you are using a 5V 2A power adapter. Check all power cable connections. |
| Wireless microphones not connecting/no sound | Microphone 'MIC ON' button not activated; microphones out of range; low microphone batteries; frequency interference. | Press the 'MIC ON' button on the mixer. Ensure microphones are within 180 feet. Replace microphone batteries. Try changing microphone frequencies. |
| Bluetooth not connecting/audio skipping | Incorrect Bluetooth name selected; device too far from mixer; interference. | Ensure you are connecting to 'BT-NSMIX'. Keep your device within 35 feet of the mixer. Minimize other wireless devices nearby. |
| Distorted audio/clipping | Input gain too high; PAD button not engaged for high-sensitivity instruments. | Reduce the 'GAIN' and 'LEVEL' knobs for the affected channels. Engage the 'PAD' button for instruments like guitars. |
| No sound from headphones | Headphone volume too low; headphones not fully plugged in. | Increase the 'PHONE' level. Ensure headphones are securely plugged into the 3.5mm jack. |
9. Specifications
- Brand: DGNOG
- Model Number: R4 PRO
- Product Dimensions: 1.77"D x 7.08"W x 9.25"H
- Item Weight: 1300 Milligrams
- Number of Channels: 4
- Hardware Interface: 1/4-inch Audio, Bluetooth 5, USB 2.0
- Power Source: Corded Electric
- Voltage: 48 Volts (Phantom Power)
- Connectivity Technology: Interface, XLR, USB, Bluetooth
10. Warranty and Support
For warranty information and technical support, please refer to the documentation included with your purchase or contact DGNOG customer service directly. Contact details can typically be found on the product packaging or the official DGNOG website.
Related documentsR4 PRO


Ask a question about this manual
Ask about setup, troubleshooting, compatibility, parts, safety, or missing instructions. Manuals+ will review the question and use this page’s manual context to help answer it.