
briidea HWHK-01
Briidea RV Electric Water Hybrid Heater Kit User Manual
Model: HWHK-01 | Brand: Briidea
Product Overview
The Briidea RV Electric Water Hybrid Heater Kit is designed to convert existing RV LP Gas water heaters to operate on 120V electricity. This kit provides an alternative and potentially more cost-effective method for heating water in your RV, caravan, or motorhome. It is compatible with most 6-10 gallon Suburban and Atwood water tanks.
Key features include an adjustable thermostat for precise temperature control, an independent on/off switch for safe operation, and a durable 304 stainless steel heating rod.
Safety Information
Please read all safety warnings and instructions carefully before installation and operation to prevent injury or property damage. Failure to follow these instructions may result in electric shock, fire, or serious injury.
- Electrical Safety: Ensure the RV's electrical system is disconnected from shore power and the battery before beginning installation. All electrical connections must be secure and properly insulated.
- Water Tank Preparation: Always ensure the water tank is full of water before activating the electric heating element. Operating the heating element in a dry tank will cause immediate damage to the element and could pose a fire hazard.
- Professional Installation: If you are not comfortable with electrical wiring or plumbing, it is recommended to seek assistance from a qualified RV technician or electrician.
- Thermostat Placement: The thermostat must be properly affixed to the water tank surface with the sensing hole exposed to ensure accurate temperature readings and prevent overheating. Do not cover the sensing hole with tape or other materials.
- Compatibility: This kit is designed for 6-10 gallon Suburban and Atwood RV water heaters. Verify compatibility with your specific model before installation.
Package Contents
Verify that all components listed below are present and undamaged before proceeding with installation.

Figure 1: All components included in the Briidea RV Electric Water Hybrid Heater Kit. This includes the heating rod, thermostat, various wires, brass bushings, an independent switch, and mounting hardware.
- 1x 304 Stainless Steel Heating Rod (425W, 120V)
- 1x Adjustable Thermostat (90°F - 150°F)
- 1x Independent On/Off Switch with Metal Bracket
- 2x Brass Bushings (1/2" and 3/4" sizes)
- 1x Power Cord with Plug (6.6 ft)
- Various Color-Coded Wires (UL1015 16AWG, 6.7 ft, 3.9 ft, 6.6 ft lengths)
- 1x Nylon Bellows
- 1x Terminal Protection Cover
- Screws and Thread Sealing Tape
Setup and Installation
Follow these steps carefully for proper installation. Ensure all safety precautions are observed.
1. Prepare the Water Heater
- Disconnect all power to the RV (shore power and battery).
- Turn off the LP gas supply to the water heater.
- Drain the water heater tank completely.
- Locate the anode rod or drain plug on your water heater.

Figure 2: The kit is compatible with both Suburban and Atwood water heater systems, utilizing the existing anode rod or drain plug opening for installation of the heating element.
2. Install the Heating Rod
- Remove the existing anode rod or drain plug.
- Select the appropriate brass bushing (1/2" or 3/4") for your water heater.
- Apply thread sealing tape to the threads of the heating rod.
- Connect the heating rod to the selected brass bushing.
- Carefully insert the heating rod assembly into the anode rod/drain plug opening on the water tank and tighten securely to prevent leaks.
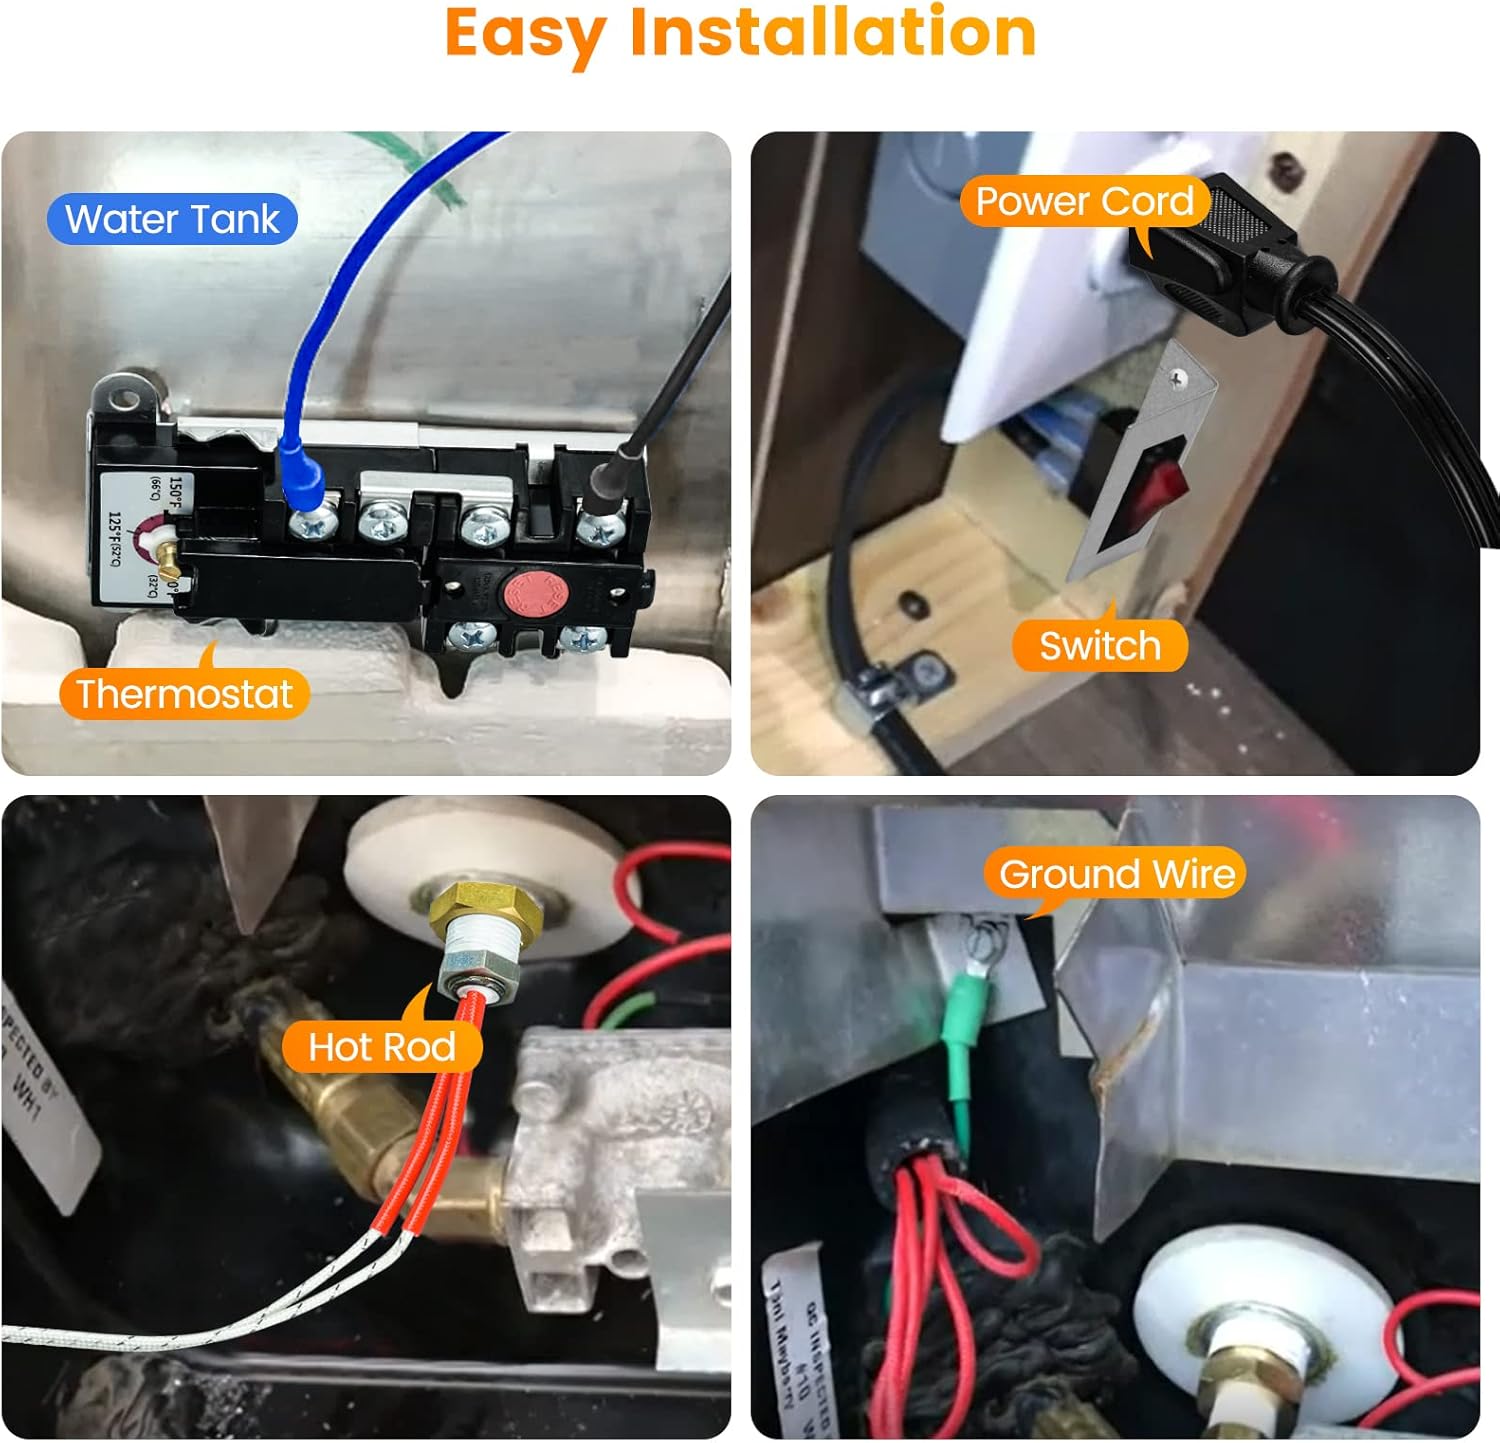
Figure 3: Detailed views of the installation process, including the heating rod (labeled "Hot Rod") being inserted into the water tank.
3. Mount the Thermostat
- Locate a flat surface on the water tank near the heating element for thermostat placement.
- Clean the surface thoroughly.
- Peel the backing from the adhesive on the thermostat.
- Affix the thermostat firmly to the water tank, ensuring the sensing hole is fully exposed and makes good contact with the tank surface. Do not cover the sensing hole.

Figure 4: Proper placement of the thermostat requires the sensing hole to be exposed and in direct contact with the water tank surface for accurate temperature sensing.
4. Wire the Components
The kit includes color-coded wires for easy connection. Refer to the wiring diagram below.

Figure 5: Overview of component dimensions and wire specifications (UL1015 16AWG). The power cord and other connecting wires are shown with their respective lengths.
- Connect the heating rod wires to the designated terminals on the thermostat.
- Connect the power cord to the thermostat and ensure the ground wire is properly connected to a suitable ground point on the RV chassis.
- Install the independent on/off switch in a convenient location using the provided metal bracket. Connect the switch into the circuit as per the wiring diagram.
- Use the terminal protection cover to secure and insulate exposed connections.
5. Final Checks Before Operation
- Refill the water heater tank completely. Ensure there is no air trapped in the system.
- Check all connections for leaks.
- Double-check all electrical connections for security and proper insulation.
- Ensure the water tank is full before restoring power.

Figure 6: It is critical to ensure the water tank is completely full before activating the electric heating element to prevent damage.
Operating Instructions
Adjusting Water Temperature
The thermostat allows you to set your desired water temperature between 90°F (32°C) and 150°F (66°C).

Figure 7: The thermostat provides an adjustable temperature range from 90°F to 150°F, allowing users to customize their hot water experience and prevent freezing water lines.
- Rotate the temperature dial on the thermostat to your preferred setting.
- The heating element will activate when the water temperature drops below the set point and deactivate once the desired temperature is reached.
Using the Independent Switch
The independent switch provides convenient control over the electric heating system.

Figure 8: The independent on/off switch allows for manual control of the electric heating system, enhancing safety and convenience.
- Flip the switch to the "ON" position to activate the electric heating element.
- Flip the switch to the "OFF" position to deactivate the electric heating element.
- Always turn off the switch when the RV is not in use or when draining the water tank.
Maintenance
- Regular Inspection: Periodically inspect all wiring and connections for signs of wear, corrosion, or damage. Ensure all connections remain tight.
- Heating Rod Condition: While the 304 stainless steel heating rod is durable, inspect it for any mineral buildup or damage during routine water heater maintenance (e.g., when flushing the tank).
- Thermostat Cleanliness: Ensure the area around the thermostat's sensing hole remains clean and free of debris to maintain accurate temperature readings.
- Winterization: When winterizing your RV, ensure the water heater tank is completely drained before temperatures drop below freezing. The electric heating element should be turned off and disconnected from power during winterization.
Troubleshooting
| Problem | Possible Cause | Solution |
|---|---|---|
| No hot water / Heater not working |
|
|
| Water not hot enough |
|
|
| Water leaking from heating rod connection |
|
|
Specifications
| Feature | Detail |
|---|---|
| Model Number | HWHK-01 |
| Power Output | 425 Watts |
| Voltage | 120 Volts |
| Heating Rod Material | 304 Stainless Steel |
| Adjustable Temperature Range | 90°F - 150°F (32°C - 66°C) |
| Compatibility | Suburban and Atwood RV Water Heaters (6-10 Gallon Capacity) |
| Product Dimensions (approx.) | Heating Rod: 4.8 inches length; Thermostat: 4.4 inches x 2.4 inches |
| Item Weight | 1.87 pounds |
| Country of Origin | China |
Warranty and Support
For warranty information, technical support, or assistance with your Briidea RV Electric Water Hybrid Heater Kit, please contact Briidea customer service through their official website or the retailer where the product was purchased.
Please have your model number (HWHK-01) and purchase date available when contacting support.
Ask a question about this manual
Ask about setup, troubleshooting, compatibility, parts, safety, or missing instructions. Manuals+ will review the question and use this page’s manual context to help answer it.