Introduction
Thank you for choosing the Cecotec EnergySilence Aero 4280 Ceiling Fan. This manual provides essential information for the safe and efficient operation, installation, and maintenance of your new ceiling fan. Please read this manual thoroughly before installation and use, and keep it for future reference.
The EnergySilence Aero 4280 is a versatile ceiling fan featuring retractable, concealed wings and an integrated lamp. It offers adjustable light intensities (warm, neutral, and cold), six fan speeds, and a summer-winter mode for year-round comfort. All functions are conveniently controlled via the included remote control.
Safety Instructions
To ensure safe operation, always follow these basic safety precautions:
- Read all instructions before installing and operating the fan.
- Ensure the power supply is disconnected before installation, maintenance, or cleaning.
- Installation must be performed by a qualified electrician in accordance with local electrical codes.
- The mounting structure must be capable of supporting the weight of the fan (refer to specifications for weight).
- Do not insert fingers or any objects into the fan blades while the fan is operating.
- Keep children and pets away from the fan during operation.
- Do not use the fan in damp or wet locations.
- Ensure all connections are secure and properly grounded.
- Only use original replacement parts and accessories.
Package Contents
Carefully unpack the box and ensure all items are present and undamaged. If any items are missing or damaged, contact Cecotec customer support.
- Ceiling Fan Unit (Motor, Housing, Light Kit)
- Retractable Fan Blades (pre-installed or separate)
- Mounting Bracket
- Downrod
- Canopy
- Remote Control
- Remote Control Holder (optional)
- Hardware Pack (screws, wire nuts, washers)
- User Manual (this document)
Setup and Installation
Important: Before beginning installation, ensure the power to the circuit breaker is turned off.
- Prepare the Mounting Location:
Ensure the ceiling joist or support structure can safely hold the fan's weight. Install a suitable electrical junction box rated for ceiling fan support.
- Install the Mounting Bracket:
Secure the mounting bracket to the ceiling junction box using the provided screws and washers. Ensure it is firmly attached.

Image: The Cecotec EnergySilence Aero 4280 ceiling fan with its remote control, illustrating the overall design and components.
- Assemble the Downrod and Fan Motor:
Feed the electrical wires from the fan motor through the downrod. Insert the downrod into the fan motor housing and secure it with the provided pin and screw.
- Hang the Fan Unit:
Carefully lift the assembled fan unit and hang it from the mounting bracket using the hook on the downrod ball. This will allow for hands-free wiring.
- Make Electrical Connections:
Connect the fan's electrical wires to the household wiring according to the wiring diagram provided in the separate installation guide (if applicable) or standard electrical codes (Live to Live, Neutral to Neutral, Ground to Ground). Use the provided wire nuts to secure connections.
- Secure the Canopy:
Slide the canopy up the downrod and secure it to the mounting bracket, covering the electrical connections.
- Install Fan Blades (if not pre-installed):
Attach the retractable fan blades to the motor housing using the designated screws. Ensure they are securely fastened.

Image: The Cecotec ceiling fan with its blades fully retracted, showcasing its compact and lamp-like appearance.

Image: A top-down view of the Cecotec ceiling fan with its transparent blades extended, ready for air circulation.
- Install the Light Kit:
Connect the light kit wires to the fan motor wires and secure the light kit to the bottom of the fan housing.
- Restore Power:
Once all connections are secure and the fan is fully assembled, restore power at the circuit breaker.
Operating Instructions
Your Cecotec EnergySilence Aero 4280 fan is operated using the included remote control.

Image: The remote control for the Cecotec EnergySilence Aero 4280 fan, showing buttons for power, speed, light, timer, and mode.
Remote Control Functions:
- ON/OFF Button: Powers the fan and light on or off.
- Speed Buttons (1-6): Adjusts the fan speed from 1 (lowest) to 6 (highest).
- Light Button: Toggles the light on/off and cycles through light color temperatures (warm, neutral, cold).
- Timer Buttons (1H, 2H, 4H, 8H): Sets the fan to automatically turn off after 1, 2, 4, or 8 hours.
- Mode Button (Summer/Winter): Changes the direction of fan rotation.
Light Control:
The integrated lamp offers three light color temperatures: warm, neutral, and cold. Press the Light button on the remote control to cycle through these options.

Image: Illustration showing the three available light color temperatures: warm, neutral, and cold, as provided by the fan's integrated lamp.
Summer and Winter Mode:
The fan features a reversible motor for year-round use.
- Summer Mode (Counter-clockwise rotation): Creates a downward airflow, producing a cooling effect.
- Winter Mode (Clockwise rotation): Creates an upward airflow, circulating warm air trapped near the ceiling downwards, helping to distribute heat more evenly.
Use the "Mode" button on the remote control to switch between summer and winter modes.
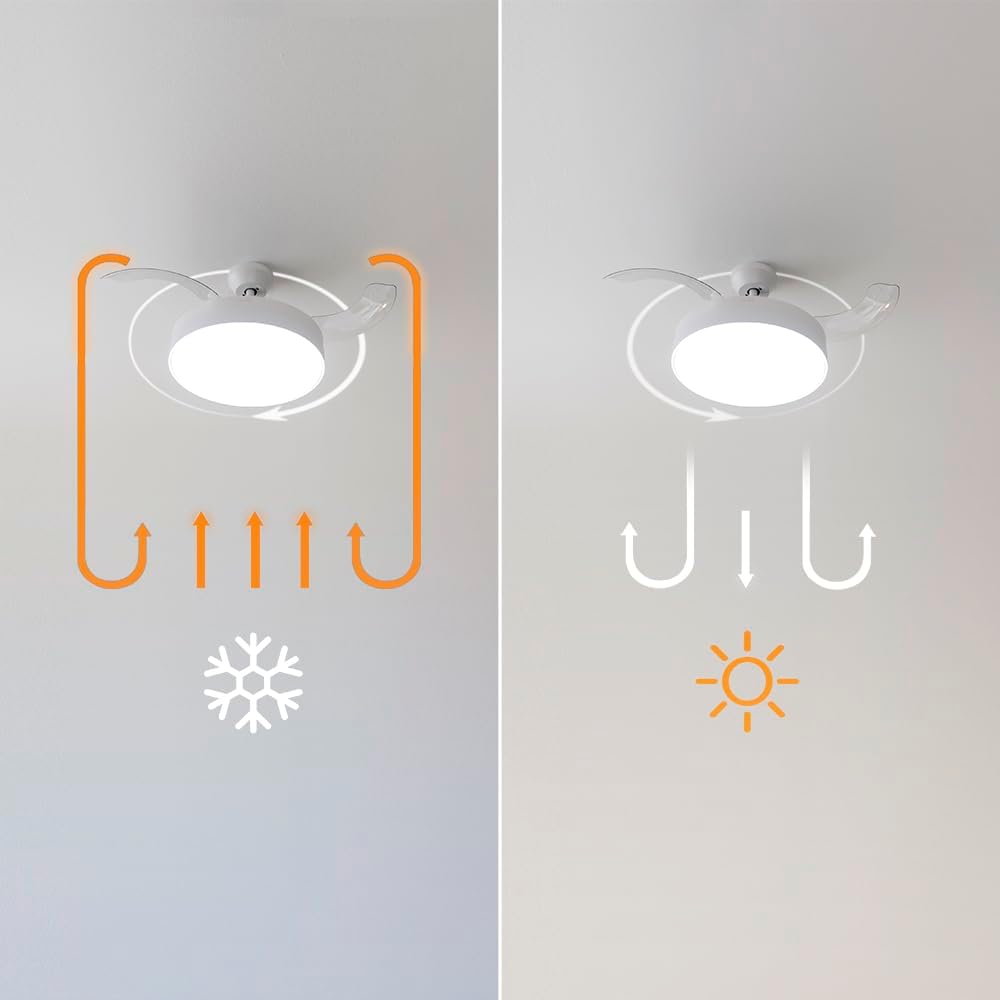
Image: Diagram illustrating the airflow patterns for summer mode (downward breeze) and winter mode (upward circulation of warm air) for the ceiling fan.
Maintenance and Care
Regular maintenance will ensure the longevity and optimal performance of your fan.
- Cleaning: Before cleaning, ensure the power to the fan is turned off at the circuit breaker. Use a soft, damp cloth to wipe down the fan housing and blades. Do not use abrasive cleaners or solvents, as they may damage the finish.
- Blade Care: The retractable blades are designed for durability. If they become dusty, gently wipe them with a soft, dry cloth.
- Tightening Screws: Periodically check all screws on the fan and mounting hardware to ensure they are tight. Loose screws can cause noise or wobble.
- No Lubrication Required: The fan motor is permanently lubricated and does not require additional oiling.
Troubleshooting
If you experience issues with your fan, consult the following table before contacting customer support.
| Problem | Possible Cause | Solution |
|---|---|---|
| Fan does not start | No power to the fan; Loose wire connections; Remote control battery low. | Check circuit breaker; Ensure all wires are securely connected; Replace remote control batteries. |
| Light does not work | Loose wire connection to light kit; Faulty LED module. | Check light kit wiring; Contact customer support for LED module replacement. |
| Fan wobbles | Loose mounting bracket; Unbalanced blades; Loose screws on fan assembly. | Ensure mounting bracket is secure; Check blade balance (balancing kit may be needed); Tighten all fan assembly screws. |
| Noisy operation | Loose screws; Motor hum; Blades hitting an obstruction. | Tighten all screws; Ensure fan is properly installed and not touching anything; Some motor hum is normal. |
| Remote control not working | Low battery; Remote not paired with fan. | Replace batteries; Refer to remote pairing instructions (if applicable, usually involves holding a button for a few seconds after power on). |
Specifications
| Feature | Detail |
|---|---|
| Brand | Cecotec |
| Model Number | 05992 |
| Power / Wattage | 40 watts |
| Voltage | 240 Volts |
| Diameter (folded wings) | 106 Centimetres |
| Number of Speeds | 6 |
| Light Colors | 3 (Warm, Neutral, Cold) |
| Material | Metal |
| Special Features | Dimmable light, Retractable blades, Timer, Summer/Winter mode |
| Controller Type | Remote Control |
Warranty and Support
Cecotec products are manufactured to the highest quality standards. For information regarding warranty coverage, please refer to the warranty card included with your purchase or visit the official Cecotec website.
For technical support, troubleshooting assistance, or to inquire about replacement parts, please contact Cecotec customer service. Have your model number (05992) and purchase date ready when contacting support.
Cecotec Official Website: https://cecotec.com/


