1. Introduction
The Tiny Hawk EZ Pilot is a ready-to-fly (RTF) First-Person-View (FPV) drone kit designed for beginners and kids. It offers an intuitive flight experience with features like gyroscopic self-leveling, Smart Height Assist, and EZ One Stick Control. This manual provides essential information for safe setup, operation, maintenance, and troubleshooting of your EZ Pilot drone, controller, and FPV goggles.
2. What's Included
Your Tiny Hawk EZ Pilot FPV Drone RTF KIT package contains the following components:
- 1 x EZ Pilot Drone
- 1 x USB Charger
- 1 x Antenna (for FPV goggles)
- 1 x Instruction Manual (this document)
- 1 x Set of Propellers (spare set included)
- 1 x Set of Stickers
- 1 x Lithium Polymer Battery
- 1 x 5.8g FPV Goggles
- 1 x Ergonomic Radio Controller
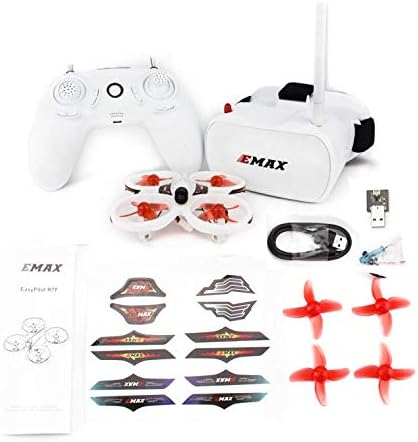
Image 2.1: All components included in the EZ Pilot FPV Drone RTF Kit.
3. Safety Guidelines
Adhering to these safety guidelines is crucial for preventing injury, damage, and ensuring a positive flight experience.
- Age Recommendation: This product is intended for users within the specified age range (Kid). Adult supervision is recommended for younger pilots.
- Flight Environment: Fly in open, clear areas, free from obstacles, people, or animals. Avoid flying near power lines, roads, or water.
- Pre-Flight Check: Always inspect the drone, propellers, and batteries for any damage before each flight. Ensure all components are securely attached.
- Battery Safety: Use only the provided or approved batteries and chargers. Do not overcharge or puncture batteries. Discontinue use if batteries show signs of swelling or damage. Store batteries in a cool, dry place away from flammable materials.
- Propeller Safety: Keep fingers, hair, and loose clothing away from rotating propellers. Always power off the drone before handling propellers.
- Respect Privacy: Be mindful of others' privacy when using the drone's camera.
- Weather Conditions: Avoid flying in strong winds, rain, or other adverse weather conditions.
4. Setup
4.1 Charging the Batteries
Ensure both the drone battery and the controller are fully charged before first use.
- Drone Battery: Connect the drone's Lithium Polymer battery to the provided USB charger. Plug the USB charger into a compatible USB power source (e.g., computer USB port, USB wall adapter). The indicator light on the charger will show charging status (e.g., red for charging, green for fully charged). Charging typically takes 30-60 minutes.
- Controller: The controller is typically charged via a micro-USB port. Connect the controller to a USB power source using a micro-USB cable (not explicitly listed as included, but standard for such devices). Refer to the controller's specific instructions for charging indicators.
4.2 Installing Propellers (If necessary)
The drone may come with propellers pre-installed. If not, or if replacing damaged propellers:
- Identify the correct propeller for each motor. Propellers are usually marked 'A' or 'B' (or similar) and must match the corresponding motor's rotation direction.
- Gently push the propeller onto the motor shaft until it sits securely. Do not force it.

Image 4.1: EZ Pilot drone with propellers correctly installed.
4.3 FPV Goggles Setup
Prepare your FPV goggles for the immersive flight experience:
- Attach Antenna: Screw the provided antenna onto the designated port on the FPV goggles.
- Power On: Press and hold the power button on the goggles to turn them on. Ensure they are charged.
4.4 Battery Installation (Drone)
Insert the charged Lithium Polymer battery into the drone's battery compartment. Ensure it is securely connected to the drone's power connector.

Image 4.2: Drone with battery properly installed.
5. Operating Instructions
5.1 Powering On and Binding
- Power On Controller: Press and hold the power button on the radio controller until it turns on.
- Power On Drone: Connect the drone's battery. The drone's indicator lights will begin to flash.
- Binding: Place the drone on a flat, level surface. The drone and controller should automatically bind. The drone's indicator lights will become solid once bound. If binding fails, power cycle both the drone and controller and try again.
- Power On Goggles: Turn on the FPV goggles. They should automatically display the drone's camera feed once the drone is powered on and transmitting.

Image 5.1: The EZ Pilot drone, controller, and FPV goggles.
5.2 Pre-Flight Check
Before every flight, perform these checks:
- Ensure drone battery is fully charged.
- Ensure controller battery is sufficiently charged.
- Verify all propellers are securely attached and undamaged.
- Confirm the flight area is clear of obstacles, people, and animals.
- Check that the FPV goggles are receiving a clear video feed from the drone.
5.3 Flight Modes and Controls
The EZ Pilot features three difficulty levels to accommodate various skill sets:
- Level 1 (EZ 1 Stick Control): Ideal for absolute beginners. This mode simplifies controls, allowing you to steer the drone in any direction using a single stick, while the drone manages altitude and stability automatically.
- Level 2 (Two Stick Control with Self-Leveling): Offers more freedom by utilizing both control sticks. The drone maintains its self-leveling feature, assisting with stable flight. This mode is suitable for pilots transitioning from basic to more advanced maneuvers.
- Level 3 (Advanced with Flips): Provides full control for experienced pilots. In this mode, you can perform acrobatic maneuvers, including flips. Self-leveling assistance is reduced or disabled for greater agility.
Refer to your controller's diagram for specific stick functions in each mode. Generally:
- Left Stick (Mode 2): Controls throttle (up/down) and yaw (rotate left/right).
- Right Stick (Mode 2): Controls pitch (forward/backward) and roll (sideways left/right).
5.4 Take-off and Landing
After binding and pre-flight checks:
- Arming Motors: Typically, push both control sticks to the bottom-outer corners simultaneously to arm the motors. The propellers will start spinning slowly.
- Take-off: Slowly increase the throttle (left stick up) to lift the drone off the ground. In EZ 1 Stick mode, the drone will maintain altitude automatically.
- Landing: Gently decrease the throttle (left stick down) to bring the drone down slowly. Once on the ground, disarm the motors by pulling both sticks to the bottom-inner corners or using a dedicated disarm button if available.
5.5 FPV Experience
The FPV goggles provide a real-time, bird's-eye view from the drone's onboard camera. This allows for an immersive piloting experience. Ensure the goggles are comfortably fitted and the image is clear before flying.

Image 5.2: Close-up of the drone's FPV camera.
6. Maintenance
Regular maintenance ensures the longevity and optimal performance of your EZ Pilot drone.
- Cleaning: After each flight, gently wipe down the drone body and camera lens with a soft, dry cloth to remove dust or debris. Avoid using liquids directly on electronic components.
- Propeller Replacement: Inspect propellers for cracks, bends, or chips. Damaged propellers can cause unstable flight. Replace them with spare propellers provided in the kit. Ensure the correct 'A' or 'B' type propeller is installed on the corresponding motor.
- Battery Care: Store Lithium Polymer batteries at room temperature and at a storage charge (around 3.8V per cell) if not used for extended periods. Do not leave batteries fully charged or fully discharged for long durations.
- Storage: When not in use, store the drone, controller, and goggles in a safe, dry place, away from direct sunlight and extreme temperatures.
7. Troubleshooting
Here are solutions to common issues you might encounter:
| Problem | Possible Cause | Solution |
|---|---|---|
| Drone does not power on | Dead battery; Loose battery connection | Charge drone battery; Ensure battery is securely connected. |
| Drone does not bind with controller | Incorrect power-on sequence; Interference | Ensure drone is powered on after controller; Power cycle both devices; Move to an area with less interference. |
| Unstable flight / Drifting | Damaged propellers; Uncalibrated gyroscope; Uneven take-off surface | Replace damaged propellers; Place drone on a flat surface for calibration before flight; Check for debris in motors. |
| Short flight time | Battery not fully charged; Old/degraded battery | Ensure battery is fully charged; Consider purchasing additional or replacement batteries. |
| No FPV video feed in goggles | Goggles not powered on; Loose antenna; Drone camera issue; Incorrect frequency | Ensure goggles are on and charged; Check antenna connection; Verify drone camera is not damaged; Consult manufacturer for frequency adjustment if applicable. |
8. Specifications
Key technical specifications for the Tiny Hawk EZ Pilot FPV Drone:
- Brand: Tiny Hawk
- Model Name: EZ Pilot
- Manufacturer: EMAX
- Skill Level: Beginner
- Age Range: Kid
- Color: White
- Material: Plastic
- Product Dimensions: 3"L x 3"W x 1"H
- Item Weight: Approximately 0.91 Kilograms (2.01 pounds)
- Flight Time: Up to 4 minutes (approximate)
- Battery Type: Lithium Polymer (1 included, rechargeable)
- Video Capture Resolution: 1080p
- Video Capture Format: MP4
- Video Output Resolution: 1080p
- Optical Sensor Technology: CMOS
- Connectivity Technology: USB (for charging)
- Remote Control Technology: Wi-Fi (for general communication, control typically 2.4GHz)
- FPV Goggles: 5.8g FPV Virtual Reality Goggles
- UPC: 717351957036
9. Warranty and Support
Specific warranty details for the Tiny Hawk EZ Pilot FPV Drone are not provided in this manual. For information regarding warranty coverage, claims, or technical support, please refer to the product packaging, the manufacturer's official website, or contact the seller directly. Keep your proof of purchase for any warranty-related inquiries.
For further assistance or questions not covered in this manual, please reach out to the customer support channels provided by the retailer or manufacturer.


