1. Introduction
This user manual provides comprehensive instructions for the installation, operation, and maintenance of your Splenssy 1080P 4CH AHD DVR. This Digital Video Recorder is designed for CCTV surveillance systems, supporting AHD, Analog, TVI, CVI, and NVR camera types. It features H.264+ video compression, P2P cloud functionality, motion detection, and remote viewing capabilities via a mobile application. Please read this manual thoroughly before using the device to ensure proper setup and optimal performance.
2. Package Contents
Verify that all items listed below are included in your package. If any items are missing or damaged, please contact customer support.
- 1 x Splenssy 1080P 4CH AHD DVR (Hard Drive Disk not included)
- 1 x Power Adapter (12V/2A)
- 1 x USB Mouse
- 1 x English User Manual
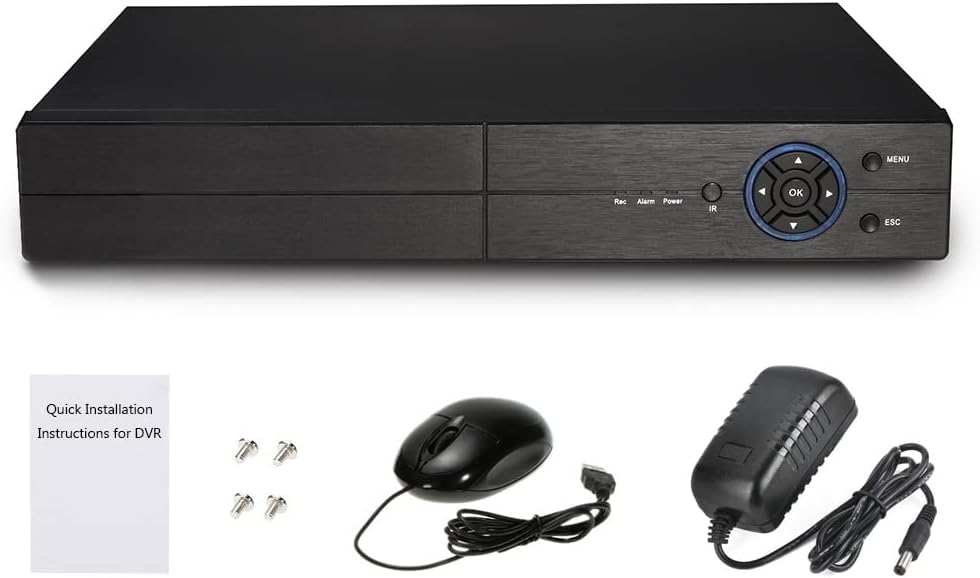
Figure 2.1: Contents of the Splenssy DVR package, showing the main DVR unit, power adapter, USB mouse, and a quick installation guide.
3. Product Overview
3.1 DVR Unit

Figure 3.1: Front view of the Splenssy 4-channel AHD DVR, displaying the control panel with navigation buttons, OK, Menu, and ESC buttons, along with status indicators for Record, Alarm, Power, and IR.
The Splenssy DVR features a compact design with a user-friendly front panel for direct control and status monitoring. The front panel includes navigation buttons, an OK button, Menu button, and ESC button for system navigation. LED indicators show the status of recording, alarms, power, and infrared activity.
3.2 Rear Panel Connections

Figure 3.2: Rear panel of the Splenssy DVR, illustrating the video input (BNC), audio input/output (RCA), VGA output, HDMI output, LAN port, USB ports, RS485 port, and DC 12V power input.
The rear panel provides all necessary ports for connecting cameras, monitors, audio devices, network cables, and power. Key ports include:
- Video In (BNC): Connect up to 4 surveillance cameras.
- Audio In/Out (RCA): Connect audio input devices (e.g., microphones) and audio output devices (e.g., speakers).
- VGA Out: Connect to a VGA monitor.
- HDMI Out: Connect to an HDMI monitor or TV for high-definition video output.
- LAN Port: Connect to your network router for remote access and internet connectivity.
- USB Ports: Connect the included USB mouse, USB flash drives for backup, or external Wi-Fi/3G adapters.
- RS485: For PTZ (Pan-Tilt-Zoom) camera control.
- DC 12V: Power input for the DVR.
3.3 Compatibility and Features
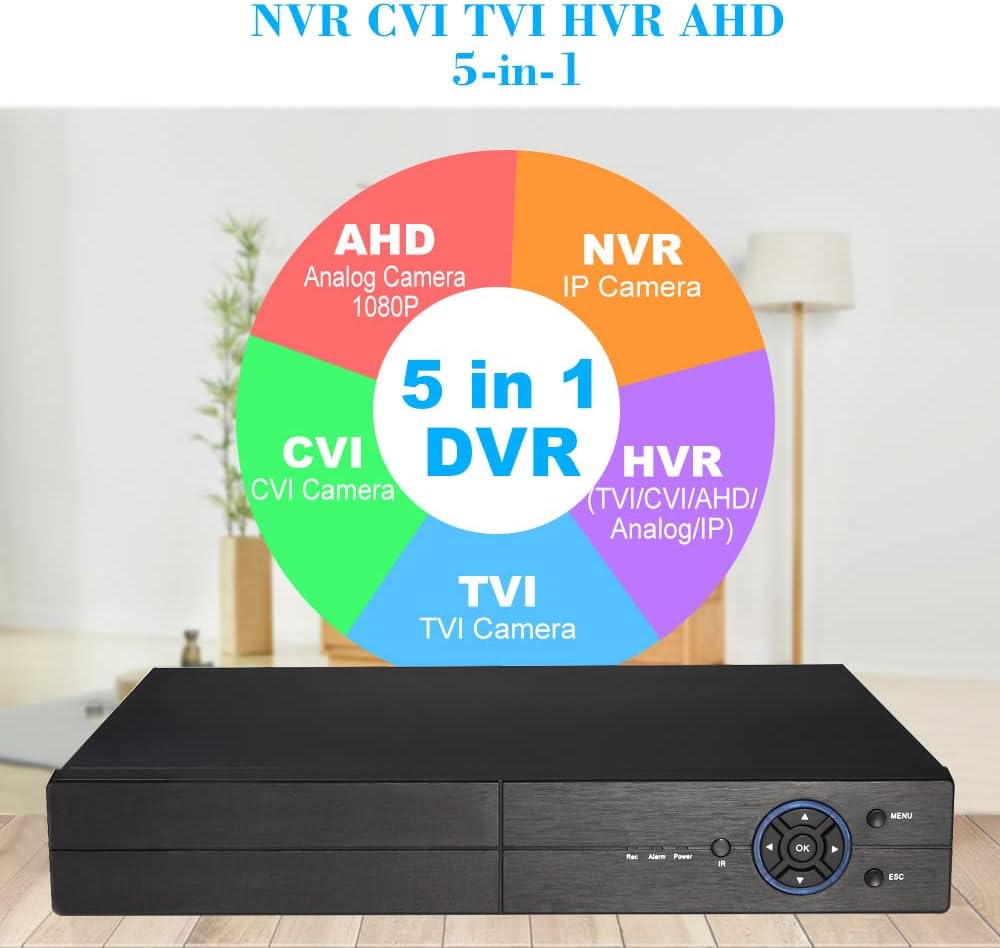
Figure 3.3: Compatibility diagram showing the DVR's support for AHD (Analog Camera 1080P), NVR (IP Camera), CVI Camera, TVI Camera, and HVR (TVI/CVI/AHD/Analog/IP) camera types, highlighting its 5-in-1 capability.
This DVR is a versatile 5-in-1 system, compatible with a wide range of camera technologies:
- AHD: Analog High Definition cameras (up to 1080P).
- NVR: Network Video Recorder for IP cameras.
- CVI: High Definition Composite Video Interface cameras.
- TVI: Transport Video Interface cameras.
- Analog: Traditional analog cameras.
Key features include H.264+ video compression for efficient storage, P2P cloud function for easy remote access, customizable motion detection zones, and multiple recording/playback modes.
4. Setup Guide
Follow these steps to set up your Splenssy DVR system.
4.1 Hard Drive Installation (Optional)
The DVR does not include a hard drive. For local recording, you must install a SATA HDD (up to 4TB supported). Refer to the specific instructions provided with your hard drive for installation, typically involving opening the DVR casing, connecting SATA data and power cables, and securing the drive.
4.2 Connecting Your System
Refer to the connection diagram below for a visual guide.

Figure 4.1: Comprehensive connection diagram for the DVR system, showing connections for analog cameras, USB mouse, U-disk for backup, router for remote viewing, audio input/output, PTZ control, 12V power, and monitors via HD (HDMI) or VGA ports.
- Connect Cameras: Connect your AHD, Analog, TVI, or CVI cameras to the "VIDEO IN" BNC ports on the rear panel. For IP cameras, ensure they are on the same network as the DVR and configure them through the DVR's NVR mode settings.
- Connect Monitor: Connect a monitor to the DVR using either the HDMI port (for best quality) or the VGA port.
- Connect USB Mouse: Plug the included USB mouse into one of the USB ports on the rear panel.
- Connect Network (Optional): For remote viewing and network features, connect an Ethernet cable from the DVR's "LAN" port to your router.
- Connect Audio (Optional): If using audio, connect microphones to "AUDIO IN" and speakers to "A-OUT".
- Connect Power: Connect the provided 12V/2A power adapter to the "DC 12V" input on the DVR, then plug the adapter into a power outlet. The DVR will power on automatically.
4.3 Initial Configuration
Upon first boot, the DVR may guide you through an initial setup wizard. Follow the on-screen prompts to:
- Set up administrator password.
- Configure date and time settings.
- Format the installed hard drive (if applicable).
- Configure network settings (DHCP recommended for easy setup).
- Scan and add IP cameras (if using NVR mode).
5. Operating Instructions
This section covers the basic operation of your DVR system.
5.1 Live View
After successful setup, the DVR will display the live view from connected cameras. You can switch between single-camera view and multi-camera grid view using the on-screen controls or mouse right-click menu.
5.2 Recording Modes
The DVR supports various recording modes:
- Continuous Recording: Records 24/7.
- Motion Detection Recording: Records only when motion is detected.
- Scheduled Recording: Records during specific time periods.
- Alarm Recording: Records when an external alarm is triggered.
To configure recording settings, navigate to the "Record" or "Schedule" section in the DVR's main menu. The H.264+ compression technology ensures efficient storage while maintaining video quality.
5.3 Playback
To review recorded footage:
- From the main menu, select "Playback".
- Choose the date and time range for the footage you wish to view.
- Select the camera channel(s).
- Use the playback controls (play, pause, fast forward, rewind) to navigate through the footage.
The DVR supports point-in-time retrieval, calendar retrieval, event retrieval, and channel search for efficient playback.
5.4 Motion Detection & Alerts
The motion detection feature allows the DVR to trigger recording or send alerts when movement is detected in specified areas.
- Go to "Alarm" or "Motion Detect" settings in the menu.
- Select the camera channel.
- Define motion detection areas (up to 192 areas per screen) and adjust sensitivity levels.
- Configure actions upon detection, such as recording, sending email alerts, or triggering an alarm output.
5.5 Remote Viewing (P2P Cloud & APP)
The P2P cloud function allows for easy remote access to your DVR from a smartphone or computer without complex network configurations.
- Ensure the DVR is connected to the internet via the LAN port.
- Download the official mobile application (check the user manual or DVR interface for the app name/QR code).
- Register an account and add your DVR by scanning the QR code (P2P ID) or manually entering the device ID.
- You can now view live footage, play back recordings, and receive push notifications remotely.
5.6 Data Backup
You can back up important video footage using various methods:
- USB Hard Disk/Flash Drive: Connect a USB storage device to the DVR's USB port and use the backup function in the menu.
- Network Backup: Transfer files over the network to a connected computer.
- USB Burner/SATA Burner: If supported, burn footage to a CD/DVD.
6. Maintenance
Regular maintenance ensures the longevity and optimal performance of your DVR system.
- Cleaning: Keep the DVR unit clean and free from dust. Use a soft, dry cloth. Do not use liquid cleaners.
- Ventilation: Ensure proper ventilation around the DVR to prevent overheating. Do not block ventilation openings.
- Hard Drive Management: Periodically check the hard drive status in the DVR's menu. Ensure there is sufficient space for recording. The DVR will typically overwrite the oldest footage when the disk is full (loop recording).
- Firmware Updates: Check the manufacturer's website periodically for firmware updates. Updates can improve performance, add features, or fix bugs. Follow update instructions carefully.
- Password Security: Regularly change your DVR and remote access application passwords to strong, unique combinations.
7. Troubleshooting
This section addresses common issues you might encounter.
| Problem | Possible Cause | Solution |
|---|---|---|
| No video output on monitor. | Loose cable connection; incorrect input selected on monitor; DVR not powered on. | Check HDMI/VGA cable connections. Ensure monitor is set to correct input (HDMI/VGA). Verify DVR power. |
| No recording. | No hard drive installed or formatted; recording schedule not set; motion detection not configured. | Install and format HDD. Check recording schedule. Configure motion detection settings. |
| Cannot access DVR remotely. | DVR not connected to network; P2P function disabled; incorrect app settings; firewall issues. | Ensure LAN cable is connected and network settings are correct (DHCP). Enable P2P in DVR settings. Verify app login and device ID. Check router/firewall settings. |
| Poor video quality. | Camera resolution mismatch; cable quality; lighting conditions. | Ensure cameras are compatible with DVR's resolution settings. Use high-quality cables. Improve lighting in surveillance area. |
| DVR beeping continuously. | Hard drive error; video loss; network disconnection. | Check HDD status in menu. Verify camera connections. Check network cable. Disable alarm beeping in settings if desired. |
If the problem persists after trying these solutions, please contact customer support.
8. Specifications
Detailed technical specifications for the Splenssy 1080P 4CH AHD DVR.
- Operating System: Embedded Linux System
- Video Code: H.264+
- Record Resolution: Encode ability: 4*1080P (5 in 1), Decode ability: 4*1080P (5 in 1), 960P/720P
- Motion Detection: Each screen can be set to 192 (16 * 12) detection areas; multi-level sensitivity can be set (Limited local channel)
- VGA Resolution Support: 1920*1080, 1440*900, 1280*1024, 1024*768, 1280*960
- Video Storage: HDD, Network
- Backup Mode: Network, USB hard disk, USB burner, SATA burner
- Wireless: 3G, WIFI (extend via USB)
- Signal System: PAL/NTSC
- Frame Rate: 1-30fps (NTSC), 1-25fps (PAL)
- HDD Supported: Support Up to 4TB (Hard drive disk not included)
- OSD Language: English, French, German, Spanish, Italian, Japanese, etc.
- Power Supply: 12V/2A
- Connectivity Technology: USB, VGA
- Number of Channels: 4
- Audio Input: RCA
- Item Weight: 2.78 pounds
- Package Dimensions: 12.8 x 10.04 x 3.15 inches
9. Warranty and Support
For warranty information and technical support, please refer to the documentation included with your purchase or visit the official Splenssy website. If you encounter any issues not covered in this manual, please contact Splenssy customer service for assistance.
Customer Service Contact: Please refer to your purchase receipt or the product packaging for the most up-to-date contact information.