1. Introduction
This manual provides essential information for the safe and efficient operation, setup, and maintenance of the CEVIK PRO CE-MINI145X Mini Welder Inverter. Please read this manual thoroughly before using the equipment to ensure proper function and to prevent injury or damage.
The CE-MINI145X is a professional inverter welder designed for MMA (Manual Metal Arc) welding with coated electrodes, operating without the need for external gas. It offers stable welding performance with low power consumption, suitable for DIY projects, maintenance tasks, and light structural work. Its compact size and light weight enhance portability, while the digital display allows for precise amperage adjustments.
2. Safety Instructions
Welding operations involve inherent risks. Adhere to the following safety guidelines to minimize hazards:
- Personal Protective Equipment (PPE): Always wear appropriate PPE, including a welding helmet with a suitable shade filter, flame-resistant clothing, welding gloves, and safety shoes.
- Ventilation: Ensure adequate ventilation in the work area to disperse welding fumes, which can be hazardous if inhaled.
- Fire Prevention: Keep a fire extinguisher nearby. Remove all flammable materials from the welding area. Sparks and hot slag can cause fires.
- Electrical Safety: Ensure the welding machine is properly grounded. Do not operate in wet conditions. Inspect cables and connections for damage before each use.
- Eye and Skin Protection: Welding arc rays can cause severe burns to eyes and skin. Never look at the arc without proper eye protection.
- Work Area: Keep the work area clean and free of clutter. Ensure stable footing.
- Children and Bystanders: Keep children and unauthorized persons away from the welding area.
- Machine Handling: Do not lift or carry the machine by its cables. Use the designated carrying strap.
3. Package Contents
Verify that all items are present and undamaged upon unpacking:
- CEVIK PRO CE-MINI145X Mini Welder Inverter Unit
- Welding Mask
- Electrode Holder
- Ground Clamp (Dough Tong)
- Brush
- User Manual (this document)
4. Product Features and Components
The CE-MINI145X is designed for versatility and ease of use. Key features include:
- MMA Inverter Welder: Operates with coated electrodes without gas, suitable for maintenance, renovation, and DIY. Inverter technology ensures energy efficiency and arc stability.
- Compact Power: Delivers up to 140 amps with a 60% duty cycle, allowing for prolonged work. Operates at 230V.
- Electrode Compatibility: Supports electrodes up to 3.25mm, suitable for welding mild steel, iron, metal frames, brackets, and railings.
- Portability: Lightweight and compact design for easy transport and use in various environments.
- Digital Display: Provides accurate amperage setting and parameter control.
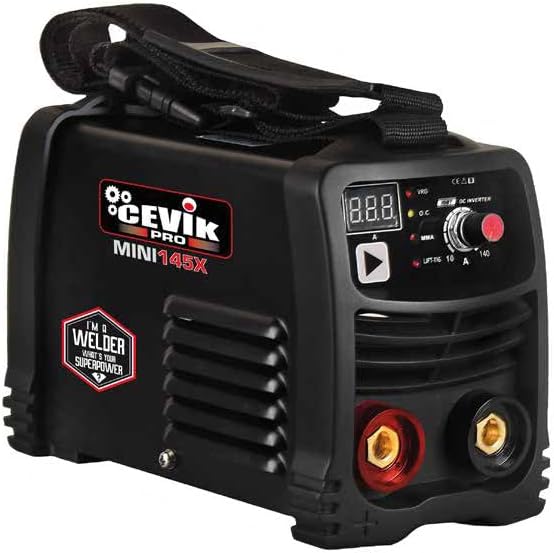
Image 1: Front view of the CEVIK PRO CE-MINI145X Mini Welder Inverter. The compact black unit features a digital display for amperage settings, a control knob, and front-facing connection ports for the electrode holder (red) and ground clamp (black). A sturdy carrying strap is visible on top, and the side shows ventilation grilles and the 'CEVIK PRO MINI145X' branding.
5. Setup
- Unpacking: Carefully remove the welder and all accessories from the packaging. Retain packaging for future storage or transport.
- Placement: Place the welder on a stable, level surface in a well-ventilated area, away from flammable materials. Ensure adequate space around the unit for air circulation.
- Power Connection: Connect the welder to a suitable 230V power outlet. Ensure the power supply matches the machine's requirements.
- Ground Clamp Connection: Connect the ground clamp cable to the appropriate terminal on the welder (usually the negative terminal, often black). Securely attach the ground clamp to the workpiece or a clean, bare metal part of the welding table to ensure a good electrical connection.
- Electrode Holder Connection: Connect the electrode holder cable to the appropriate terminal on the welder (usually the positive terminal, often red). Insert the welding electrode into the electrode holder.
- Initial Inspection: Before powering on, visually inspect all cables and connections for any signs of damage or loose fittings.
6. Operation
- Power On: Turn on the main power switch of the welder. The digital display should illuminate.
- Amperage Adjustment: Use the control knob to set the desired welding amperage. The digital display will show the current setting. Refer to electrode manufacturer specifications for recommended amperage ranges.
- Electrode Selection: Choose an electrode suitable for the material thickness and type. The CE-MINI145X supports electrodes up to 3.25mm.
- Welding Technique:
- Ensure proper PPE is worn.
- Strike the arc by lightly tapping or scratching the electrode on the workpiece.
- Maintain a consistent arc length and travel speed for a stable weld bead.
- Angle the electrode appropriately for the joint type.
- Cool Down: Allow the machine to cool down after prolonged use. The duty cycle (60% at 140A) indicates the percentage of time within a 10-minute period that the machine can operate at its maximum rated output without overheating.
- Power Off: After completing welding tasks, turn off the main power switch and disconnect the welder from the power supply.
7. Maintenance
Regular maintenance ensures the longevity and optimal performance of your welder:
- Cleaning: Periodically clean the exterior of the welder with a dry, soft cloth. Ensure ventilation openings are free from dust and debris to prevent overheating. Do not use solvents or abrasive cleaners.
- Cable Inspection: Regularly inspect all welding cables, connections, and the power cord for cuts, abrasions, or loose connections. Replace damaged components immediately.
- Storage: Store the welder in a dry, clean environment, away from direct sunlight, moisture, and extreme temperatures. Use the original packaging or a protective cover if available.
- Internal Cleaning (Professional): For internal cleaning of dust accumulation, especially in dusty environments, it is recommended to have the unit serviced by a qualified technician.
8. Troubleshooting
This section addresses common issues you might encounter. For problems not listed here, contact customer support.
| Problem | Possible Cause | Solution |
|---|---|---|
| Welder does not power on. | No power supply; faulty power cord; internal fault. | Check power outlet and circuit breaker. Inspect power cord for damage. If problem persists, contact support. |
| No welding arc or weak arc. | Poor ground connection; incorrect amperage setting; damp electrode; faulty cable. | Ensure ground clamp is on clean metal. Adjust amperage. Use dry electrodes. Inspect cables for damage. |
| Overheating indicator (if present) is on. | Exceeded duty cycle; blocked ventilation. | Allow machine to cool down. Ensure ventilation openings are clear. Reduce welding time or amperage. |
| Excessive spatter. | Amperage too high; incorrect arc length; damp electrode. | Reduce amperage. Adjust arc length. Use dry electrodes. |
9. Specifications
Technical specifications for the CEVIK PRO CE-MINI145X Mini Welder Inverter:
| Parameter | Value |
|---|---|
| Model | CE-MINI145X |
| Brand | CEVIK PRO |
| Welding Type | MMA Inverter |
| Input Voltage | 230V |
| Max Amperage | 140A |
| Duty Cycle | 60% at 140A |
| Electrode Diameter | Up to 3.25mm |
| Item Weight | 2 Kilograms (4.4 pounds) |
| Product Dimensions | 7.87 x 7.87 x 7.87 inches |
| Material | Electronic Components, Metal housing, Electromechanical Components |
| Special Features | Portable, Digital Display, Connectable to Generator, VRD (Voltage Reduction Device) |
10. Warranty and Support
For information regarding warranty coverage, technical support, or service, please refer to the warranty card included with your product or visit the official CEVIK PRO website. You may also contact CEVIK PRO customer service directly for assistance.
Keep your purchase receipt as proof of purchase for warranty claims.


