1. Introduction
This instruction manual provides essential information for the installation, operation, maintenance, and troubleshooting of the HP 17-by and 17T-by series laptop motherboards. These motherboards are compatible replacement parts for specific HP laptop models and feature an integrated Intel Core i5-1035G1 processor.
Please read this manual thoroughly before attempting any installation or repair to ensure proper handling and to prevent damage to the component or your system.
2. Product Overview
The HP laptop motherboard models L87451-001, L87451-501, and L87451-601 are designed as direct replacements for HP 17-by and 17T-by series laptops. These boards come equipped with an Intel Core i5-1035G1 processor, offering a base clock speed of 1.0GHz and a Max Turbo frequency of 3.60GHz. They support up to 16GB of DDR4 SDRAM across two memory slots.
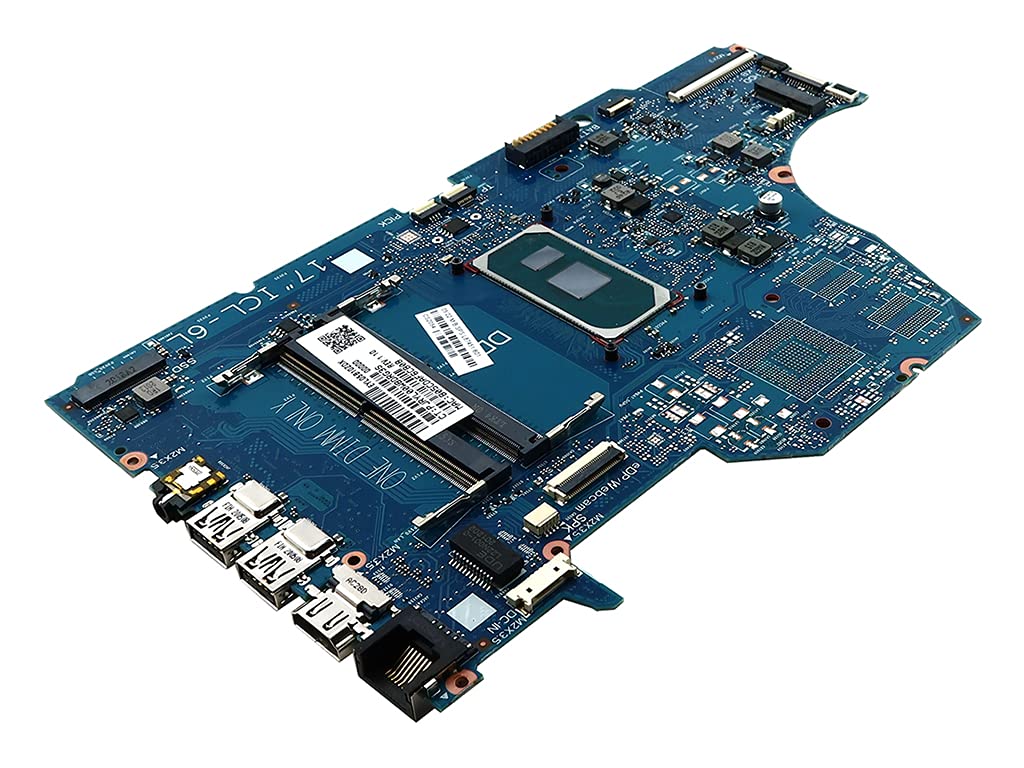
Figure 1: An overhead view of the HP laptop motherboard, model L87451-001, showing its various components and connectors. The board is blue with silver and copper traces.
Compatible Models: HP 17-BY (e.g., 17-BY3001CY, 17-BY3002CY, 17-BY3003CA, 17-BY3005CY, 17-BY3006CY, 17-BY3007CY, 17-BY3008CA, 17-BY3051CL, 17-BY3053CL, 17-BY3056CL, 17-BY3065ST, 17-BY3613DX, 17-BY3652CL), 17T-BY (e.g., 17T-BY300).
Key Features:
- Integrated Intel Core i5-1035G1 Processor (SRGKG)
- Two DDR4 SDRAM Memory Slots
- Compatible with HP 17-by and 17T-by series laptops
3. Safety Information
Working with electronic components requires careful attention to safety. Failure to follow these guidelines may result in personal injury or damage to your equipment.
- Static Electricity: Always use an anti-static wrist strap and work on an anti-static mat to prevent electrostatic discharge (ESD), which can damage sensitive components.
- Power Disconnection: Ensure the laptop is completely powered off and disconnected from all power sources (AC adapter and battery) before beginning any work.
- Tool Usage: Use appropriate tools for the task. Avoid using excessive force.
- Component Handling: Handle the motherboard by its edges. Avoid touching integrated circuits or connectors directly.
- Professional Installation: If you are not comfortable performing the installation, seek assistance from a qualified technician.
4. Setup and Installation
Replacing a laptop motherboard is a complex procedure. The following steps are general guidelines. Refer to your specific HP laptop's service manual for detailed, model-specific instructions.
- Preparation: Power off the laptop, disconnect the AC adapter, and remove the battery. Discharge any residual power by holding the power button for 15-20 seconds.
- Disassembly: Carefully open the laptop casing. This typically involves removing screws from the bottom cover, keyboard, palm rest, and other components. Document screw locations and types.
- Component Removal: Disconnect all cables (display, keyboard, touchpad, speakers, Wi-Fi, etc.) and remove components such as RAM, SSD/HDD, Wi-Fi card, and cooling assembly from the old motherboard.
- Old Motherboard Removal: Unscrew the old motherboard from the laptop chassis. Carefully lift it out, ensuring no cables or components are still attached.
- New Motherboard Installation: Place the new motherboard into the chassis, aligning it with the screw posts. Secure it with the appropriate screws.
- Component Reinstallation: Reinstall all previously removed components (RAM, SSD/HDD, Wi-Fi card, cooling assembly) onto the new motherboard. Reconnect all cables, ensuring they are properly seated and secured.
- Reassembly: Reassemble the laptop casing, ensuring all screws are tightened and components are correctly aligned.
- Initial Power-Up: Reconnect the AC adapter and battery. Power on the laptop. The system may take a moment to recognize new hardware.

Figure 2: A detailed view of the left side of the HP laptop motherboard, highlighting the USB ports, audio jack, and other peripheral connectors. This area is crucial for external device connectivity.
5. Operating Considerations
Once the motherboard is installed and the system is reassembled, the laptop should power on normally. The operating system should detect the new hardware. If a new operating system installation is required, follow standard procedures.
- BIOS/UEFI Access: To access the system's BIOS/UEFI settings, typically press F10, F2, or Esc immediately after powering on the laptop.
- Driver Installation: Ensure all necessary drivers for the new motherboard and integrated components are installed. These can usually be found on the official HP support website for your specific laptop model.
6. Maintenance
Proper maintenance can extend the lifespan of your laptop and its components.
- Dust Removal: Periodically clean the laptop's cooling system (fans and heatsinks) to prevent dust buildup, which can lead to overheating. Use compressed air for this purpose.
- Thermal Paste: If the cooling assembly was removed during installation, ensure fresh thermal paste is applied to the CPU and GPU (if applicable) before reattaching the heatsink.
- Software Updates: Keep your operating system and drivers updated to ensure optimal performance and compatibility.
7. Troubleshooting
If you encounter issues after installing the new motherboard, consider the following troubleshooting steps:
- No Power/No Boot:
- Verify AC adapter and battery connections.
- Ensure the power button cable is correctly connected to the motherboard.
- Try booting with only essential components (CPU, one RAM stick, display).
- No Display:
- Check the display cable (e.g., eDP cable) connection to both the motherboard and the display panel.
- Ensure RAM modules are properly seated in their slots.
- System Instability/Crashes:
- Run memory diagnostics to check RAM integrity.
- Verify that the cooling system is functioning correctly and the CPU is not overheating.
- Ensure all drivers are correctly installed and updated.
- Peripheral Malfunction:
- Check cable connections for affected components (keyboard, touchpad, USB ports).
- Reinstall or update drivers for the specific peripheral.
If issues persist, consult the official HP support resources or a professional technician.
8. Specifications
| Feature | Detail |
|---|---|
| Model Name | L87451-001 (Compatible with L87451-501, L87451-601) |
| Compatible Part Numbers | TPN-I133, SNAPE01-6050A3168901-MBN-A02, ICL-6L, SNAPE01-6050A3168901-MB-A0 |
| Compatible Laptop Series | HP 17-BY, HP 17T-BY |
| Processor/CPU | Intel Core i5-1035G1 (SRGKG) |
| Processor/CPU Speed | 1.00GHz (Base), 3.60GHz (Max Turbo) |
| Max Supported Memory | 16GB |
| Number of Memory Slots | 2 |
| Memory Type | DDR4 SDRAM |
| Memory Clock Speed | 3200 MHz |
| Chipset Type | SoC |
| CPU Socket | Integrated |
| Item Weight | 2 pounds |
| Platform | No Operating System (Motherboard only) |
9. Warranty and Support
Warranty coverage for this replacement motherboard is typically provided by the seller or manufacturer at the time of purchase. Please retain your proof of purchase for any warranty claims.
For technical support, driver downloads, or further assistance with your HP laptop, please visit the official HP Support website and search for your specific laptop model.