1. Introduction
The TechniSat DIGITRADIO 602 is a comprehensive internet stereo radio designed for music enthusiasts. It offers a wide range of audio sources and features, including digital radio (DAB+), FM radio, internet radio, CD playback, USB media playback, Bluetooth audio streaming, and Spotify Connect. Its powerful 2.1 sound system delivers clear and nuanced audio. This manual provides essential information for setting up, operating, and maintaining your device.
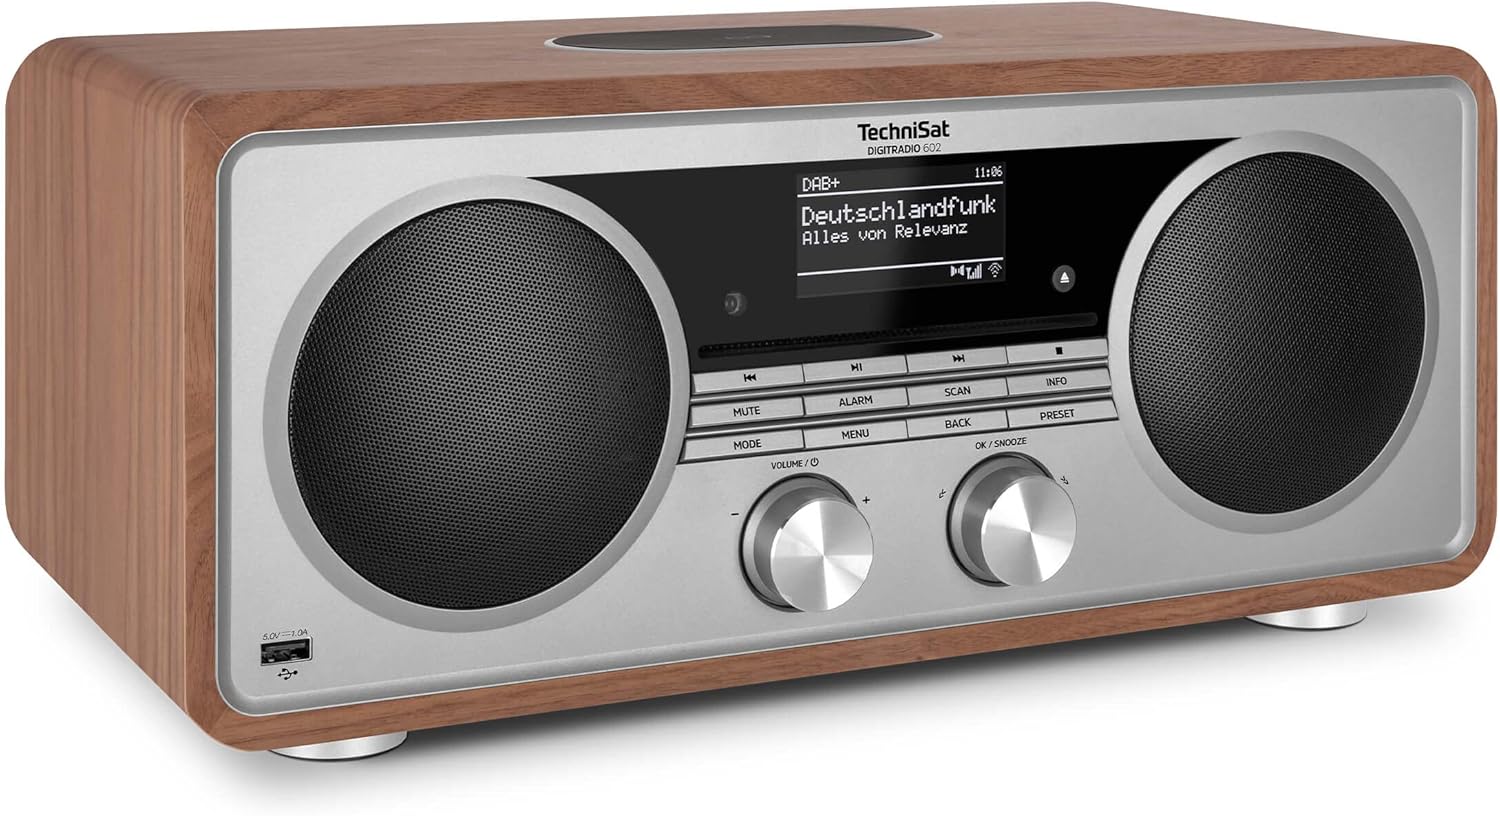
Image 1.1: Front view of the TechniSat DIGITRADIO 602 in walnut finish.
2. General Safety Information
- Read all instructions carefully before using the device.
- Keep this manual for future reference.
- Do not expose the device to rain or moisture to prevent fire or electric shock.
- Ensure proper ventilation; do not block any ventilation openings.
- Only use attachments/accessories specified by the manufacturer.
- Disconnect the device during lightning storms or when unused for long periods.
- Refer all servicing to qualified service personnel.
3. Package Contents
Please check that all items listed below are included in your package:
- TechniSat DIGITRADIO 602 unit
- DAB+/FM telescopic antenna
- F-connector tool (for removable antenna)
- Power supply unit
- Remote control
- User manual
4. Product Overview
The DIGITRADIO 602 features a robust design with intuitive controls and a clear OLED display. It integrates multiple audio technologies to provide a versatile listening experience.
4.1. Key Features
- Radio Reception: DAB+, FM (with RDS and PLL), Internet Radio (over 40,000 stations).
- Audio Playback: CD player (supports MP3), USB port (MP3 playback), Bluetooth audio streaming, Spotify Connect, AUX input.
- Sound System: 2 x 20W stereo speakers and a 30W downfire subwoofer for powerful 2.1 sound.
- Convenience: Wireless charging for Qi-compatible smartphones, large OLED display, alarm and sleep functions, app control (TechniSat Connect app), remote control.

Image 4.1: The 2.1 Sound System with Equalizer, featuring two 20W stereo speakers and a 30W subwoofer for excellent sound.
5. Setup
5.1. Connecting Power and Antenna
Connect the provided power supply unit to the DC IN connector on the rear of the DIGITRADIO 602 and then to a wall outlet. For optimal radio reception, connect the DAB+/FM telescopic antenna to the designated F-connector on the rear panel. Ensure the antenna is fully extended.

Image 5.1: Rear connections: 1. Headphone jack (3.5mm), 2. Analog audio input / AUX in, 3. DC in connector for external power supply, 4. Removable DAB+/FM telescopic antenna.
5.2. Initial Setup and Network Connection
Upon first power-on, the device will guide you through an initial setup process, including language selection and network configuration. Connect the DIGITRADIO 602 to your Wi-Fi network to access internet radio and other online features. This can typically be done via WPS or by manually entering network credentials.
5.3. Wireless Charging
The top surface of the DIGITRADIO 602 features a wireless charging pad. Place your Qi-compatible smartphone on this pad to initiate wireless charging.

Image 5.2: Wireless charging for compatible smartphones with QI charging standard.
6. Operating Instructions
6.1. Basic Controls
The front panel features various buttons and two rotary knobs for controlling the device. The left knob typically controls volume, while the right knob is used for navigation and selection (OK/SNOOZE). Buttons like MODE, MENU, ALARM, SCAN, INFO, BACK, and PRESET provide direct access to functions.
6.2. Radio Reception (DAB+, FM, Internet Radio)
Press the MODE button to switch between DAB+, FM, and Internet Radio modes. Use the navigation knob to browse available stations. For Internet Radio, ensure a stable Wi-Fi connection.

Image 6.1: Radio via DAB+ / Internet / FM. Radio adapter for full program variety - also in digital quality.
6.3. CD Playback
Insert an audio CD or MP3 CD into the slot-loading CD player. The device will automatically switch to CD mode and begin playback. Use the control buttons for play, pause, skip tracks, and stop.

Image 6.2: CD Player with MP3 function. Plays your favorite CDs.
6.4. USB Playback and Charging
Connect a USB storage device containing MP3 files to the USB port on the front panel. The device will detect the USB drive, allowing you to browse and play music files. The USB port also functions as a charging port for mobile devices (5V/1.0A).

Image 6.3: USB Playback/Charging. Play music files from USB storage devices or charge mobile devices via USB.
6.5. Bluetooth and Spotify Streaming
Activate Bluetooth mode on the DIGITRADIO 602 and pair it with your mobile device. You can then stream audio wirelessly. For Spotify Connect, ensure both your radio and mobile device are on the same Wi-Fi network and select the DIGITRADIO 602 as the playback device within the Spotify app.

Image 6.4: Wireless music enjoyment with Bluetooth audio streaming and Spotify Connect.
6.6. AUX Input
Connect an external audio source (e.g., an MP3 player or TV) to the 3.5mm AUX IN jack on the rear panel using an appropriate audio cable. Select AUX mode on the radio to play audio from the connected device.
6.7. Alarm and Sleep Functions
The DIGITRADIO 602 includes alarm clock functionality. Press the ALARM button to set alarms, including options for daily, weekend, weekdays, or one-time alarms. The sleep timer function allows the radio to turn off automatically after a set period.
6.8. App Control
Download the TechniSat Connect app (available for iOS and Android) to control your DIGITRADIO 602 remotely. The app provides comprehensive control over all functions, including source selection, volume, station tuning, and settings.
7. Maintenance
To ensure the longevity and optimal performance of your DIGITRADIO 602, follow these maintenance guidelines:
- Cleaning: Use a soft, dry cloth to clean the exterior of the device. Do not use liquid cleaners or abrasive materials.
- Antenna: Handle the telescopic antenna carefully to avoid damage.
- CD Player: Keep the CD slot free from dust and debris. Use only clean, undamaged CDs.
- Ventilation: Ensure that the ventilation openings are not obstructed to prevent overheating.
8. Troubleshooting
If you encounter issues with your DIGITRADIO 602, refer to the following common problems and solutions:
- No Power: Check if the power supply unit is securely connected to both the radio and the wall outlet. Ensure the outlet is functional.
- No Sound: Check the volume level. Ensure the correct audio source is selected. If using external devices, check their connections and volume.
- Poor Radio Reception: Extend the telescopic antenna fully. Try repositioning the radio. For DAB+, ensure you are in an area with good digital radio coverage. For Internet Radio, check your Wi-Fi connection.
- Wi-Fi Connection Issues: Ensure your Wi-Fi router is on and within range. Re-enter your Wi-Fi password if necessary. Try restarting both the radio and your router.
- CD Playback Errors: Ensure the CD is clean and free of scratches. Try a different CD.
- Display Too Bright/Dim: Adjust the display brightness settings in the system menu.
- Alarm Clock Resetting: In case of a power outage, the clock may reset. If connected to WLAN, it should automatically update the time once power is restored. Settings are saved, but a battery backup is not present for continuous clock function during extended outages.
9. Specifications
| Feature | Detail |
|---|---|
| Brand | TechniSat |
| Model Number | 0002/3987 |
| Color | Walnut |
| Connectivity Technology | USB, Wi-Fi, Auxiliary, Bluetooth |
| Special Features | DAB+ Digital Radio, Wireless charging, FM Radio (RDS/PLL), Internet Radio, OLED display, Spotify & Bluetooth streaming, CD player (MP3), USB (charging/MP3), App control |
| Total USB Ports | 1 |
| Compatible Devices | Headphones, Smartphone |
| Rechargeable Battery | No |
| Product Dimensions (LxWxH) | 40 x 21.5 x 17 cm |
| Tuning Technology | FM, DAB+, Internet Radio |
| Power Source | Electric cable |
| Supported Radio Bands | DAB+, FM, Internet Radio |
10. Warranty and Support
10.1. Manufacturer's Warranty
The TechniSat DIGITRADIO 602 comes with a 2-year manufacturer's warranty. Please retain your proof of purchase for warranty claims.
10.2. Customer Support
For further assistance, technical support, or warranty inquiries, please contact TechniSat customer service. Refer to the official TechniSat website or the contact information provided in the packaging for details.


