Introduction
The Vividia VC-38 Industrial Aviation Joystick Articulating Videoscope Borescope Inspection Camera is designed for detailed visual inspection in industrial and aviation environments. It features a 3.8mm diameter probe with 360° all-way articulation, controlled by a joystick, allowing for comprehensive examination of hard-to-reach areas. This manual provides essential information for the safe and effective operation, maintenance, and troubleshooting of your device.
Safety Information
- Always ensure the device is powered off before connecting or disconnecting any components.
- Do not expose the monitor unit to water or excessive moisture. The probe and insertion tube are waterproof (IP67), but the main unit is not.
- Avoid bending the probe beyond its maximum articulation angle (approximately 120 degrees) to prevent damage.
- Do not use the device in environments with explosive gases or flammable materials.
- Keep the device away from strong magnetic fields.
- Handle the sapphire protective lens with care to avoid scratches, although it is designed to be impact-resistant.
- Use only the specified power adapter for charging the device.
Product Overview
The VC-38 system consists of a main monitor unit with integrated controls and a flexible insertion probe with an articulating camera tip.

Figure 1: Front view of the Vividia VC-38 main unit, showing the display screen, joystick control, and various function buttons. The probe is connected to the top of the unit.
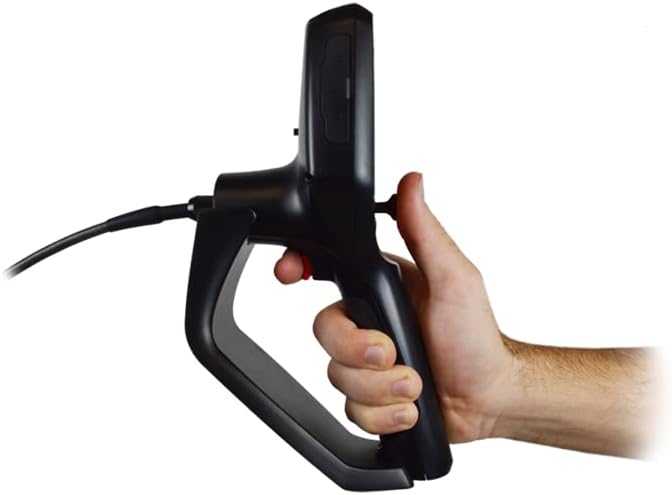
Figure 2: Side view of the Vividia VC-38 main unit, illustrating the ergonomic grip and the trigger button for image capture or video recording.

Figure 3: The Vividia VC-38 borescope with its flexible probe extended, demonstrating the overall system setup for inspection.

Figure 4: Detailed view of the probe tip components, including the tungsten braided tube, titanium alloy probe, and sapphire protective lens, highlighting their robust construction and waterproof design.
Setup
- Charge the Battery: Before first use, fully charge the integrated lithium battery using the provided power adapter. The charging indicator will show status.
- Insert SD Card: Locate the SD card slot on the monitor unit. Insert the 8GB mini SD card (or a compatible card up to 32GB) with the contacts facing down until it clicks into place. This is required for saving images and videos.
- Connect the Probe: Align the connector of the inspection probe with the port on the top of the main unit. Gently push and twist to secure the connection. Ensure it is firmly seated to maintain a stable image feed.

Figure 5: Illustration of connecting the inspection probe to the main unit, ensuring a secure and proper fit.
- Power On: Press and hold the power button on the main unit until the display screen illuminates.
Operating Instructions
Basic Operation
- Power On/Off: Press and hold the power button (␡) to turn the device on or off.
- Joystick Control: Use the red joystick to articulate the camera tip 360 degrees. Gently move the joystick in the desired direction to bend the probe. The maximum bending angle is approximately 120 degrees.
- LED Brightness Adjustment: Press the light bulb button (💡) to cycle through 7 levels of LED brightness for optimal illumination.
- Zoom Function: Use the zoom buttons (e.g., + and - or dedicated zoom buttons if present) to adjust the digital zoom level on the display.
Capturing Images and Videos
- Take a Picture: While viewing the live feed, press the camera button (📷) or the trigger button on the handle to capture a still image. The image will be saved to the SD card.
- Record Video: Press the video record button (●) to start recording. Press it again to stop recording. Video files will be saved to the SD card.
- Playback: Enter playback mode by pressing the dedicated playback button (often indicated by a play icon or folder icon). Navigate through saved files using the directional buttons.

Figure 6: Example of an inspection image captured by the borescope, showing internal components with date and time overlay.
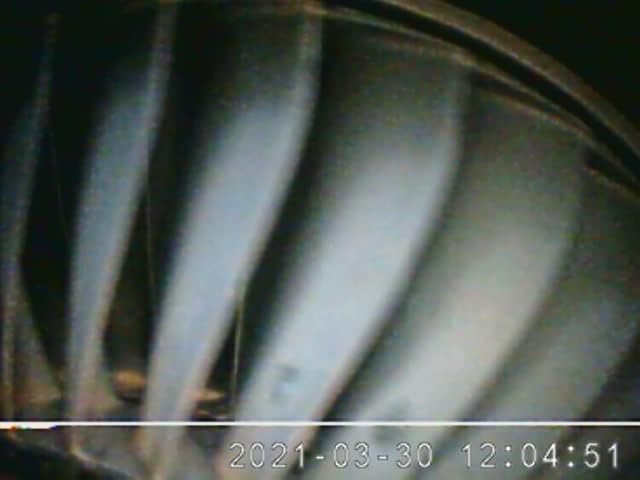
Figure 7: Another example of an inspection image, demonstrating the clarity and detail achievable with the borescope camera.
Maintenance
- Cleaning the Probe: After each use, especially in oily or dirty environments, wipe the probe and camera tip with a soft cloth. For stubborn residue, use a mild, non-abrasive cleaner. The probe is waterproof (IP67) and can be rinsed, but ensure the main unit is not exposed to water.
- Cleaning the Monitor: Use a soft, dry cloth to clean the monitor screen. Do not use liquid cleaners directly on the screen.
- Battery Care: To prolong battery life, avoid fully discharging the battery frequently. Store the device with a partial charge if not used for extended periods.
- Storage: Store the device in a cool, dry place, away from direct sunlight and extreme temperatures. Ensure the probe is not sharply bent during storage.
Troubleshooting
| Problem | Possible Cause | Solution |
|---|---|---|
| Device does not power on. | Low battery; Power button not held long enough. | Charge the battery; Press and hold the power button for 3-5 seconds. |
| No image on screen. | Probe not connected properly; Damaged probe cable. | Ensure probe is securely connected; Contact support if cable is damaged. |
| Cannot save images/videos. | No SD card inserted; SD card full or corrupted. | Insert SD card; Delete old files or replace SD card; Format SD card (backup data first). |
| Camera tip does not articulate. | Joystick malfunction; Mechanical obstruction. | Check for obstructions; If issue persists, contact support. |
Specifications
| Feature | Detail |
|---|---|
| Model Number | B-C-ME610 (VC-38) |
| Probe Diameter | 3.8mm / 0.15" |
| Probe Length | 3.0m (9.8 ft) or 1.5m (4.9 ft) |
| Articulation | 360° all-way joystick control, Max. 120° bending angle |
| Camera Resolution | 640x480 pixels (1MP) |
| Depth of Field | 10-100mm |
| Angle of Field | 120° (front view) |
| Illumination | Adjustable LED lights (7 levels), 20,000lx max |
| Probe Material | Titanium alloy tip, Quadruple tungsten-braided tubes |
| Waterproof Rating | Camera/Object glass/Tubes IP67 |
| Monitor Display | 3.5" TFT LCD, 720x480 resolution |
| Memory | SD card, Max. 32GB (8GB included) |
| Data I/O Port | Micro-USB, HDMI |
| Power Supply | Rechargeable lithium battery (4.2V 2200mAh) |
| Battery Life | >4 hours continuous operation |
| Weight | ≤0.55kg (with batteries) |
Warranty and Support
For warranty information and technical support, please refer to the documentation provided with your purchase or visit the official Vividia website. You may also contact the seller, Oasis Scientific Inc., for assistance.
- Protection Plans: Optional 2-Year and 3-Year protection plans are available for extended coverage.
- Returns: Standard return policies apply. Please refer to your purchase platform for specific return window details.


