
OSOTEK H200
OSOTEK Cordless Wet Dry Vacuum Cleaner User Manual
Model: H200
1. Introduction
Thank you for choosing the OSOTEK Cordless Wet Dry Vacuum Cleaner. This manual provides essential information for the safe and efficient operation, maintenance, and troubleshooting of your new appliance. Please read this manual thoroughly before first use and retain it for future reference.

Figure 1.1: OSOTEK Cordless Wet Dry Vacuum Cleaner. This image displays the complete vacuum cleaner unit, showcasing its sleek design and primary components.
2. Product Components
Before assembly, ensure all components listed below are present and undamaged. If any parts are missing or damaged, please contact customer support.
- Main Vacuum Body
- Handle Assembly
- Charging Station
- Power Cable
- Brush Roll
- Water Tank Cleaning Brush
- OSOTEK Sanitize Formula (Cleaning Solution)
- Storage Box for accessories

Figure 2.1: Included Components. This image illustrates all the parts and accessories that come with the OSOTEK Wet Dry Vacuum Cleaner, including the main unit, charging station, power cable, brush roll, cleaning brush, cleaning solution, and storage box.
3. Setup and Initial Use
3.1 Assembly
- Attach the Handle: Insert the handle assembly into the designated slot on the main vacuum body until it clicks securely into place.
- Position the Charging Station: Place the charging station on a flat, stable surface near a power outlet.
- Connect Power: Plug the power cable into the charging station and then into a wall outlet.
3.2 Charging the Battery
For optimal performance, fully charge the vacuum cleaner before its first use. The smart LED display will indicate the charging status.
- Place the vacuum cleaner onto the charging station.
- The LED display will show charging progress. A full charge typically takes several hours.
3.3 Filling the Clean Water Tank
The clean water tank has a capacity of 750 ml.
- Remove the clean water tank from the main unit.
- Open the tank cap and fill with clean water. For enhanced cleaning, add a small amount of OSOTEK Sanitize Formula as per instructions on the solution bottle. Do not exceed the MAX fill line.
- Securely close the cap and reattach the tank to the vacuum cleaner.
4. Operating Instructions
4.1 Powering On/Off
Press the power button located on the handle to turn the vacuum cleaner on or off.
4.2 Cleaning Modes and Features
The OSOTEK vacuum offers versatile cleaning capabilities:
- 3-in-1 Function: This appliance vacuums, mops, and washes simultaneously, making it suitable for various messes including dry debris, wet spills, and mixed dirt.
- Perfectrange: Designed for easy cleaning under furniture, the vacuum head can recline to a low angle, allowing access to hard-to-reach areas.
- Feeledge: Equipped with LED headlights and a specialized brush design, this feature ensures thorough edge-to-edge cleaning along baseboards and corners.
- Smart LED Display & Voice Prompt: The integrated LED display provides real-time information on cleaning modes, water levels, and battery status. Voice prompts offer guidance during operation and maintenance.

Figure 4.1: 3-in-1 Cleaning Capability. This image demonstrates the vacuum's ability to handle various types of debris, including dry particles, wet spills, and mixed messes, highlighting its vacuuming, mopping, and washing functions.

Figure 4.2: Perfectrange Feature. This image shows the vacuum cleaner head positioned at a low angle, illustrating its capability to easily clean under furniture and other low-clearance areas.

Figure 4.3: Feeledge Edge Cleaning. This image highlights the vacuum's design for effective cleaning along edges and corners, featuring LED headlights for improved visibility.

Figure 4.4: Smart Display Interface. This image displays the vacuum's LED screen, showing various indicators such as cleaning modes, water level sensor, voice broadcast status, and remaining battery life, designed for intuitive operation.

Figure 4.5: Runtime and Tank Capacities. This image visually represents the vacuum's runtime of 35 minutes, a 640ml used water tank, and a 750ml clean water tank, indicating its capacity for cleaning up to 200m².
4.3 Cleaning Tips
- For best results, move the vacuum cleaner at a moderate pace.
- Overlap passes slightly to ensure complete coverage.
- Empty the dirty water tank after each use to prevent odors and maintain hygiene.
5. Maintenance
Regular maintenance ensures the longevity and optimal performance of your OSOTEK vacuum cleaner.
5.1 Innovative Self-Cleaning System
The vacuum cleaner features an innovative self-cleaning system for convenient maintenance of the brush roll and internal pathways.
- Ensure the clean water tank has sufficient water.
- Place the vacuum cleaner on its charging station.
- Activate the self-cleaning function via the dedicated button or smart display. The vacuum will automatically clean the brush roll and flush the internal system.
- After the self-cleaning cycle, empty the dirty water tank.

Figure 5.1: Self-Cleaning System. This image illustrates the internal mechanism of the vacuum's self-cleaning system, showing how water is circulated to clean the brush roll and internal components, with icons indicating real-time and one-touch self-cleaning.
5.2 Cleaning the Dirty Water Tank
The used water tank has a capacity of 640 ml.
- Remove the dirty water tank from the main unit.
- Empty the contents and rinse the tank thoroughly with clean water.
- Clean any debris from the filter located within the dirty water tank.
- Allow the tank and filter to air dry completely before reassembling.
5.3 Brush Roll Maintenance
The efficient track-wheel roller brush is designed for effective cleaning, but requires periodic inspection.
- Periodically remove the brush roll from the vacuum head.
- Use the provided cleaning brush to remove any tangled hair or debris from the brush roll.
- Rinse the brush roll under running water if necessary and allow it to air dry completely before reinstallation.
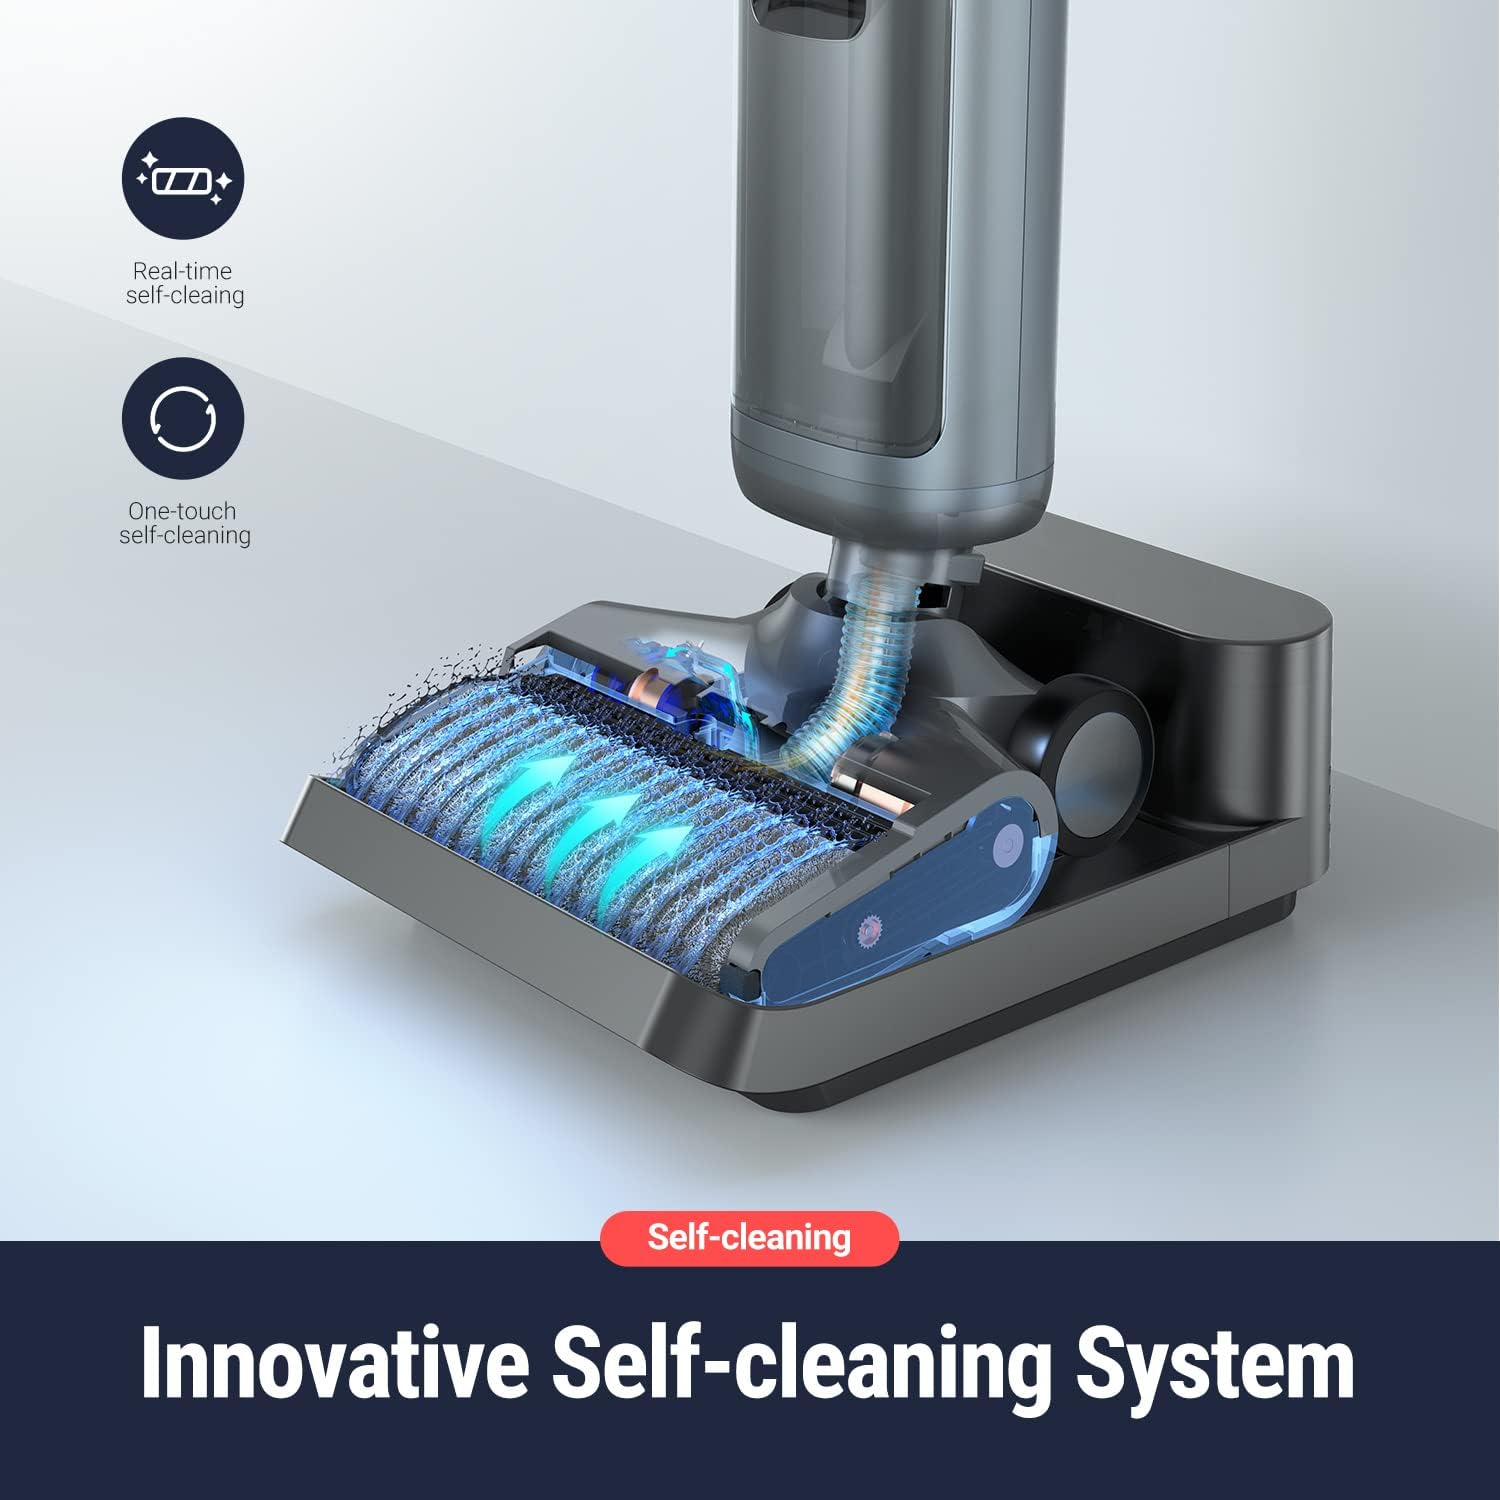
Figure 5.2: Track-Wheel Roller Brush. This image showcases the design of the efficient track-wheel roller brush, emphasizing its ability to cover a larger cleaning area and improve cleaning efficiency compared to standard brushes.
5.4 HEPA Filter Maintenance
The vacuum is equipped with a HEPA filter for improved air quality.
- Locate the HEPA filter (typically near the dirty water tank or motor housing).
- Tap the filter gently over a waste bin to remove loose dust.
- Rinse the HEPA filter under cool running water if heavily soiled. Ensure it is completely dry before reinstallation (allow 24-48 hours).
- Replace the HEPA filter every 3-6 months, or as needed, depending on usage.
6. Troubleshooting
This section addresses common issues you might encounter. If the problem persists, please contact customer support.
| Problem | Possible Cause | Solution |
|---|---|---|
| Vacuum not turning on | Battery is low or depleted Power button not pressed correctly | Charge the battery fully Ensure the power button is pressed firmly |
| Poor suction or cleaning performance | Dirty water tank is full Clean water tank is empty Brush roll is tangled or dirty Filter is clogged | Empty and clean the dirty water tank Refill the clean water tank Clean the brush roll Clean or replace the HEPA filter |
| Water leakage | Water tanks not properly installed Tank caps not securely closed Damaged tank | Ensure both clean and dirty water tanks are securely in place Check that tank caps are tightly sealed Contact customer support for replacement parts |
| Unusual noise | Debris caught in brush roll or air path Motor issue | Inspect and remove any obstructions from the brush roll and air path If noise persists, contact customer support |
7. Specifications
| Feature | Detail |
|---|---|
| Brand | OSOTEK |
| Model Number | H200 |
| Colour | White |
| Product Dimensions | 30.48 x 27.94 x 78.74 cm |
| Item Weight | 4.99 kg |
| Clean Water Tank Capacity | 750 ml |
| Used Water Tank Capacity | 640 ml |
| Power/Wattage | 180 watts |
| Voltage | 21.6 Volts |
| Noise Level | 75 dB |
| Special Features | HEPA, Lightweight, Cordless, Smart LED Display, Voice Prompt, Self-Cleaning |
| Filter Type | Cartridge (HEPA) |
| Surface Recommendation | Hard Floor |
| Power Source | Battery Powered |
8. Warranty and Support
OSOTEK products are manufactured to high-quality standards. For information regarding warranty coverage, technical support, or replacement parts, please refer to the warranty card included with your purchase or visit the official OSOTEK website. Please have your model number (H200) and purchase date available when contacting support.
Related documentsH200


Ask a question about this manual
Ask about setup, troubleshooting, compatibility, parts, safety, or missing instructions. Manuals+ will review the question and use this page’s manual context to help answer it.