1. Introduction
Thank you for choosing the VASNER VUTS1 Universal Programmable Plug Thermostat. This device is designed to provide precise and flexible temperature control for electric heaters, such as infrared heaters, by simply plugging it into a standard wall socket. This manual provides essential information for safe operation, setup, programming, and maintenance of your thermostat. Please read it thoroughly before first use and keep it for future reference.
2. Safety Instructions
- Always ensure the thermostat is correctly plugged into a grounded wall socket.
- Do not exceed the maximum load capacity of 3600 W (16 A) for connected appliances.
- Avoid placing the thermostat in direct sunlight, near heat sources, or in areas with high humidity.
- Do not immerse the device in water or any other liquid.
- Keep the device out of reach of children. The child lock function should be activated to prevent unintended changes.
- Do not open or attempt to repair the thermostat yourself. Contact qualified service personnel for any repairs.
- Before cleaning, always unplug the thermostat from the wall socket.
3. Product Overview
The VASNER VUTS1 is a compact plug-in thermostat featuring a digital display and intuitive controls for managing your heating system.

Figure 3.1: Angled view of the VASNER VUTS1 thermostat, showing the digital display and control buttons.

Figure 3.2: Front view of the thermostat, highlighting the display and button layout.

Figure 3.3: Rear view of the thermostat, showing the plug and the technical specification label.
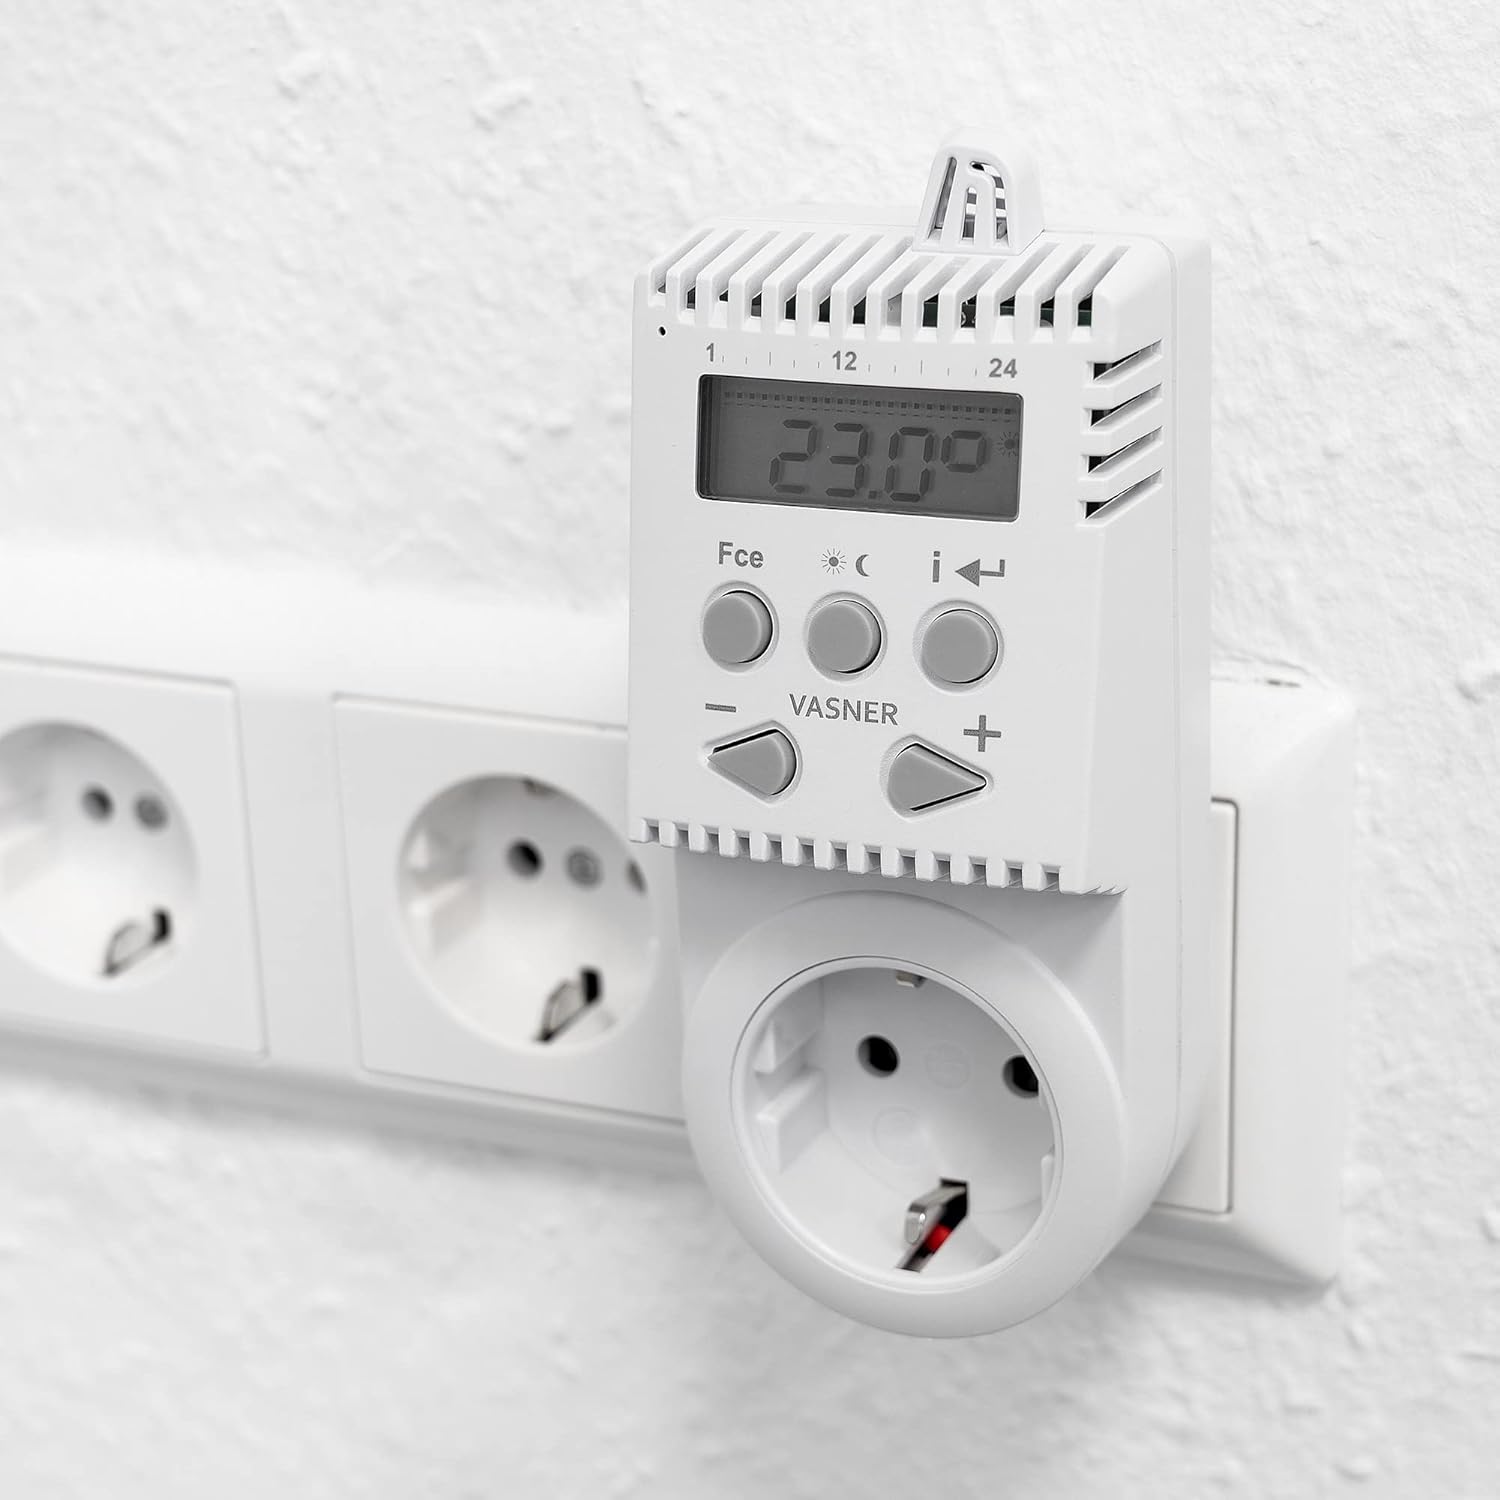
Figure 3.4: The thermostat in use, plugged into a standard wall socket.
3.1. Display Elements
- Current Temperature: Shows the ambient temperature detected by the thermostat.
- Set Temperature: Indicates the desired temperature.
- Time/Day: Displays the current time and day of the week.
- Program Indicator: Shows if a programmed schedule is active.
- Heating On/Off: Icon indicating whether the connected heating device is active.
3.2. Control Buttons
- Mode Button (Fce): Cycles through operating modes (Comfort, Absence, Anti-frost).
- Set Button (i): Used to enter programming mode and confirm settings.
- Arrow Buttons (< / >): Navigate through settings or adjust values.
- Plus (+) / Minus (-) Buttons: Adjust temperature or time values.
4. Setup
4.1. Initial Charging
Before first use, it is recommended to charge the thermostat for a few days by plugging it into a wall socket without a connected appliance. This ensures the internal backup battery is sufficiently charged to maintain settings during power outages or when unplugged.
4.2. Connecting the Thermostat
- Plug the VASNER VUTS1 thermostat into a standard 230V wall socket.
- Plug your electric heating appliance (e.g., infrared heater) into the socket on the front of the thermostat. Ensure the heating appliance is switched on and ready to receive power from the thermostat.
- The thermostat is now ready for operation.
5. Operating Instructions
5.1. Setting Current Time and Day
- Press and hold the Set (i) button until the time display flashes.
- Use the Plus (+) or Minus (-) buttons to adjust the hour. Press Set (i) to confirm.
- Adjust the minutes using Plus (+) or Minus (-), then press Set (i) to confirm.
- Adjust the day of the week (1 for Monday, 7 for Sunday) using Plus (+) or Minus (-), then press Set (i) to confirm and exit time setting mode.
5.2. Manual Temperature Adjustment
In normal operating mode, press the Plus (+) or Minus (-) buttons to manually adjust the desired temperature. The new setting will be active until the next programmed time slot or until a different mode is selected.
5.3. Operating Modes
Press the Mode (Fce) button to cycle through the following modes:
- Comfort Mode (23 °C default): Maintains a comfortable temperature. You can adjust the default comfort temperature in programming mode.
- Absence Mode (17 °C default): Maintains a lower temperature, suitable when the room is unoccupied. You can adjust the default absence temperature.
- Anti-frost Mode: Prevents the temperature from dropping below a critical level (e.g., 3-5 °C) to protect against freezing.
- Program Mode: Activates the weekly programmed schedule.
5.4. Window Open Detection
The thermostat can detect a sudden drop in temperature, indicating an open window. When detected, it will temporarily switch off the heating to save energy. Heating will resume automatically after a set period or when the temperature stabilizes.
5.5. Child Lock / Keypad Lock
To prevent accidental changes, activate the child lock by pressing and holding the Plus (+) and Minus (-) buttons simultaneously for a few seconds. Repeat the action to unlock the keypad.
6. Programming Modes
The VUTS1 thermostat allows you to set individual heating schedules for each day of the week.
6.1. Setting Weekly Program
- Ensure the thermostat is in Program Mode (indicated by a specific icon on the display). If not, press the Mode (Fce) button until it is.
- Press and hold the Set (i) button until the program setting interface appears (e.g., flashing day or program number).
- Use the Arrow (< / >) buttons to select the day or program period you wish to edit.
- Use the Plus (+) or Minus (-) buttons to set the desired start time and temperature for each period.
- Press Set (i) to confirm each setting and move to the next.
- Repeat for all desired periods and days. Press Set (i) repeatedly to exit programming mode.
6.2. Backup Memory
The thermostat features an internal memory that retains your programmed settings for up to 50 hours even if the device is unplugged or in case of a power failure. This ensures your schedules are not lost.
7. Maintenance
7.1. Cleaning
To clean the thermostat, first unplug it from the wall socket. Use a soft, dry cloth to wipe the surface. Do not use abrasive cleaners, solvents, or immerse the device in water.
7.2. Storage
If storing the thermostat for an extended period, ensure it is clean and dry. Store it in a cool, dry place away from direct sunlight and extreme temperatures.
8. Troubleshooting
| Problem | Possible Cause | Solution |
|---|---|---|
| Thermostat display is blank or unresponsive. | No power supply; internal battery depleted. | Ensure the thermostat is securely plugged into a live wall socket. Allow several days for the internal battery to charge fully. |
| Connected heater does not turn on/off as expected. | Incorrect mode selected; heater not switched on; programming error. | Check if the thermostat is in Program Mode or the desired manual mode. Ensure the heater itself is switched on. Verify your programmed schedule. |
| Difficulty reading the display when plugged in. | Viewing angle or ambient light conditions. | Adjust your viewing angle. The display has a backlight for improved visibility. |
| Buttons are unresponsive. | Child lock is active. | Deactivate the child lock by pressing and holding the Plus (+) and Minus (-) buttons simultaneously. |
| Settings are difficult to understand or configure. | Unfamiliarity with the interface. | Refer to sections 5 and 6 of this manual for detailed instructions on setting time, modes, and programs. Practice navigating the menus. |
9. Specifications
| Feature | Specification |
|---|---|
| Brand | VASNER |
| Model Number | VA11100001 (VUTS1) |
| Color | White |
| Power | Max. 3600 Watts |
| Voltage | 230 Volts |
| Current | Max. 16 Amperes |
| Temperature Range | 3 °C - 40 °C |
| Weight | 160 grams |
| Special Features | Programmable, Anti-frost function, Window open detection, Child lock, Internal memory (up to 50 hours backup), Backlight |
| Control Type | Button |
| Batteries | Included (Type: Unknown) |
10. Warranty and Support
For warranty information or technical support, please refer to the documentation provided with your purchase or contact VASNER customer service directly. Keep your proof of purchase for warranty claims.


