
1. Introduction
Welcome to the user manual for your SSK Dual Bay Hard Drive Docking Station. This manual provides detailed instructions on how to set up, operate, and maintain your device. Please read this manual thoroughly before using the product to ensure proper functionality and to prevent any damage.
The SSK DK108 is an external dual-bay docking station designed for 2.5-inch and 3.5-inch SATA I/II/III HDDs and SSDs. It features USB 3.0 connectivity with UASP support for fast data transfers and includes two additional USB 3.0 expansion ports.
2. Product Overview & Features

Figure 2.1: Front view of the SSK Dual Bay Hard Drive Docking Station, showcasing its two drive bays and two front-facing USB 3.0 ports.
Key Features:
- Dual Bay Design: Supports two 2.5-inch or 3.5-inch SATA I/II/III HDDs/SSDs simultaneously, with a maximum capacity of 16TB per bay (total 32TB).
- High-Speed USB 3.0: Achieves data transfer rates of up to 5Gbps, backward compatible with USB 2.0 and 1.1.
- UASP Support: Utilizes the USB Attached SCSI Protocol for up to 20% faster transfer speeds compared to traditional USB 3.0 when used with UASP-enabled systems.
- Multi-Function USB 3.0 Ports: Includes two additional USB 3.0 expansion ports for connecting other USB devices or charging.
- Tool-Free Installation: Easy plug-and-play setup without the need for tools or drivers.
- Wide Compatibility: Compatible with Windows XP/Vista/7/8/8.1/10, Mac OS 10.4 to 10.11, and Linux Kernel 2.4.2 or higher.
- Robust Power Supply: Comes with a 12V/3A power adapter to ensure stable operation even with multiple high-capacity drives and connected USB devices.
- Aluminum Shell: Durable, shockproof, and vibration-resistant aluminum casing with efficient heatsink for reliable data transfers and low power consumption.
- Safety Protections: Built-in over-current, over-voltage, short-circuit, and leakage protection.
- No Offline Clone Function: This model does not support offline cloning.
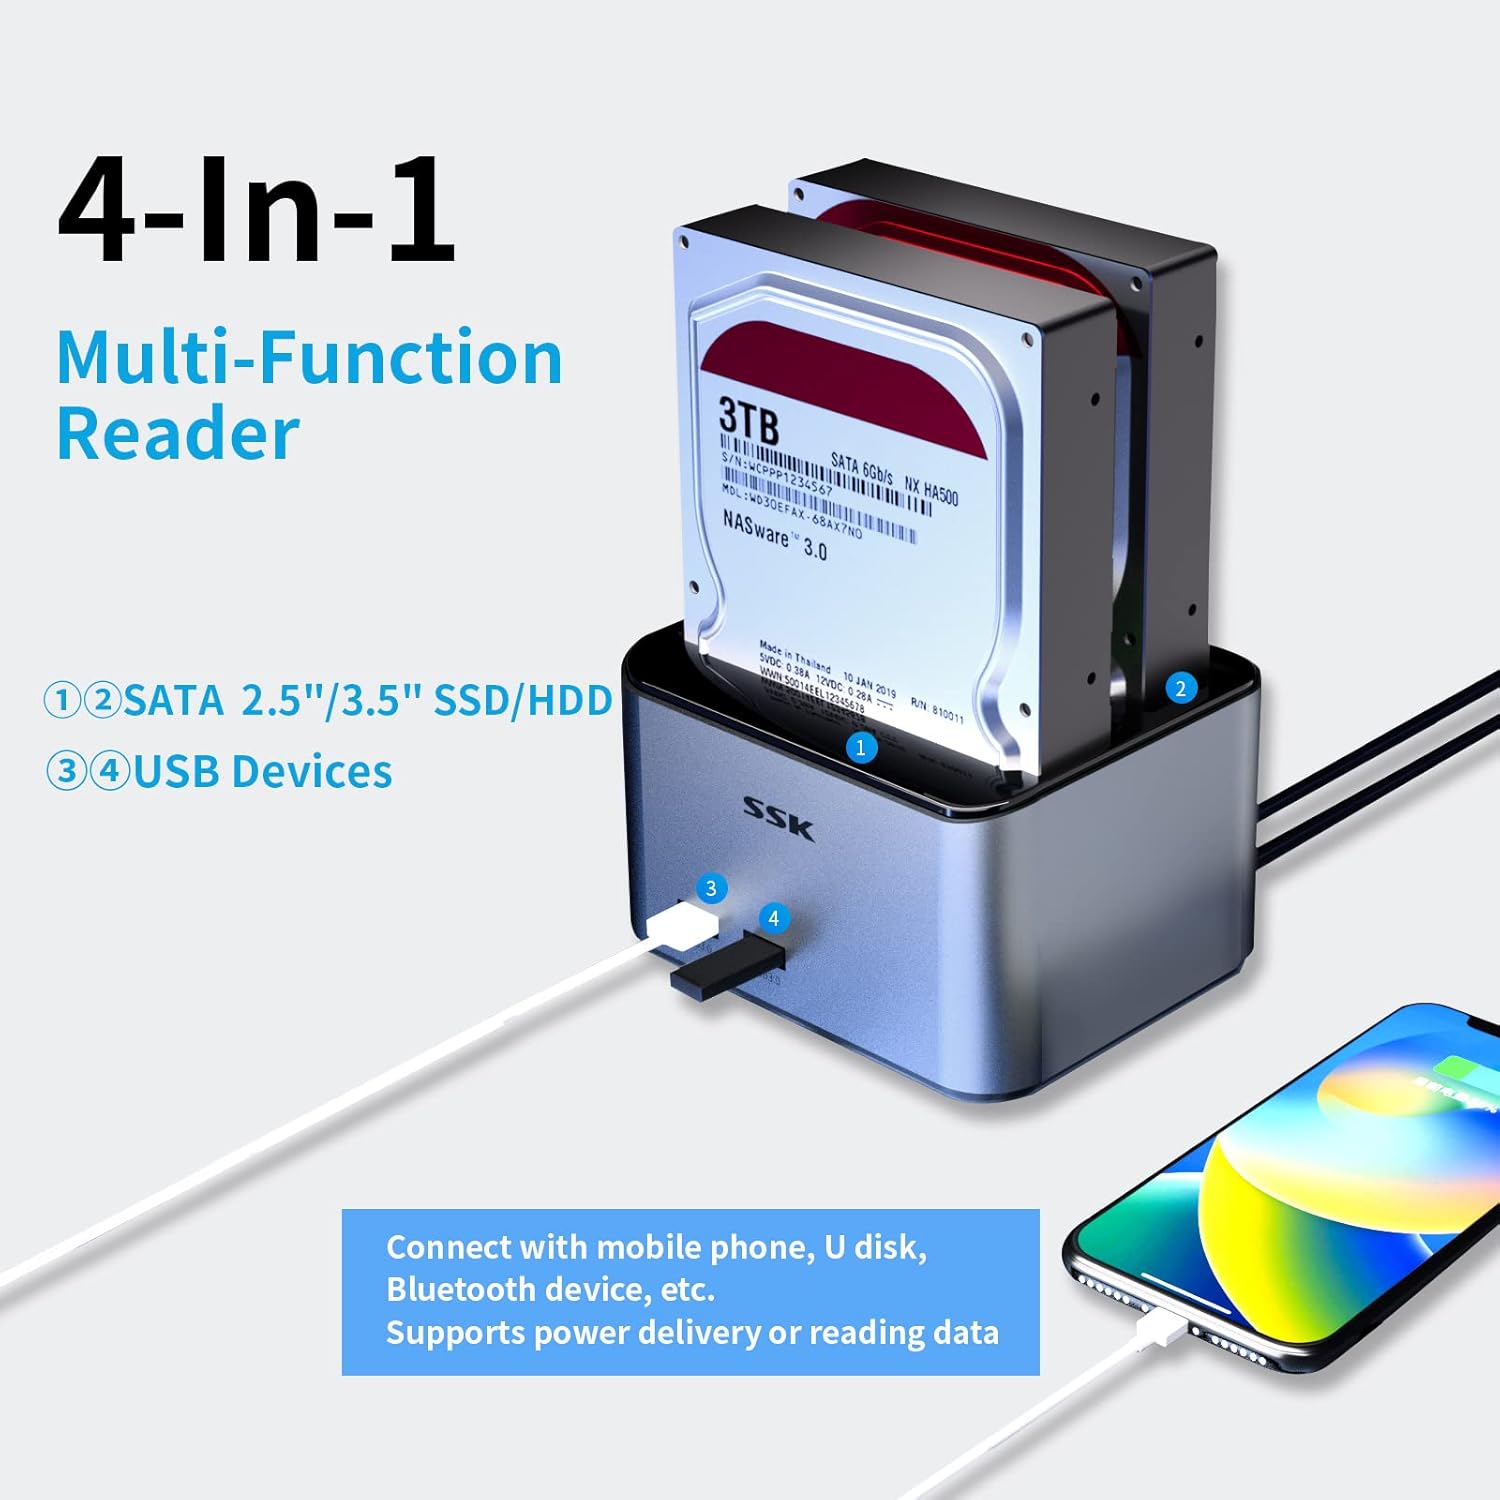
Figure 2.2: Illustration of the docking station's 4-in-1 multi-functionality, showing two SATA drive bays and two USB 3.0 ports for connecting USB devices like U disks or mobile phones.

Figure 2.3: Diagram illustrating the speed benefits of UASP protocol, showing 20% faster transfer speeds and lower CPU usage compared to traditional USB 3.0.
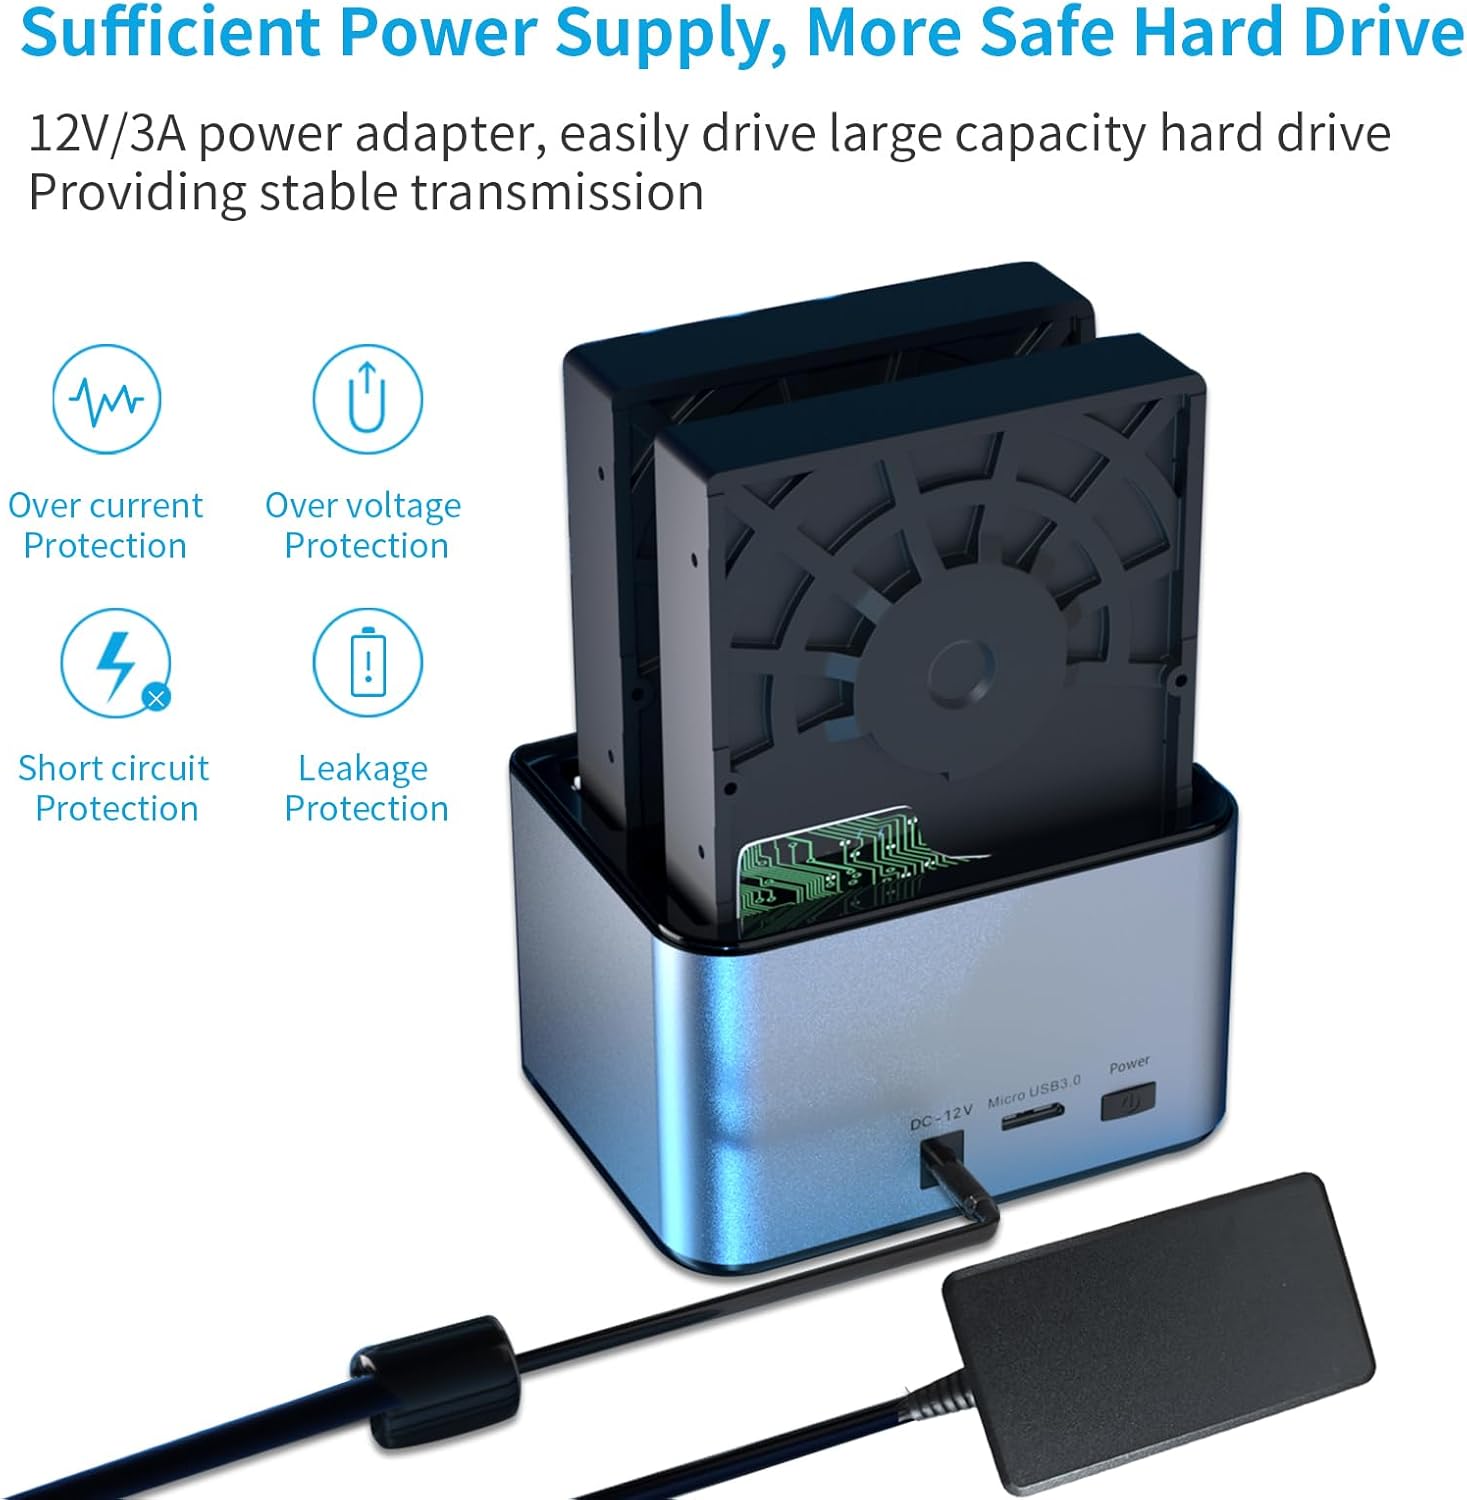
Figure 2.4: Image highlighting the 12V/3A power adapter and the various protection features (over-current, over-voltage, short-circuit, leakage protection) ensuring safe and stable operation.

Figure 2.5: Visual representation of the docking station's compatibility with various drive sizes (2.5" and 3.5" SATA HDD/SSD) and operating systems (Windows, Mac OS, Linux, Android). It also explicitly states "No Offline Clone Function".

Figure 2.6: Close-up views showcasing the premium features of the docking station, including its aluminum alloy shell, operating status indicators (A, B, Power), dust-proof design for the bays, and anti-skid footpads for stability.
3. What's in the Box
The package for your SSK Dual Bay Hard Drive Docking Station should contain the following items:
- SSK Dual Bay Hard Drive Docking Station (Model DK108)
- 12V/3A Power Adapter
- USB 3.0 Data Cable
Note: Hard drives (HDD/SSD) are not included and must be purchased separately.
4. Setup Guide
4.1 Identifying Components

Figure 4.1: Front and rear views of the docking station with labels for HDD-A status indicator, HDD-B status indicator, Power indicator, USB 3.0 ports, DC 12V Input, Micro USB 3.0 port, and Power Button, along with product dimensions.
4.2 Drive Compatibility
This docking station is compatible with 2.5-inch and 3.5-inch SATA I/II/III HDDs and SSDs. Ensure your drive has a SATA interface before insertion.

Figure 4.2: Comparison image showing the distinct connectors for SATA (compatible) and IDE (not compatible) hard drives. Ensure your drive matches the SATA connector.
4.3 Installation Steps
- Insert Hard Drives: Gently slide your 2.5-inch or 3.5-inch SATA HDD/SSD into the drive bay(s) until it is firmly seated. The tool-free design allows for easy insertion.
- Connect Power Adapter: Plug the 12V/3A power adapter into the DC 12V input port on the back of the docking station, then plug the adapter into a power outlet.
- Connect to Computer: Connect one end of the provided USB 3.0 data cable to the Micro USB 3.0 port on the back of the docking station and the other end to an available USB 3.0 port on your computer.
- Power On: Press the Power button on the back of the docking station. The Power indicator light will illuminate.
- Drive Recognition: Your operating system should automatically detect the connected drives. If the drives are new, you may need to initialize and format them through your computer's disk management utility before use.
5. Operating Instructions
5.1 Accessing Drives
Once connected and recognized by your computer, the inserted hard drives will appear as removable storage devices. You can access, read, and write data to them just like any other external drive.
Figure 5.1: The docking station connected to a laptop, demonstrating file transfer operations.

Figure 5.2: The docking station in use with a desktop computer setup.
5.2 Using the USB 3.0 Expansion Ports
The two front-facing USB 3.0 ports can be used to connect additional USB devices such as USB flash drives, card readers, or to charge compatible devices.

Figure 5.3: The docking station's front USB 3.0 ports being used to charge mobile devices.
5.3 Safely Removing Drives
Before physically removing a hard drive from the docking station, always safely eject it from your operating system to prevent data corruption. The two inserted hard disks can operate independently, allowing you to safely eject one without affecting the use of the other.
- Windows: Click the "Safely Remove Hardware and Eject Media" icon in the system tray, then select the drive you wish to eject.
- macOS: Drag the drive icon to the Trash, or right-click (Ctrl-click) the drive icon and select "Eject".
- Once the operating system confirms it is safe to remove, gently pull the hard drive out of the bay.
6. Specifications
Technical Specifications:
| Feature | Specification |
|---|---|
| Model Number | DK108 |
| Material | Aluminum Alloy |
| Color | Silver |
| Compatible Drives | 2.5" / 3.5" SATA I/II/III HDD/SSD |
| Max Capacity Supported | 16TB per bay (32TB total) |
| Interface | USB 3.0 (backward compatible with USB 2.0/1.1) |
| Data Transfer Rate | Up to 5Gbps (USB 3.0) |
| UASP Support | Yes |
| Power Adapter | 12V/3A |
| Operating System Compatibility | Windows XP/Vista/7/8/8.1/10, Mac OS 10.4-10.11, Linux Kernel 2.4.2+ |
| Product Dimensions (L x W x H) | 4.76 x 3.94 x 2.91 inches (12.1 x 10.0 x 7.4 cm) |
| Item Weight | 1.32 pounds (0.6 kg) |
7. Troubleshooting
Common Issues and Solutions:
- Drive Not Detected:
- Ensure the power adapter is securely connected and the docking station is powered on.
- Verify the USB 3.0 data cable is properly connected to both the docking station and your computer.
- Check if the hard drive is correctly seated in the bay.
- Confirm the hard drive is a SATA drive (not IDE). Refer to Figure 4.2.
- For new drives, ensure they are initialized and formatted in your computer's Disk Management (Windows) or Disk Utility (macOS).
- Try connecting to a different USB port on your computer.
- Slow Transfer Speeds:
- Ensure you are connected to a USB 3.0 port on your computer. USB 2.0 ports will result in slower speeds.
- Verify your operating system and motherboard support UASP for optimal performance.
- Check the health of your hard drive. A failing drive can cause slow transfers.
- Avoid transferring many small files simultaneously, as this can be slower than transferring a few large files.
- Docking Station Not Powering On:
- Ensure the power adapter is securely plugged into both the docking station and a working power outlet.
- Press the power button firmly.
- Try a different power outlet.
8. Maintenance
To ensure the longevity and optimal performance of your SSK Dual Bay Hard Drive Docking Station, follow these maintenance guidelines:
- Keep Clean: Regularly wipe the exterior with a soft, dry cloth. Avoid using liquid cleaners or aerosols.
- Dust Prevention: The docking station features a dust-proof design for the bays, but it's still advisable to keep it in a clean environment to prevent dust accumulation in ports and vents.
- Proper Storage: When not in use for extended periods, disconnect the power and USB cables and store the device in a cool, dry place.
- Handle with Care: Avoid dropping or subjecting the device to strong impacts, as this can damage internal components.
- Ventilation: Ensure the docking station is placed in an area with adequate airflow to prevent overheating, especially during prolonged use.
9. Warranty and Support
9.1 Warranty Information
SSK products typically come with a limited warranty. Please refer to the warranty card included with your product or visit the official SSK website for detailed warranty terms and conditions specific to your region.
9.2 Customer Support
If you encounter any issues or have questions not covered in this manual, please contact SSK customer support. You can find contact information and additional resources on the official SSK website or through their Amazon store page:
- SSK Amazon Store: Visit the SSK Store
- User Manual (PDF): Download PDF Manual

