
Aideepen BM-002
Aideepen 1200W 20A DC Boost Converter Power Supply Module (BM-002) User Manual
Model: BM-002
1. Introduction
This manual provides essential information for the safe and effective use of your Aideepen 1200W 20A DC Boost Converter Power Supply Module. This high-efficiency module is designed to convert an input voltage of 8-60V DC to an adjustable output voltage of 12-83V DC, with a maximum output current of 20A. It features constant voltage and constant current control, making it suitable for various applications such as powering electrical devices, laptops, digital products, and solar panel voltage regulation.
Key features include:
- Input Voltage: 8-60V DC
- Output Voltage: 12-83V DC (continuously adjustable)
- Output Power: Up to 1200W (Input 12V: 240W; Input 24V: 480W; Input 48V: 960W)
- Output Current: Max 20A (requires fan cooling above 15A input)
- Conversion Efficiency: Up to 95%
- Protections: Overcurrent protection, short-circuit protection (20A input fuse), adjustable low battery protection.
2. Safety Warnings
Failure to follow these safety instructions may result in electric shock, fire, or other serious injury or damage.
- Always ensure the input power supply is connected correctly before connecting any load. Incorrect polarity can damage the module.
- Do not short-circuit the output terminals. The module has a 20A input fuse for protection, but repeated short-circuits can cause damage.
- When operating at high power (above 15A input or 10A output), ensure adequate cooling by adding a fan. Overheating can lead to reduced performance or damage.
- The output voltage must always be higher than the input voltage for proper boost operation.
- Adjust voltage and current potentiometers carefully. Make small adjustments and verify with a multimeter.
- This module is not isolated. Exercise caution when working with live circuits.
- If using two modules in parallel for higher output, ensure proper current sharing and limit the current potentiometer settings accordingly.
3. Product Overview
The Aideepen DC Boost Converter module features clearly marked input and output terminals, along with three potentiometers for precise adjustments.
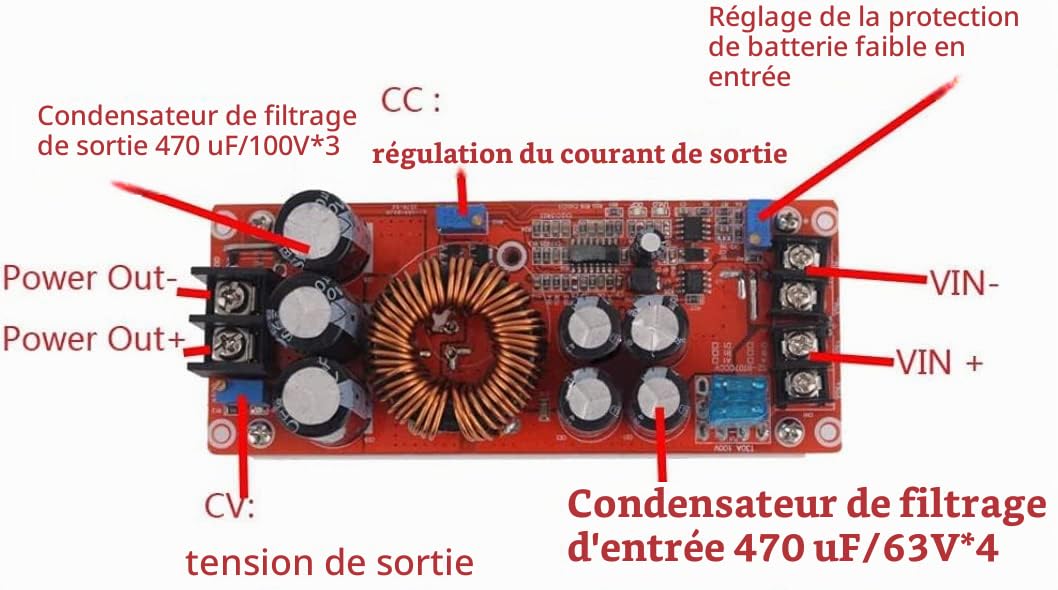
- VIN+ / VIN-: Input voltage terminals (8-60V DC).
- Power Out+ / Power Out-: Output voltage terminals (12-83V DC).
- CV (Output Voltage Adjustment): Potentiometer for adjusting the output voltage. Turn clockwise to increase voltage.
- CC (Output Current Regulation): Potentiometer for adjusting the output current limit. Turn clockwise to increase current.
- UVLO (Input Low Battery Protection Adjustment): Potentiometer for setting the input undervoltage lockout threshold.
- Input Fuse: 20A fuse for short-circuit protection.

4. Specifications
| Parameter | Value |
|---|---|
| Input Voltage | DC 8-60V |
| Output Voltage | DC 12-83V (Continuously Adjustable) |
| Input Current | 20A (MAX), recommend fan cooling above 15A |
| Output Current | 18A (MAX), recommend enhanced heat dissipation above 10A |
| Output Power | 1200W (MAX) |
| Conversion Efficiency | 92% - 97% (depends on input/output voltage, current, and pressure difference) |
| Static Operating Current | 15mA (12V to 20V, current increases with higher output voltage) |
| Operating Frequency | 150 KHz |
| Operating Temperature | -40 ~ +85 Degrees Celsius (enhance heat dissipation if ambient temperature is too high) |
| Dimensions (L x W x H) | 13cm x 5.3cm x 5.2cm (approx.) |
| Model Number | BM-002 |
5. Setup Instructions
Follow these steps to set up your DC Boost Converter module:
- Connect Input Power: Connect your DC power source (8-60V) to the VIN+ and VIN- terminals. Ensure correct polarity. Do not connect the load yet.
- Adjust Output Voltage (CV):
- With no load connected, use a multimeter to measure the voltage at the Power Out+ and Power Out- terminals.
- Turn the "CV" potentiometer (usually the one closest to the output terminals) with a small screwdriver. Turn clockwise to increase the voltage, counter-clockwise to decrease it.
- Adjust until the desired output voltage is reached.
- Adjust Output Current (CC):
- This step requires a constant current load (e.g., an LED or a battery being charged).
- First, turn the "CC" potentiometer fully counter-clockwise (about 30 turns) to set the current to its minimum.
- Connect your constant current load to the output terminals.
- Slowly turn the "CC" potentiometer clockwise while monitoring the current with an ammeter in series with the load. Adjust until the desired output current limit is reached.
- Note: If you connect a constant voltage load and the load current exceeds the set current limit, the output voltage will drop. The constant current function only works as a current limit.
- Adjust Input Low Battery Protection (UVLO):
- This feature prevents the input battery from over-discharging.
- Connect the module to your input battery.
- Adjust the "UVLO" potentiometer (usually the one closest to the input terminals) to set the desired low voltage threshold. When the input voltage drops below this threshold, the module will stop outputting power.
- Example: To set a 10V protection for a 12V battery, connect a 10V power supply to the input, then adjust the UVLO potentiometer until the UVLO indicator light turns off.
- Final Connection: Once all adjustments are made, you can connect your intended load to the output terminals.

6. Operating the Module
After completing the setup, the module is ready for operation. Always monitor input and output parameters, especially when operating near maximum limits.
- Power On: Apply input voltage to the VIN+ and VIN- terminals. The module will start boosting the voltage to your preset output.
- Load Connection: Connect your load to the Power Out+ and Power Out- terminals.
- Monitoring: It is recommended to use a multimeter to periodically check the input voltage, output voltage, and output current to ensure stable operation and prevent exceeding limits.
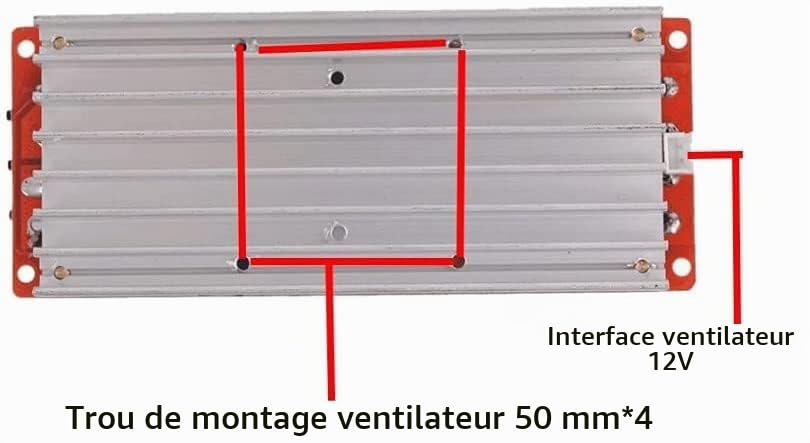
- High Power Operation: For continuous operation at high currents (above 10A output or 15A input), ensure a cooling fan is attached to the heatsink. The module has a 12V fan interface.

7. Maintenance
- Cleaning: Keep the module free from dust and debris to ensure proper heat dissipation. Use a soft, dry brush or compressed air for cleaning.
- Cooling: Regularly check that the heatsink is not obstructed and that any attached fan is functioning correctly, especially during high-power operation.
- Fuse Replacement: If the input fuse blows, replace it with a fuse of the same rating (20A). A blown fuse often indicates a short circuit or excessive load.
- Connections: Periodically inspect all wiring connections to ensure they are secure and free from corrosion.
8. Troubleshooting
- Q1: Input short-circuit?
- A1: This may indicate a short-circuited switching tube. It needs to be replaced.
- Q2: Current cannot be adjusted?
- A2: The load connected might be incorrect. You must connect a constant current load (e.g., LED lights or batteries) to adjust the current. If you connect a constant voltage load, the voltage will drop if the load current exceeds the set limit.
- Q3: Voltage and current cannot be adjusted?
- A3: Check if the low battery protection (UVLO) is active. The UVLO indicator light must be off for proper operation. Adjust the UVLO potentiometer if necessary.
- Q4: Unstable output voltage, or input voltage fluctuates significantly and cannot be used?
- A4: This product is a boost power supply. The output voltage can only be higher than the input voltage. Ensure your input power source is stable and within the specified range (8-60V).
- Q5: When the load is connected to the output, the product works perfectly initially, but a fuse blows on the second connection?
- A5: There are two possible issues: 1. A short circuit at the output; 2. An excessively large load. The fuse needs to be replaced with a 20A fuse, and the cause of the overload or short circuit must be identified and resolved.
- Q6: When a fan is connected to the socket, the device stops working, there is no higher voltage at the output, and the fan only heats up without spinning?
- A6: The fan might be too powerful, or the fan itself is faulty. Ensure the external fan current does not exceed 0.1A and the voltage is 12V.
- Q7: Regardless of whether the voltage is 5V or 32V, every fuse used blows?
- A7: Check if the switching tube is burnt out. This indicates a severe internal fault.
9. Warranty and Support
Aideepen provides a 10-year availability for spare parts for this product.
For technical support, troubleshooting assistance beyond this manual, or warranty inquiries, please contact the seller or manufacturer directly through your purchase platform. Provide your product model (BM-002) and a detailed description of the issue for faster service.
Related documentsBM-002


Ask a question about this manual
Ask about setup, troubleshooting, compatibility, parts, safety, or missing instructions. Manuals+ will review the question and use this page’s manual context to help answer it.